Wrecked Civic Rides Again As Cozy Camp Trailer

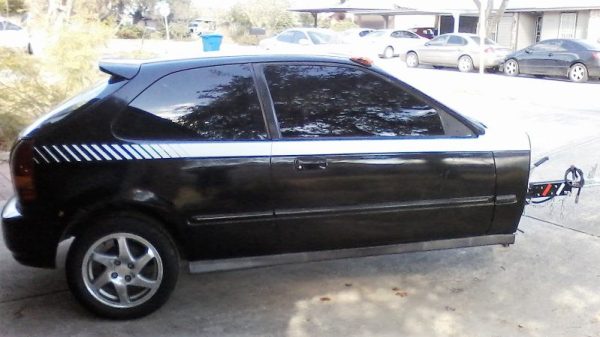
It may not be the typical fare that we like to feature, but you can’t say this one isn’t a hack. It’s a camp trailer fashioned from the back half of a wrecked Honda Civic, and it’s a pretty unique project.

We don’t know about other parts of the world, but a common “rural American engineering” project is to turn the bed and rear axle of an old pickup truck into a trailer. [monickingbird]’s hacked Civic is similar to these builds, but with much more refinement. Taking advantage of the intact and already appointed passenger compartment of a 1997 Civic that had a really bad day, [monickingbird] started by lopping off as much of the front end as possible. Front fenders, the engine, transmission, and the remains of the front suspension and axle all fell victim to grinder, drill, and air chisel. Once everything in front of the firewall was amputated, the problem of making the trailer safely towable was tackled. Unlike the aforementioned pickup trailers, the Civic lacks a separate frame, so [monickingbird] had to devise a way to persuade the original unibody frame members to accept his custom trailer tongue assembly. Once roadworthy, the aesthetics were tackled — replacing the original interior with a sleeping area, installing electrics and sound, and a nice paint job. Other drivers may think the towing vehicle is being seriously tailgated, but it seems like a comfy and classy way to camp.

Now that the trailer is on the road, what to do with all those spare Civic parts? Sure, there’s eBay, but how about a nice PC case featuring a dashboard gauge cluster?

Overclock Your Raspberry Pi The Right Way

The Raspberry Pi came upon us as an educational platform. A credit card sized computer capable of running Linux from a micro SD card, the Raspberry Pi has proven useful for far more than just education. It has made its way into every nook and cranny of the hacker world. There are some cases, however, where it might be a bit slow or seem a bit under powered. One way of speeding the Raspi up is to overclock it.

[Dmitry] has written up an excellent overclocking guide based upon Eltech’s write up on the subject. He takes it a bit further and applies the algorithm to both Raspi 2 and Raspi 3. You’ll need a beefier power supply, some heat sinks and fans – all stuff you probably have lying around on your workbench. Now there’s no excuse stopping you from ratcheting up the MHz and pushing your Pi to the limit!

We’ve seen several guides to overclocking the Raspi here on Hackaday, including the current record holder. Be sure to check out [dmitry’s] IO page for the overclocking details, and let us know of any new uses you’ve found by overclocking your Raspi in the comment below.

Smartphone Controlled Periodic Table Of Elements

It wouldn’t be much of a stretch to say that here at Hackaday, we’re about as geeky as they come. Having said that, even we were surprised to hear that there are people out there who collect elements. Far be it from us to knock how anyone else wishes to fill their days, but telling somebody at a party that you collect chemical elements is like one step up from saying you’ve got a mold and fungus collection at home. Even then, at least a completed mold and fungus collection won’t be radioactive.

But if you’re going to spend your spare time working on a nerdy and potentially deadly collection, you might as well put it into an appropriate display case. You can’t just leave your Polonium sitting around on the kitchen counter. That’s the idea behind the interactive periodic table built by [Maclsk], and we’ve got to admit, if we get to put it in a case this awesome we might have to start our own collection.

A large portion of this project is building the wooden display case itself as, strangely enough, IKEA doesn’t currently stock a shelving unit that’s in the shape of the periodic table. The individual cells and edge molding are made of pine, the back panel is MDF, and the front of the display is faced off with thin strips of balsa to cover up all the joints. Holes were then drilled into the back of each cell for the LED wiring, and finally the entire frame was painted white.

Each cell contains an WS2812B RGB LED, which at maximum brightness draws 60mA. Given the 90 cells of the display case, [Maclsk] calculated a 5.4A power supply would be needed to keep everything lit up. However, he found a 4A power supply that made his budget happier, which he reasons will be fine as long as he doesn’t try to crank every cell up to maximum at the same time. Control for the display is provided by an Arduino Nano and HC05 Bluetooth module.

The final piece of the project was the Android application that allows the user to control the lighting. But it doesn’t just change colors and brightness, it’s actually a way to visualize information about the elements themselves. The user can do things like highlight certain groups of elements (say, only the radioactive ones), or light up individual cells in order of the year each element was discovered. Some of the information visualizations are demonstrated in the video below, and honestly, we’ve seen museum displays that weren’t this well done.

We last caught up with [Maclsk] when he created a very slick robotic wire cutting machine, which we can only assume was put to work for this particular project. Too bad he didn’t have a robot to handle the nearly 540 soldering joints it took to wire up all these LEDs.

[via /r/DIY]

Continue reading “Smartphone Controlled Periodic Table Of Elements”

A Salty Solution For A Dead Nexus 5X

If you’re an Android fan, there’s a good chance you’ve heard of the Nexus 5X. The last entry in Google’s line of low-cost Nexus development phones should have closed the program on a high note, or at the very least maintained the same standards of quality and reliability as its predecessor. But unfortunately, a well known design flaw in the Nexus 5X means that the hardware is essentially a time-bomb. There are far too many reports of these phones entering into an endless bootloop right around the one year mark to say it’s just a coincidence.

The general consensus seems to be that faulty BGA chip soldering on the CPU works lose after about a year or so of thermal stress. Whatever the reason, [hillbillysam] recently found himself the proud owner of a dead Nexus 5X. Resigned to the fact that he would need to get a new phone, he at least wanted to get some of his data off the device before it went to that big landfill in the sky.

As it turns out these bootlooped phones can temporarily be revived by cooling them down, say by putting them in the freezer for a few hours. There’s plenty of debate as to why this works, but even our own [Lewin Day] can testify that it does seem to get the phone booting again; though only until it comes back up to operating temperature. With this in mind, [hillbillysam] reasoned that if he kept the phone as cold as possible while it was running, it may stay operational long enough for him to pull his files off of it over USB.

He couldn’t exactly freeze the phone in a block of ice, but remembering his high school chemistry, he came up with something pretty close. By adding salt to water, you can significantly lower temperature at which it freezes. Putting the phone into a watertight bag and submerging it in this supercooled solution is an easy and non-destructive way of keeping it very cold while still being accessible over USB.

His Nexus 5X was able to keep kicking the whole time it was luxuriating in its below-freezing saltwater bath, giving him plenty of time to copy everything he needed. It doesn’t sound like the kind of spa day we’d like to have personally, but to each their own.

If your Nexus 5X has met a similar fate, you may want to take a look at our previous coverage about the issue. While your mileage may vary, we’ve reported on a couple of success stories so it’s worth a shot.

[via /r/nexus5x]

How To Reverse Engineer Silicon

A few semesters back, [Jordan] was in an Intro to Hardware Security course at CMU. The final project was open ended, and where some students chose projects like implementing a crypto algorithm or designing something on an FPGA, [Jordan] decided to do something a little more ambitious. He wanted to decapsulate and reverse engineer an IC. No, this isn’t taking a peek at billions of transistors — [Jordan] chose a 74-series Quad XOR for this project — but it does show what goes into reverse engineering silicon, and how even simple chips can be maddeningly confusing.

The first step to reverse engineering a chip is decapsulation, and for this [Jordan] had two options. He could drop acid, or he could attack a ceramic package with an endmill. While hot nitric acid is effective and fun, it is a bit scary, so [Jordan] mounted a few chips in a 3D printed holder wedged in the vice on his mill. By slowly bringing the Z axis down a few thou at a time, he was able to find the tiny 1 mm square bit of silicon embedded in this chip. With the help of a grad student and the cleanroom, this square of sand was imaged with a very nice microscope.

Now that [Jordan] had an image of the silicon itself, he had to reverse engineer the chip. You might think that with less than a dozen transistors in there, designing an XOR out of transistors is something anyone with a bit of Minecraft experience can do. This line of thinking proved to be a trap. Technically, this wasn’t an XOR gate. It was a transmission gate XNOR gate with a big inverter on the output. Logically, it’s the same, but when it comes to silicon fabrication, the transmission gate XNORs aren’t able to sink or source a lot of current. By designing the chip as an XNOR with an inverter, the chip designers were able to design a simple chip that could still meet the spec.

While [Jordan] managed to reverse engineer the chip, this was quite possibly the simplest chip he could reverse engineer. The Quad XOR is just the same silicon repeated four times, anyway. This is the baseline for all efforts to reverse engineer silicon, and there were still a few confusing traps.

Review: LinkSprite Mini CNC

It’s a great time to be a hobbyist. No matter how you feel about the Arduino/Raspberry Pi effect, the influx of general enthusiasm and demand it has created translates to better availability of components, a broader community, and loads of freely available knowledge. When people have access to knowledge and ideas, great things can happen. Tools that were once restricted to industrial use become open source, and the price of entry-level versions goes into a nosedive.

As we’ve seen over the last several years, the price of cheap 3D printers keeps falling while the bar of quality keeps rising. It’s happening with laser cutters and carving tools, too. Strolling through Microcenter a few weeks ago, I spotted a new toy on the back wall next to the 3D printers. It was LinkSprite’s desktop mini CNC. They didn’t have one out on display, but there were two of them in boxes on the shelf. And boy, those boxes were small. Laughably small. I wondered, could this adorable machine really be any good? To some, the $200 price tag suggests otherwise. To me, the price tag made it justifiable, especially considering that the next price point for a hobby CNC mill is at least twice as much. I took my phone out and stood there frantically looking for reviews, documentation, anything that was available. It seemed that the general, if sparse consensus is that this thing isn’t a total waste of money. Oh, and there’s a wiki.

According to LinkSprite’s wiki, this little machine will engrave wood, plastic, acrylic, PVC, and PCBs. It will specifically not engrave metal (PCB copper notwithstanding). I’m a bit leery of the chemicals used in the PCB etching process, so the idea of engraving them instead was especially tempting. I pulled the trigger.

Continue reading “Review: LinkSprite Mini CNC”

Remember Your Birthday For Fifty Years

Our Coin Cell Challenge competition has turned up some amazing entries, things that we wouldn’t have thought possible from such meagre power sources. Take [Vishnu M Aiea]’s entry for instance, a device which he claims can light up as a birthday reminder every year for up to fifty years.

At its heart is a modified Arduino Nano clone that draws a measured 608 nA from a CR2450N. From the specification of the cell he has calculated the 50 year maximum figure, as well as a possible 29 years for a CR2032 and 64 years for a CR2477. He does however note that this does not take self-discharge into account, but you can probably afford a new battery in a decade or so.

The Arduino clone carefully selected for its “P” version low-power processor has had its serial bridge IC removed to achieve this power consumption, as well as a voltage regulator and some discrete components. Interestingly he notes that the ATMega168P is even more frugal than its 328 cousin, so he’s used the former chip. A selection of internal flags are set for minimal power consumption, and the internal oscillator is selected to use as low a clock speed as possible. There is an Intersil ISL1208 low power RTC chip mounted on a piece of stripboard to provide the timing, and of course an LED to provide the essential birthday alert.

When the LED lights for the big day there’s always the hope you’ll receive another coin cell, this time powering an edge-lit musical birthday card.