Lasers used to detect handprint.

DIY Laser Speckle Imaging Uncovers Hidden Details

It sure sounds like “laser speckle imaging” is the sort of thing you’d need grant money to experiment with, but as [anfractuosity] recently demonstrated, you can get some very impressive results with a relatively simple hardware setup and some common open source software packages. In fact, you might already have all the components required to pull this off in your own workshop right now and just not know it.

Anyone who’s ever played with a laser pointer is familiar with the sparkle effect observed when the beam shines on certain objects. That’s laser speckle, and it’s created by the beam reflecting off of microscopic variations in the surface texture and producing optical interference. While this phenomenon largely prevents laser beams from being effective direct lighting sources, it can be used as a way to measure extremely minute perturbations in what would appear to be an otherwise flat surface.

In this demonstration, [anfractuosity] has combined a simple red laser pointer with a microscope’s 25X objective lens to produce a wider and less intense beam. When this diffused beam is cast onto a wall, the speckle pattern generated by the surface texture can plainly be seen. What’s not obvious to the naked eye is that touching the wall with your hand actually produces a change in the speckle pattern. But if you take high-resolution before and after shots, the images can be run through OpenCV to highlight the differences and reveal a ghostly hand-print.

Continue reading “DIY Laser Speckle Imaging Uncovers Hidden Details”

3D Printing Your Own Sturdy Lens Caps

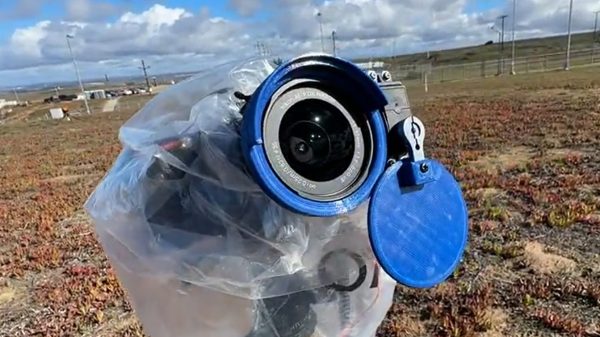
Lens caps are important for protecting expensive camera lenses from damage. Dust, grit, and other nasty things will all quickly spoil the quality of a shot, and can even permanently damage a lens if you’re unlucky. However, lens caps are also lost quite easily. Thus, it’s useful to be able to make your own, and [DSLR CNC DIY] has the low down on how to do it. 

The benefit of printing your own lens caps is customization. No matter the oddball size and shape of your lens, when you’re 3D printing your own cap, you can design it to fit. The video also shows off the benefits of being able to embed text right into the body of the cap, so you’re never confused as to which cap goes with which lens. The caps use the metal lever from a binder clip in order to provide the clamping force necessary to hang on to the lens. It’s an improvement over some living-hinge designs that grow weaker over time.

Overall, if you’ve got a bunch of lenses that need a new cap, this could be the project for you. It’s also likely much cheaper and easier than hunting down replacement caps for obscure lenses online. Alternatively, contemplate what you could do with fancy lens adapters. Video after the break. Continue reading “3D Printing Your Own Sturdy Lens Caps”

Better 3D Scans Through A Slowed Down Turntable

3D scanners aren’t cheap, and the last thing you want to see after purchasing one is bad data. But that’s what [Dave Does] and others were getting from their Revopoint POP scanners until some communal brainstorming uncovered the reason: the motorized turntable that came with the Kickstarter edition of the product was spinning too fast for the software to accurately keep track of the object. So he decided to replace the stepper motor controller in his turntable and document the process for anyone else who’s scanner might be struggling.

Plenty of room for expansion.

In the video below, [Dave] pops open the plastic case of the turntable and reveals a pretty sparse interior. There’s an incredible amount of empty space inside, and even some mounting studs to screw down new components, should you want to get into some hardcore upgrades. But for his purposes, a generic stepper motor controller that featured a potentiometer to adjust the speed was enough. He found a suitable board online for around $5 USD, and got to designing a 3D printed bracket that mates up to the existing screw holes on the turntable.

But it’s not exactly a drop-in replacement. For one thing, you’ve got to pop a hole in the side of the enclosure for the potentiometer knob to stick out of. You’ve also got to solder wires coming from the original DC jack and power switch to the new board to get it hooked up, but at least the motor plugs right in. In the video below, you can see [Dave] demonstrate the impressively deep throttle capability of the new driver.

If you’d rather build than buy, we’ve covered some impressive DIY turntables in the past that could fit the bill nicely, from automatic models that handle camera control to fully 3D printed versions that you’ve got to crank yourself.

Continue reading “Better 3D Scans Through A Slowed Down Turntable”

Pedal Operated Cable Cam For Hands Free Video

[Vintage Backyard RC] has built a nice little RC track in his backyard, and wanted a motorized dolly system to capture footage along the main straight with his GoPro. Using only junk box parts, he created a simple pedal operated RC cable dolly. (Video, embedded below.)

[Vintage Backyard RC] first experimented with a high speed car running on a length of model train track. However, it was bumpy at high speed, the track is expensive, and it needs 50 V running through the open tracks. The new cable cam gives a much smoother ride, and cost almost nothing with his supply of old RC gear. The cable cam is powered by a brushed motor from an RC airplane, running with plastic wheels on some weed trimmer line. Control is provided by an old 27 MHz RC system, with the controller’s internals transplanted into an old wah-wah guitar pedal.

The non-geared motor can drive the cable much faster than required, so [Vintage Backyard RC] needs to exercise some careful foot control to run it at a reasonable speed. This is easier said than done while also controlling an RC car with his hands, so he plans to replace the RC system with a newer 2.4 GHz system software end-point limits. We would be reaching for the ESP32 or any other microcontroller with wireless that we’ve come to know, but it’s worth remembering that most people are not familiar with these tools.

This is definitely the most minimalist cable cam we’ve covered this year, but just demonstrates how simple they can be to build. You can always upgrade to a sleek folding frame from 3D printed parts, and add machine vision and long range video streaming.

Continue reading “Pedal Operated Cable Cam For Hands Free Video”

Everything You Always Wanted To Know About Radioactive Lenses

We think of radioactive material as something buried away in bunkers with bombs, power plants, and maybe some exotic medical equipment. But turns out, there are little bits of radiation in the water, our soil, bananas, granite countertops, smoke detectors, and even some camera lenses. Camera lenses? A few decades ago, camera companies added rare elements like thorium to their glass to change the optical properties in desirable ways. The downside? Well, it made the lenses somewhat radioactive.  A post by [lenslegend] explains it all.

Exotic elements such as Thorium, Lanthanum and Zirconium are added to glass mixtures to create the high refractive indexes necessary in sophisticated lens designs. Selection of premium quantities of glass from the large glass pots, stringent spectrophotometric tests after stress and strain checks provide the valuable raw glass for ultimate use in lens elements.
Konica Hexanon Lens Guide, Konica Camera Company, 1972

According to [lenslegend] the practice started in 1945 with Kodak. However, by the 1980s, consumer distaste for radioactive things and concern for factory workers ended the production of hot camera lenses.

Continue reading “Everything You Always Wanted To Know About Radioactive Lenses”

One Of The Largest Large Format Cameras You Will Ever Have Seen

When fate lands a very high quality lens in front of you, what do you do with it? If you are [Tim Hamilton], the solution is obvious. Use it in a huge large-format camera.

The lens came from a newspaper magnifier made redundant by digitalisation and used as a paperweight. It’s an extremely high quality piece of optical equipment so seeing it wasted in this way was a source of distress. So after characterising it an enormous scaled-up box and bellows was constructed, and set upon a suitably substantial wheeled tripod.

Instead of a huge piece of film or some unobtainable giant electronic sensor, the image is projected onto a large screen at the rear of the camera. A modern digital camera is mounted inside the box just beneath the lens and photographs the screen, resulting in the feel of the largest of large format cameras with the convenience of a digital format. The resulting images have a special quality to them that recalls pictures from the past, and definitely makes the camera a special if slightly inconvenient device.

This may be one of the larger cameras we’ve featured, but it’s not the first that uses a similar technique.

Hands-On Review: TCam-Mini WiFi Thermal Imager

A thermal camera is a tool I have been wanting to add to my workbench for quite a while, so when I learned about the tCam-Mini, a wireless thermal camera by Dan Julio, I placed an order. A thermal imager is a camera whose images represent temperatures, making it easy to see things like hot and cold spots, or read the temperature of any point within the camera’s view. The main (and most expensive) component of the tCam-Mini is the Lepton 3.5 sensor, which sits in a socket in the middle of the board. The sensor is sold separately, but the campaign made it available as an add-on.

Want to see how evenly a 3D printer’s heat bed is warming up, or check whether a hot plate is actually reflowing PCBs at the optimal temperature? How about just seeing how weird your pets would look if you had heat vision instead of normal eyes? A thermal imager like the tCam-mini is the tool for that, but it’s important to understand exactly how the tCam-mini works. While it may look like a webcam, it does not work like one.

Continue reading “Hands-On Review: TCam-Mini WiFi Thermal Imager”