Building An ESP8266 Game System With MicroPython

After a seemingly endless stream of projects that see the ESP8266 open doors or report the current temperature, it can be easy to forget just how powerful the little WiFi-enabled microcontroller really is. In fact, you could argue that most hackers aren’t even scratching the surface of what the hardware is actually capable of. But that’s not the case for [Brian Wagner] and his students from the Kentucky Country Day School.

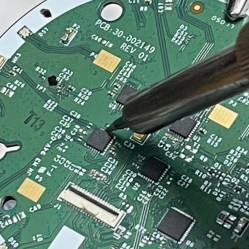
Their project, the GamerGorl, is a completely custom handheld game system running on a Wemos D1 Mini development board. The team’s PCB, which was developed over several iterations, is essentially a breakout board which allows them to easily connect up peripheral devices. Given the low total component cost of the GamerGorl and relative simplicity of its construction, it looks like a phenomenal project for older STEM students.

Beyond the ESP8266 board, the GamerGorl features a SSD1106 1.3″ OLED display, a buzzer for sound effects, two tactile buttons, and an analog joystick originally intended for an Xbox controller. Around the backside there’s a WS2812B RGB LED strip that’s at least partially for decoration, but it’s also actively used in some of the games such as the team’s take on Simon.

Even if you aren’t in the market for a portable game system, the GameGorl does provide an interesting case study for MicoPython applications on the Wemos D1 Mini. Browsing through the team’s source code as well as the helpful hints that [Brian] gives about getting the software environment up and running could be useful if you’re looking to expand your ESP8266 programming repertoire. We’d also love to see this device running the “ESP Little Game Engine” we covered recently.

Continue reading “Building An ESP8266 Game System With MicroPython”

A Keyboard For Your Thumb

Here’s an interesting problem that no one has cracked. There are no small keyboards that are completely configurable. Yes, you have some Blackberry keyboards connected to an Arduino, but you’re stuck with the key layout. You could get one of those Xbox controller chat pads, but again, you’re stuck with the keyboard layout they gave you. No, the right solution to building small and cheap keyboards is to make your own, and [David Boucher] has the best one yet.

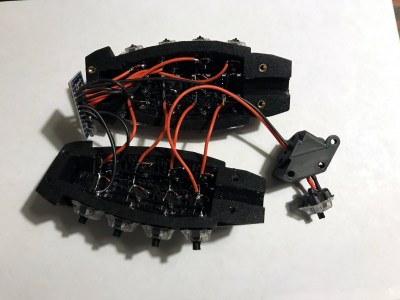
The Thumb Keyboard uses standard through-hole 4mm tact switches on a 10×4 grid, wired up in a row/column matrix. Yes, this is a mechanical keyboard, which is important: no one wants those terrible rubber dome keyswitches, and you need only look at the RGB gaming keyboard market for evidence of that. These tact switches fit into a standard perfboard, allowing anyone to build this at home with a soldering iron. After wiring up the keyboard and connecting it to an Arduino, [David] had a working keyboard.

There’s a lot going on with this build, not the least of which is the custom, 3D printed bezel for those tiny, tiny tact switches. This is a much simpler solution than building an entirely new PCB, which we’ve seen before. Since this is a 3D printed bezel, it’s easy to put labels or whatnot above the keys, or potentially print buttons. It’s great work, and one of the best small keyboards we could imagine.

Repairing A Vintage Sharp MemoWriter

As you may know, we’re rather big fans of building things here at Hackaday. But we’re also quite partial to repairing things which might otherwise end up in a landfill. Especially when those things happen to be interesting pieces of vintage hardware. So the work [ekriirke] put in to get this early 1980’s era Sharp MemoWriter EL-7000 back up and running is definitely right up our alley.

There were a number of issues with the MemoWriter that needed addressing before all was said and done, but none more serious than the NiCd batteries popping inside the case. Battery leakage is a failure mode that most of us have probably seen more than a few times, but it never makes it any less painful to see that green corrosion spreading over the internals like a virus. When [ekriirke] cracked open this gadget he was greeted with a particularly bad case, with a large chunk of the PCB traces eaten away.

The corrosion was removed with oxalic acid, which dropped the nastiness factor considerably, but didn’t do much to get the calculator back in working order. For that, [ekriirke] reconnected each damaged trace using a piece of wire; he even followed the original traces as closely as possible so the final result looked a little neater. Once everything was electrically solid again, he covered the whole repair with a layer of nail polish to adhere the wires and add a protective coating. Nail polish might not have been our first choice for a sealer, and likely not that particular shade even if it was, but sometimes you’ve got to use what you have on hand.

After years of disuse the ribbon cartridge was predictably dry, so [ekriirke] rejuvenated it with the fluid from a permanent marker applied to the internal sponge. He also made some modifications to the battery compartment so he could insert rechargeable Ni-MH AA batteries rather than building a dedicated pack. There’s no battery door in the enclosure, so removing the batteries will require opening the calculator up, but at least he has the ability to remove the batteries before putting the device in storage. Should help avoid a repeat of what happened the first time.

If you’re a fan of a good restoration, we’ve got plenty to keep you entertained. From bringing a destroyed Atari back from the dead to giving some cherished children’s toys a new lease on life, fixing old stuff can be just as engrossing as building it from scratch.

Continue reading “Repairing A Vintage Sharp MemoWriter”

Tucoplexing: A New Charliplex For Buttons And Switches

Figuring out the maximum number of peripherals which can be sensed or controlled with a minimum number of IOs is a classic optimization trap with a lot of viable solutions. The easiest might be something like an i2c IO expander, which would give you N outputs for 4 wires (SDA, SCL, Power, Ground). IO expanders are easy to interface with and not too expensive, but that ruins the fun. This is Hackaday, not optimal-cost-saving-engineer-aday! Accordingly there are myriad schemes for using high impedance modes, the directionality of diodes, analog RCs, and more to accomplish the same thing with maximum cleverness and minimum part cost. Tucoplexing is the newest variant we’ve seen, proven out by the the prolific [Micah Elizabeth Scott] (AKA [scanlime]) and not the first thing to be named after her cat Tuco.

[Micah’s] original problem was that she had a great 4 port USB switch with a crummy one button interface. Forget replacement; the hacker’s solution was to reverse and reprogram the micro to build a new interface that was easier to relocate on the workbench. Given limited IO the Tucoplex delivers 4 individually controllable LEDs and 4 buttons by mixing together a couple different concepts in a new way.

Up top we have 4 LEDs from a standard 3 wire Charlieplex setup. Instead of the remaining 2 LEDs from the 3 wire ‘plex at the bottom we have a two button Charlieplex pair plus two bonus buttons on an RC circuit. Given the scary analog circuit the scan method is pleasingly simple. By driving the R and T lines quickly the micro can check if there is a short, indicating a pressed switch. Once that’s established it can run the same scan again, this time pausing to let the cap charge before sensing. After releasing the line if there is no charge then the cap must have been shorted, meaning that switch was pressed. Else it must be the other non-cap switch. Check out the repo for hardware and firmware sources.

Last time we talked about a similar topic a bunch of readers jumped in to tell us about their favorite ways to add more devices to limited IOs. If you have more clever solutions to this problem, leave them below! If you want to see the Twitter thread with older schematics and naming of Tucoplexing look after the break.

Continue reading “Tucoplexing: A New Charliplex For Buttons And Switches”

The Tiniest RetroPie

The RetroPie project is a software suite for the Raspberry Pi that allows the user to easily play classic video games through emulators. It’s been around for a while now, so it’s relatively trivial to get this set up with a basic controller and video output. That means that the race is on for novel ways of implementing a RetroPie, which [Christian] has taken as a sort of challenge, building the tiniest RetroPie he possibly could.

The constraints he set for himself were to get the project in at under 100 mm. For that he used a Pi Zero loaded with the RetroPie software and paired it with a 1.44″ screen. There’s a tiny LiPo battery hidden in there, as well as a small audio amplifier. Almost everything else is 3D printed including the case, the D-pad, and the buttons. The entire build is available on Thingiverse as well if you’d like to roll out your own.

While this might be the smallest RetroPie we’ve seen, there are still some honorable mentions. There’s one other handheld we’ve seen with more modest dimensions, and another one was crammed into an Altoids tin with a clamshell screen. It’s an exciting time to be alive!

Continue reading “The Tiniest RetroPie”

A Practical Portable Wii Emerges From The Memes

A few months ago, [Shank] built what will almost certainly go down in history as the world’s smallest portable Nintendo Wii. As it turns out, the Wii motherboard is home to a lot of unnecessary hardware, and with a careful hand and an eye for detail, it’s possible to physically cut it down to a much smaller unit; allowing this particularly tenacious hacker to put an actual Wii, along with everything else required to make it portable, into an Altoids tin.

As you might expect, between the cramped controls, comically short battery life, and the fact that the whole thing got hot to the touch during use, it was a miserable excuse for a portable console. But the incredible response the project received inspired [Shank] to dust off an earlier project: a far more practical portable Wii that he calls PiiWii. This time around the handheld is a more reasonable size, a useful battery life, and proper controls. It even has an integrated “Sensor Bar” so you can use real Wii Remotes with it. It might not be the prettiest portable console conversion we’ve ever seen, but it certainly ranks up there as one of the most complete.

[Shank] actually “finished” the PiiWii some time ago, but in his rush to complete the project he got a little overzealous with the hot glue and ended up with a device that was difficult to diagnose and fix when things started to go wrong. He shelved the project and moved on to his Altoids tin build, which helped him refine his Wii shrinking skills. With a clearer head and some more practical experience under his belt, the PiiWii was revamped and is clearly all the better for it.

Unlike previous Wii portables we’ve seen, there’s no attempt at adding GameCube controller ports or video out capability. It’s built to be a purely handheld system, and that focus has delivered a system that’s roughly the size of the original Game Boy Advance. Beyond the cleverly sliced Wii motherboard, the inside of the PiiWii features a 3.5 inch display, a custom designed audio amplifier PCB, four 3400 mAh cells which deliver a run time of around four hours, a 3DS “slider” analog stick, and a generous helping of Kapton tape in place of hot glue.

If there’s any criticism of the PiiWii, it’s likely going to be about the system’s boxy exterior. But as [Shank] explains, there’s an excellent reason for that: it’s literally built into a project box. He simply took a commercially available ABS project box, the Polycase SL 57, and made all his openings on the front with a laser cutter. Other than the fact taking a laser to ABS releases hydrogen cyanide, he found it a good way to quickly knock out a custom enclosure.

Last year we took a look his ridiculously small Altoids tin Wii, and while that was an impressive project to be sure, we’re glad he revisited the PiiWii and showed that a portable Wii can be more than just a novelty. Compared to other systems, the Wii doesn’t seem to get the portable treatment that often, so we’re always glad to see somebody come in and do the concept justice.

Continue reading “A Practical Portable Wii Emerges From The Memes”

Get Your Tweets Without Looking

Head-mounted displays range from cumbersome to glass-hole-ish. Smart watches have their niche, but they still take your eyes away from whatever you are doing, like driving. Voice assistants can read to you, but they require a speaker that everyone else in the car has to listen to, or a headset that blocks out important sound. Ignoring incoming messages is out of the question so the answer may be to use a different sense than vision. A joint project between Facebook Inc. and the Massachusetts Institute of Technology have a solution which uses the somatosensory reception of your forearm.

A similar idea came across our desk years ago and seemed promising, but it is hard to sell something that is more difficult than the current technique, even if it is advantageous in the long run. In 2013, a wearer had his or her back covered in vibrator motors, and it acted like the haptic version of a spectrum analyzer. Now, the vibrators have been reduced in number to fit under a sleeve by utilizing patterns. It is being developed for people with hearing or vision impairment but what drivers aren’t impaired while looking at their phones?

Patterns are what really set this version apart. Rather than relaying a discrete note on a finger, or a range of values across the back, the 39 English phenomes are given a unique sequence of vibrations which is enough to encode any word. A phenome phoneme is the smallest distinct unit of speech. The video below shows how those phonemes are translated to haptic feedback. Hopefully, we can send tweets without using our hands or mouths to upgrade to complete telepathy.

Continue reading “Get Your Tweets Without Looking”