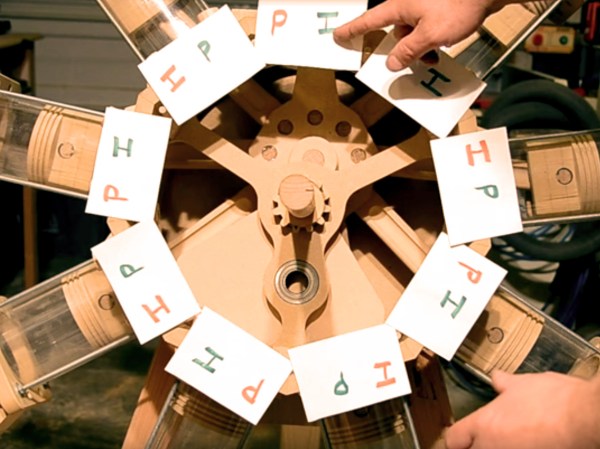
Developed On Hackaday : HaDge Update – It’s A HACK

Work on HaDge – the Hackaday con badge, continues in bits and spurts, and we’ve had some good progress in recent weeks. HaDge will be one conference badge to use at all conferences, capable of communicating between badges.

Picking up from where we left off last time, we had agreed to base it around the Atmel D21, a 32-bit ARM Cortex M0+ processor. To get some prototype boards built to help with software development, we decided to finish designing the HACK before tackling HaDge. HACK is a project that [Michele Perla] started that we have sort of assimilated to act as the prototyping platform for HaDge. We wanted a compact micro-controller board and hence opted for the SAM D21E – a 32 pin package with 26 IO’s.

[Michele Perla] had earlier designed HACK based on the larger 32 pin SAM D21G and used Eagle to hack-brddraw the schematic and layout. Using the Eagle to KiCad script, he quickly converted the project and got on to making the board layout. I took up the rear guard, and worked on making his schematic (pdf) “pretty” and building up a schematic library of symbols. While [Michele] finished off the board layout, I worked on collecting STEP models for the various footprints we would be using, most of which I could get via 3dcontentcentral.com. The few I couldn’t were built from scratch using FreeCAD. The STEP models were converted to VRML using FreeCAD. Using [Maurice]’s KiCad Stepup script, we were able to obtain a complete STEP model of the HACK board.

HACK is now ready to go for board fabrication and assembly. We plan to get about 20 boards made and hand them out to developers for working on the software. The GitHub repository has all the current files for those who’d like to take a look – it includes the KiCad source files, PDFs, gerbers, data sheets and images. The board will be breadboard compatible and also have castellated pads to allow it to be soldered directly as a module. Let us know via group messaging on the HACK project page if you’d like to get involved with either the software or hardware development of HaDge.

In a forthcoming post, we’ll put out ideas on how we plan to take forward HaDge now that HACK is complete. Stay tuned.

Make PCBs With DLP, OMG!

There’s so many ways to skin the home-fabrication-of-PCBs cat! Here’s yet another. [Nuri Erginer] had a DLP projector on hand, and with the addition of some reducing optics, managed to turn it into a one-shot PCB exposer.

If you’ve ever used photo-resist PCB material before, you know the drill: print out your circuit onto transparency film, layer the transparency with the sensitized PCB, expose with a UV light for a while, dissolve away the unexposed resist, and then etch. Here, [Nuri] combines the first three steps in one by exposing the board directly from a DLP projector.

The catch is that the projector’s resolution limits the size of the board that you can make. To fab a board that’s 10cm x 10cm, at XGA resolution (1024×768), you’ll end up with a feature size of around 0.004″ in the good direction and 0.005″ in the other.

For DIP parts, that’s marginal, but for fine-pitch or small SMT parts, that won’t do. On the other hand, for a smaller board, optimally one in the same 4:3 ratio, it could work. And because it exposes in one shot, you can’t beat the speed. Cool hack, [Nuri]!

When you need more precision, strapping a UV laser to an accurate 2D robot is a good way to go, but it’s gonna take a while longer.

Help Needed: No-Soldering ESP8266 IFTTT Button

We all love to see amazing hacks in their finished state and be dazzled by what our peers can do. But that’s just the summit of the hacker’s Everest. We all know that the real work is in getting there. Hackaday.io user [stopsendingmejunk] is working on an ESP8266-based IFTTT Button based on a simple breakout board so that anyone could rebuild it without having to do any soldering, and he’s looking for collaboration.

[stopsendingmejunk]’s project takes off from this similar project on different hardware. The board he’s chosen to use is the EZSBC ESP8266-07 breakout, which should have everything he needs, including an on-board button. It should be an easy enough job, but he’s having trouble getting the thing to stay asleep until the button is pressed.

We’ve seen more than a few hacks of the Amazon Dash button, but aside from hacking for hacking’s sake, we’re also happy to see a ground-up open redesign. Besides, this looks like it’ll be a great introductory project, requiring little fiddling around. With a little help. The code is up here on GitHub. Anyone game?

Muscle Wire Pen Dances To Duke Nukem

[serdef] is clearly just having a little bit of fun here. One never needs a whiteboard pen that’s syncronized by MIDI to dance along with the theme from Duke Nukem.

But if you had all of the parts on hand (a highly liquid MIDI-driven relay board that connects straight up to a soundcard, some muscle wire, tape, and a whiteboard pen, naturally) we’re pretty sure that you would. You can watch the dancing pen in a video below the break.

The project is really about documenting the properties of [serdef]’s muscle wire, and he found that it doesn’t really contract enough with a short piece to get the desired effect. So he added more wire. We’ve always meant to get around to playing with muscle wire, and we were surprised by how quickly it reacted to changing the voltage in [serdef]’s second video.

Now the dancing pen isn’t the most sophisticated muscle wire project we’ve ever seen. And that award also doesn’t go to this Nitinol-powered inchworm. Did you know that there’s muscle wire inside Microsoft’s Surface?

Continue reading “Muscle Wire Pen Dances To Duke Nukem”

Scratching Vinyl Straddles Physical And Digital Realms

The life of a modern DJ is hard. [Gergely] loves his apps, but the MIDI controller that works with the app feels wrong when he’s scratching, and the best physical interfaces for scratching only work with their dedicated machines. [Gergely]’s blog documents his adventures in building an interface to drive his iPad apps from a physical turntable. But be warned, there’s a lot here and your best bet is to start at the beginning of the blog (scroll down) and work your way up. Or just let us guide you through it.

In one of his earliest posts he lays out his ideal solution: a black box that interprets time-code vinyl records and emulates the MIDI output of the sub-par MIDI controller. Sounds easy, right? [Gergely] gets the MIDI side working fairly early on, because it’s comparatively simple to sniff USB traffic and emulate it. So now he’s got control over the MIDI-driven app, and the hard part of interfacing with the real world began.

After experimenting a lot with timecode vinyl, [Gergely] gives up on that and looks for an easier alternative. He also considers using an optical mouse, but that turns out to be a dead-end as well. Finally, [Gergely] settled on using a Tascam TT-M1, which is basically an optical encoder that sits on top of the record, and that makes the microcontroller’s job a lot easier. You can see the result in the video below the break.

And then in a surprise ending worthy of M. Night (“I see dead people”) Shyamalan  he pulls timecode vinyl out of the grave, builds up a small hardware translator, and gets his original plan working. But we have the feeling that he’s not done yet: he also made a 3D printed optical-mouse holder.

Continue reading “Scratching Vinyl Straddles Physical And Digital Realms”

Maker Barn Organizer Creates Makerspace Access Control System

The MakerBarn is a new makerspace between The Woodlands and Tomball, TX (north of Houston). [George Carlson], one of the founders and a retired design engineer, wanted to make sure only members certified on a machine could use it. He worked with [Kolja Windeler] to create the MACS or Makerspace Access Control System. He has one video explaining MACS and, after the break, another explaining the browser based user interface for the system.

20151205_181615A control box, [George] calls them stations, controls the power to a machine. Member badges have an RFID tag that is read when inserted into the station’s reader. If the member is authorized to use the machine, the power is enabled. For safety, the member’s badge must remain in the reader to maintain power. The reader uses a Photon board from Particle with a WiFi link to a Raspberry Pi server.

[Kolja] developed a Pi system to maintain a database of member numbers and the machines they can use. The list is sent to the stations periodically or when updates occur. The user interface is browser based on the MakerBarn’s LAN so it can be maintained by a computer or smartphone in the space. Presently 21 MACS modules have been built with some going to Hanover University in Germany for their auto hobby shop.

Not only did [George] lead the effort on creating MACS but has been key to getting the construction done inside a pole barn to make the MakerBarn a reality.

Continue reading “Maker Barn Organizer Creates Makerspace Access Control System”

OSWatch, An Open Source Watch

If you are a soldering ninja with a flair for working with tiny parts and modules, check out the Open Source Watch a.k.a. OSWatch built by [Jonathan Cook]. His goals when starting out the project were to make it Arduino compatible, have enough memory for future applications, last a full day on one charge, use BLE as Central or Peripheral and be small in size. With some ingenuity, 3d printing and hacker skills, he was able to accomplish all of that.

OSWatch is still a work in progress and with detailed build instructions available, it is open for others to dig in and create their own versions with modifications – you just need to bring in a lot of patience to the build. The watch is built around a Microdunio Core+ board, an OLED screen, BLE112A module, Vibration motor, a couple of LEDs and Buttons, and a bunch of other parts. Take a look at the schematics here. The watch requires a 3V3, 8MHz version of the Microdunio Core+ (to ensure lower power consumption), and if that isn’t readily available, [Jonathan]  shows how to modify a 5V, 16MHz version.

Continue reading “OSWatch, An Open Source Watch”