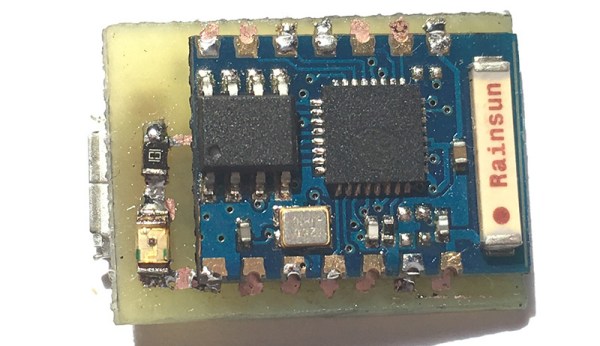
Ask Hackaday: What Is “Home Automation”?

homeAutomationCollage

We’re not entirely sure what’s become of the term “home automation.” The definition seems to have settled for any user interface in the home—via tablets, phones, handheld remote controls, etc. Some of these devices lack any form of automation and instead require manual input. Even Wikipedia’s home automation article suggests a move toward this trend, offering the following definition (emphasis ours):

It is automation of the home, housework or household activity. Home automation may include centralized control of lighting, HVAC (heating, ventilation and air conditioning), appliances, security locks of gates and doors and other systems, to provide improved convenience, comfort, energy efficiency and security.

Though “automation” is clearly included in the first sentence, one could interpret the bolded potion as meaning either:

  • Truly automated systems may also include centralized control (as a feature).
  • The category of home automation also includes systems that merely provide centralized controls.

So, are automated components optional? Judging by the phrasing of projects submitted to our tips line: yes sir. Truly automated systems exist, but if you browse through any home improvement store’s “home automation” section, you’ll be pummeled by a string of remote-controlled light dimmers and outlets. How many of these are designed to interact with sensors as feedback systems or otherwise function unattended?

Our articles often favor an “automation-optional” categorization. Should we, however, reserve the “automation” label for projects like the light switch based on room occupancy and deny other builds, like the voice-activated lights/outlets system or the RasPi lighting and audio control via web interface? Hit up the comments and help shed some light on how to properly use the terminology.

Custom HTPC And Home Media Server

[Benoit Frigon]’s builds are a tribute to tidiness: both his HTPC and media server are elegant creations packed full of features. He has quite the knack for clean builds in this form factor; his PBX server was met with high praise earlier this summer.

For the HTPC, [Benoit] gutted and cleaned an old DVR case and modified it to house a Mini-ITX board. He added standoff mounts to support the motherboard, then sketched up a template for the IO shield as a guide for cutting the back panel. The front of the DVR case originally had a 4-digit 7-segment display and a few simple buttons. Though he kept the original button layout, [Benoit] chose to replace the segment displays with a 20×2 character LCD. The new display is controlled via a python script on the HTPC, which runs an OpenElec Linux distro with XBMC 12.0.

The HTPC’s hard drive bay is a bit lighter these days, because [Benoit] decided to migrate his media storage to a separate server. Inside the new home media server is yet another Mini-ITX motherboard with an embedded Atom N2800 that runs Ubuntu Server. Live television streams via a WinTV HVR-2550 TV tuner and TVHeadend software. The case originally suspended the tuner from the IO bracket on the back (and nowhere else), which left the rest of the card dangerously unsupported inside. [Benoit] solved the problem by building an additional aluminum bracket that firmly holds both the PCIe riser and the tuner. Check out both builds’ pages for downloadable templates, software details and bill of materials.

Custom Arcade Control Panel

Anybody can fire up an emulator and play arcade games of yesteryear, but if you want to capture more of the nostalgia, you should build a custom arcade control panel. [Quinn] started her build by narrowing down which games she was most interested in playing, and decided on a straightforward 2-player setup. The biggest challenge was finding joysticks that would allow for switchable 4-way or 8-way control: some games such as Ms. Pac Man were made for 4-way joystick input, and the added positions on a 8-way can lead to confused inputs and frustrated players.

[Quinn] found the solution with a pair of Ultimarc Servo Stik joysticks, which use a servo motor to swap between 4 and 8-way mode. The output from both the joysticks and the buttons feed into an iPac encoder, which converts the signal to emulate a USB keyboard. The panel was first mocked up on butcher paper, with dimensions borrowed from various games: the panel itself resembles Mortal Kombat 2, while the buttons are spaced to match X-Men vs Street Fighter 2. [Quinn] chose some spare melamine—plywood with a plastic coating—to construct the panel, drilled some holes and used a router to carve out space for the joysticks. A USB hub was added to power the servos and to make room for future additions, which [Quinn] will have no difficulty implementing considering that her electrical layout is enviably clean. To cap it all off, she fit two “coin slot” buttons: a quarter placed into a slot serves as a start button when pressed.

Be sure to see the videos after the break that demonstrate the coin buttons and the servos, then check out a different retro joystick hack for a tripod controller, or look to the future with the Steam Controller.

Continue reading “Custom Arcade Control Panel”

Raspberry Pi Media Center On An Apple TV

You may tend to think of the AppleTV as a sort of walled garden, and you would mostly be right. Apple keeps tight control over what runs on their devices. That said, [David] decided to look closer at how the various ‘applications’ work. It turns out, the applications are nothing more than glorified web plugins. Using XML and Javascript, the apps simply define library function calls, giving them a consistent interface. So using fairly simply methods, the options really open up. Unfortunately, the method for adding new sites isn’t enabled by default.

Using a jailbroken AppleTV, [David] was able to do a fair bit of detective work and found a way to enable the ‘Add Site’ option, which allowed him to use his Raspberry Pi as a media server. The good news: you don’t need to jailbreak if you’re running 5.2 or 5.3… you should be able to recreate his success fairly easily. The bad news: things seem to have changed in 6.0. [David] isn’t sure if this was Apple intentionally closing a hole, or just not dotting all of their i’s.

[David] put all of his research up on Github, including the rough code. If you haven’t updated your AppleTV yet, and you have a Raspberry Pi to use as a media server, give it a try and let us know how it goes in the comments.

Learn To Translate IR Codes And Retransmit Using Arduino

[Dave Jones] from EEVBlog.com takes “Arduino fan boys” off the garden path getting down and dirty with different methods to capture, evaluate and retransmit IR remote control codes. Capturing and reproducing IR remote control codes is nothing new, however, [Dave] carves his own roads and steers us around some “traps for young players” along the way.

[Dave] needed a countdown timer that could remotely start and stop recording on his Cannon video camera, which he did with simplicity in a previous EEVBlog post using a commercial learning remote control unit. The fans demanded better so he delivered with this excellent tutorial capturing IR codes on his oscilloscope from an IR decoder (yellow trace) as well as using an IR photo transistor (blue trace) which showed the code inclusive of 38 KHz carrier frequency. Either capture method could easily be used to examine the transmitted code. The second lesson learned from the captured waveforms was the type of code modulation being used. [Dave’s] remote transmitted NEC (Japanese) pulse length encoding — which can be assertaind by referencing the Infrared Remote Control Techniques (PDF). Knowing the encoding methodology it was trivial to manually translate the bits for later use in an Arduino transmitter sketch. We find it amazing how simple [Dave] makes the process seem, even choosing to write his own sketch to reproduce and transmit the IR codes and carrier instead of taking the easy road looking for existing libraries.

A real gem of knowledge in the video was when it didn’t work! We get to follow along as [Dave] stumbles before using a Saleae Logic analyzer to see that his transmitter was off frequency even though the math in his sketch seemed correct. Realizing the digital write routine was causing a slowdown he fudged his math to make the needed frequency correction. Sure, he could have removed the performance glitch by writing some custom port control but logic dictates using the fastest and simplest solution when hacking a one-off solution.

[Dave’s] video and links to source code after the break.

Continue reading “Learn To Translate IR Codes And Retransmit Using Arduino”

VCR Centrifuge

VCR’s practically scream “tear me open!” with all those shiny, moving parts and a minimal risk that you’re going to damage a piece of equipment that someone actually cares about. Once you’ve broken in, why not hack it into a centrifuge like [Kymyst]? Separating water from the denser stuff doesn’t require lab-grade equipment. As [Kymyst] explains: you can get a force of 10 G just spinning something around your head. By harvesting some belt drives from a few VCR’s, however, he built this safer, arm-preserving motor-driven device.

[Kymst] dissected the video head rotor and cassette motor drive down to a bare minimum of parts which were reassembled in a stack. A bored-out old CD was attached beneath the rotor while a large plastic bowl was bolted onto the CD. The bowl–here a microwave cooking cover–acts as a protective barrier against the tubes spinning inside. The tube carriers consist of plastic irrigation tubing fitted with a homemade trunnion, which [Kymyst] fashioned from some self-tapping screws and a piece of PVC. At 250 rpm, this centrifuge reaches around 6 G and best of all, gives a VCR something to do again. Take a look at his guide and make your own, particularly if your hackerspace has a bio lab.