Off-Grid Van Build Uses 3D Scanning For Smarter Planning

Folks who refurbish and rebuild vans into off-grid campers (especially with the ability to work in them remotely) put a fantastic amount of planning and work into their projects. [Rob] meticulously documented his finished van conversion and while he does a ton of clever work, we especially liked how he shows modern tools like photogrammetry can improve the process.

Photogrammetry helped turn a bunch of photos from different angles into a textured 3D model with accurate dimensions.

[Rob] used a camera and photogrammetry software to 3D scan the van inside and out. The resulting model means that CAD tools can better assist with the layout and design phase. This is an immense help, because as [Rob] points out, an empty van is anything but a hollow box on wheels. Every surface is curved, none of the sides are identical, and there frankly isn’t a right angle to be found anywhere. When every little scrap of space counts, it’s important to have an accurate reference.

Of course, mapping the work are was just the beginning. It took six months, but he turned a Volkswagen Crafter cargo van into a slick off-grid camper capable of remote work. The full series of videos is on his site, but you can also watch the video highlights, embedded below.

The photogrammetry was done with Meshroom, and if you’d like to know more, we’ve previously explained different 3D scanning methods and how they can help with design work like this.

Continue reading “Off-Grid Van Build Uses 3D Scanning For Smarter Planning”

A wooden table with walnut squares and a maple grid. The table has a large barrel-shaped curve on one end and the other is a representation of a wormhole with what look like two stretched cones connected through a narrow cylinder. The wooden grid looks stretch to follow the curvature of spacetime.

Wormhole Coffee Table Takes Woodworking To Another Dimension

While some people are happy with a simple coffee table to hold their snacks while watching Star Trek reruns, others want their furniture to go where no furniture has gone before. [Olivier Gomis] has definitely satisfied this need with his Wormhole Coffee Table. [YouTube]

The complicated shape and curvature of a (3D representation of a) wormhole isn’t easy to create, but [Gomis] managed to carve one without the aid of a CNC or 3D printer. Starting with walnut planks and maple veneer laminated together, he created a grid stackup to replicate the common representation of spacetime as a 2D grid. Using various arrangements of these grids, he built up the central section of the wormhole which looked like a low poly vase before he put it on the lathe for turning.

The lathe work on this build is simultaneously impressive and terrifying. Turning down the central portion of the wormhole required working between two large spinning squares of walnut, which [Gomis] admits was “scary.” Multiple custom jigs were required to keep parts flat and deal with the extreme curvature of the inside of the wormhole’s opening. If that weren’t enough, if you look down the wormhole, he has installed a set of LED lights that show the spacetime grid continuing on to parts unknown.

If you’d like to see another impressive wormhole, check out this Amazing STARGᐰTE With DHD And Infinity Mirror Wormhole.

Continue reading “Wormhole Coffee Table Takes Woodworking To Another Dimension”

Automated Drip Watering Device Keeps Plants Happy

Plants tend to need a regular supply of water to stay happy. If you’re a green thumb, it’s one of the primary things you should take care of before you go on holiday. This DIY plant watering system from [Jaychouu] offers to handle just that.

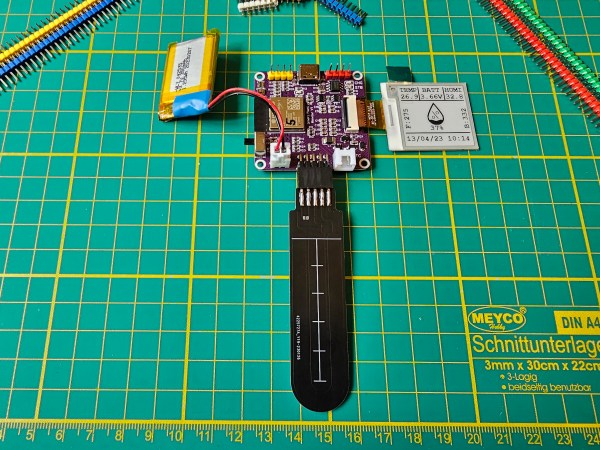
The system consists of a soda bottle acting as a water container, and an electronically-controlled valve to control the flow of water to plants. Irrigation of the plants is via dripper nozzles to provide a small but consistent feed to the plants. The use of drippers tends to disturb the soil less than pressurized jets of water. A soil humidity sensor is used to detect moisture levels and avoid over-watering. There’s also a capacitive water level sensor that fires off a warning when the reservoir’s water level is low. An ESP32 serves as the brains of the operation, allowing remote control via Blynk.

If you’re looking for a simple way to drip water your plants while you’re away, it’s hard to go wrong with this concept. If you feel like a more passive solution though, we’ve seen other viable methods too.

Continue reading “Automated Drip Watering Device Keeps Plants Happy”

Domesticating Plasma With A Gorgeous Live Edge Table

If you’ve been reading Hackaday for any length of time, you’ll know we don’t often cover woodworking projects here. It’s not because we aren’t impressed with the skill and effort that folks put into them, and truth be told, we occasionally we even feel a pang of envy when looking at the final result. It’s just that, you know…they’re made of wood.

But when [Jay Bowles] of Plasma Channel sent in this live edge wooden table that features not only a pair of custom-made neon tubes but the burned out transistors and ICs from his previous high-voltage exploits — we knew this wasn’t exactly your grandpa’s idea of woodworking. In fact, he wisely offloaded a lot of the dead tree cutting and shaping to the burly gentlemen at the local sawmill so he could better focus his efforts on the sparky bits.

At its core, he’s created what’s generally known as a “river table” — a surface made of two or more pieces of live edge wood (that is, a piece of lumber that features at least one uncut edge) that are linked via a band of colored epoxy which looks like flowing water. It’s not uncommon to embed stones or even fake fish in the epoxy to really sell the underwater effect, but this is Plasma Channel we’re talking about, so [Jay] had other ideas.

The first step was hitting up a local neon supplier who could fabricate a pair of neon tubes which roughly followed the shape of his epoxy river. While he was waiting for them to be finished, [Jay] played around with a clever experimental rig that let him determine how thick he could pour the epoxy over the tubes before he lost the capacitive coupling effect he was going for. By embedding a short length of neon tube off-center in a block of epoxy, he could see how the thickness impacted his ability to manipulate the plasma with a wave of his hand just by flipping it over.

With the tube placed on clear standoffs, he was able to position it at the ideal depth for the final epoxy pours. It was around this time that he scattered the remains of his previous projects on the “bottom” of the river, so they can spend the rest of their days looking up at his latest technical triumph. We’re not sure if this is to punish the fallen silicon for giving up early or to honor their sacrifice in the name of progress, but in either event, we respect anyone who keeps a jar of blown components laying around for ritualistic applications.

Once the table was assembled, all that was left was to power the thing. Given his previous projects, [Jay] had no shortage of existing HV supplies to try out. But not being satisfied with anything in the back catalog, he ended up building a new supply that manages to pump out the required amount of juice while remaining silent (to human ears, at least). The unit is powered by a battery pack cleverly embedded into the legs of the table, and is easy to fiddle with thanks to a pulse-width modulation (PWM) module wired hooked to the input. All the components were then held in place with a wide array of custom brackets courtesy of his newly arrived 3D printer.

There’s a lot to love about this project, and more than a few lessons learned. Whether you’re interested in recreating the Tron-like effect of the neon tubes, or have been contemplating your own epoxy-pour worktable and want to see how a first-timer tackles it, this video is a great resource.

Continue reading “Domesticating Plasma With A Gorgeous Live Edge Table”

Grass Gauge Tells You When The Lawnmower’s Catcher Is Full

If you’re not mowing your lawn regularly, you’re probably familiar with the hassle of overfilling your catcher. Grass clippings end up scattered everywhere, and you end up with a messy yard after all your hard work. [Dominic Bender] designed a mower fill gauge to eliminate this problem which shows you when your catcher is getting full.

The concept behind the gauge’s operation is simple. Catcher-based mowers rely on airflow from the spinning blades to carry grass into the catcher. That airflow is, in this case, also used to push up a flap mounted in the top of the catcher. As the catcher fills with grass, that airflow no longer reaches the flap, which sinks down, indicating the catcher is getting full. The basic design is a simple 3D printed flap and housing that uses a short piece of filament as a hinge. There’s also a small mesh guard to stop the flap getting clogged by the incoming grass clippings.

If you’re the forgetful sort, or your enthusiastic children aren’t always emptying the catcher when they should, this gauge might be a useful tool for you. Alternatively, consider robotizing your mowing in the vein of other builds we’ve seen, including one by yours truly. If you’ve got your own nifty gardening hacks, be sure to drop us a line!

A white stairwell ceiling with a rack holding clothes. The rack follows the slope of the ceiling and is attached to a series of ropes and pulleys to let it got up and down.

Stairway Drying Rack Rises Above The Rest

Finding space to dry clothes can be challenging in smaller spaces. [Tom Parker] solved this conundrum in his one bedroom apartment by putting a drying rack in his stairwell.

By making the laundry rack fold up above the stairwell, [Parker] can dry his clothes without them taking up a lot of precious floor space. A pole is used to is raise and lower a dowel rod attached to two lines of paracord running over pulleys and to the end of the rack. Each moving corner of the rack also has a set length of cord attached to prevent the rack from rotating too far down as well as providing a safety mechanism should one of the other lines of cord snap.

The rack is bolted-together, laser cut 1.5mm thick mild steel with 15 mm dowels attached to the sides via threaded inserts. Spacing is set for the raised rack to put clothes at 75 mm apart. Plywood pieces interface the rack with the wall to avoid damaging the drywall.

If you’re looking for more laundry hacks, check out this Smart Clothes Dryer or How Robots Suck at Folding Laundry.

A composite picture with a 3D printed cylinder with a magnet at one end held in a 3D printed housing ring on the left composite picture and a fridge buzzer board with buzzer, CR2032 battery, MCP430 microcontroller and hall effect sensor slid into a 3D printed base on the right part of the composite picture

Don’t Lose Your Cool With This Fridge Buzzer

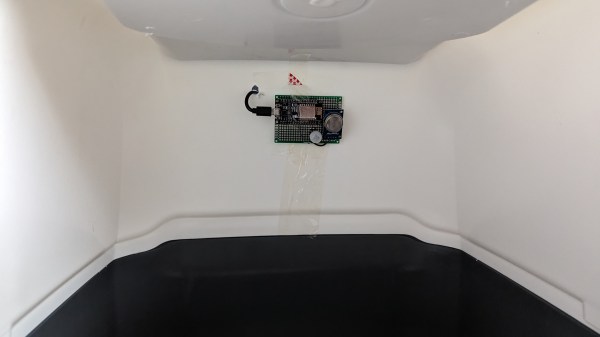
[CarrotIndustries] wanted to add an audible warning for when the refrigerator door was left open. The result is a fridge buzzer that attaches to the inside of a fridge door and starts buzzing if the door is left ajar for too long.

The main components of the fridge buzzer consist of an MSP430G2232 low-power MCU connected to a SI7201 hall sensor switch, along with a CR2032 battery holder, push button and buzzer. The MSP430’s sleep mode is used here, consuming less than 3 µA of current which [CarrotIndustries] estimates lasting 9 years on a 235 mAh CR2032 battery.

A 3D printed housing is created so that the board slides into a flat bed, which can then be glued onto to the fridge door. The other mechanical component consists of a cylinder with a slot dug out for a magnet, where the cylinder sits in a mounting ring that’s affixed to the side of the fridge wall that the end of the door closes on. The cylinder can be finely positioned so that when the refrigerator is closed, the magnet sits right over the hall sensor of the board, allowing for sensitivity that can detect even a partial close of the fridge door.

All source code is available on [CarrotIndustries] GitHub page, including the Horizon EDA schematics and board files, the Solvespace mechanical files, and source code for the MSP430. We’ve featured an IoT fridge alarm in the past but [CarrotIndustries]’ addition is a nice, self contained, alternative.