Reading Data From A CD, With A Microscope

There was a time when electronic engineering students studied the audio CD, for all its real-world examples of error correction and control systems. There’s something to be found in the system still for young and old though, and thus we were intrigued when we saw [Peter Monta] reading the data from a CD using a microscope.

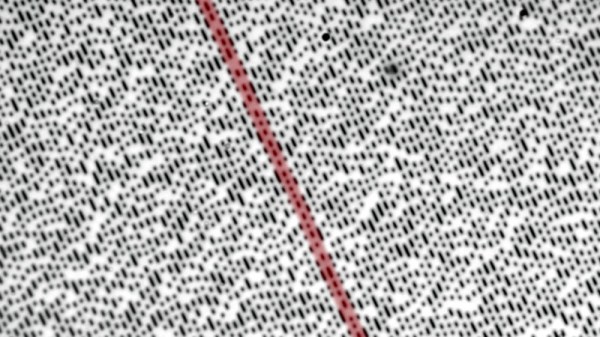
CDs encode data as so-called pits and lands in a spiral track across a metalised surface, with a transition from pit to land signifying a logic 1 and a missing transition signifying a 0. Reading a section of the raw data is achieved in the first part of his write-up, but in the next installment he goes further into retrieving more data through stitching together microscope pictures and writing some code to retrieve data frames. He’s not quite at the audio playback stage, but he’s planning in the future to spiral-track a full image to rip an entire disc.

There are plenty of CD drives around to read audio the conventional way, but the techniques here still find a use where less ubiquitous media has to be read. In the last decade for example there was an effort to read the BBC Domesday Project from the 1980s, as it became clear that few of the original readers survived in working order.

A handheld game console made from bare PCBs

Minimalist Homebrew Hardware Recreates Arcade Classics

Classic video games might look primitive by today’s standards, but the addictive gameplay of Breakout or Pac-Man remains fun no matter what decade you were born in. Keeping the relevant hardware running becomes harder as the years pile up however, so when [Michal Zalewski] decided to introduce his kids to classic video games, he didn’t dig up his old game consoles. Instead, he decided to recreate several games from scratch using the bare minimum amount of hardware needed.

The first project is a copy of Snake, the arcade classic that millennials will recognize from their Nokia phones. [Michal] made an initial version using an ATmega328P with an 8×8 LED matrix as a display, but quickly upgraded the hardware to a 16×16 display powered by an ATmega644, and added an LED seven-segment display to show the score. All parts are simply soldered onto a piece of prototyping board, with no need for any custom PCBs or enclosures.

Game #2 is a side-scrolling space shooter called Dino in Space. This game runs on an ATmega1284 and uses a 4×20 character text display, allowing simple graphics as well as an on-screen score counter. Similar hardware, although with a 128×64 graphic OLED screen, powered game #3, a Breakout/Arkanoid clone called Blockbuster 7000.

[Michal]’s blog post is filled with interesting tips for real-life game programming. For example, a true random number generator creates a rather odd-looking bunch of asteroids in space – tweaking the distribution to make it a bit more uniform greatly enhances the game’s playability. Source files for all games are available on [Michal]’s website, and include a description of the exact hardware setup needed for each game.

Recreating Snake on custom hardware is sort of a rite of passage for microcontroller hackers, as you can see in  many impressive projects. Breakout-style games can also be implemented on various hardware platforms, including analog oscilloscopes.

Hackaday Links Column Banner

Hackaday Links: January 22, 2023

The media got their collective knickers in a twist this week with the news that Wyoming is banning the sale of electric vehicles in the state. Headlines like that certainly raise eyebrows, which is the intention, of course, but even a quick glance at the proposed legislation might have revealed that the “ban” was nothing more than a non-binding resolution, making this little more than a political stunt. The bill, which would only “encourage” the phase-out of EV sales in the state by 2035, is essentially meaningless, especially since it died in committee before ever coming close to a vote. But it does present a somewhat lengthy list of the authors’ beefs with EVs, which mainly focus on the importance of the fossil fuel industry in Wyoming. It’s all pretty boneheaded, but then again, outright bans on ICE vehicle sales by some arbitrary and unrealistically soon deadline don’t seem too smart either. Couldn’t people just decide what car works best for them?

Speaking of which, a man in neighboring Colorado might have some buyer’s regret when he learned that it would take five days to fully charge his brand-new electric Hummer at home. Granted, he bought the biggest battery pack possible — 250 kWh — and is using a standard 120-volt wall outlet and the stock Hummer charging dongle, which adds one mile (1.6 km) to the vehicle’s range every hour. The owner doesn’t actually seem all that surprised by the results, nor does he seem particularly upset by it; he appears to know enough about the realities of EVs to recognize the need for a Level 2 charger. That entails extra expense, of course, both to procure the charger and to run the 240-volt circuit needed to power it, not to mention paying for the electricity. It’s a problem that will only get worse as more chargers are added to our creaky grid; we’re not sure what the solution is, but we’re pretty sure it’ll be found closer to the engineering end of the spectrum than the political end.

Continue reading “Hackaday Links: January 22, 2023”

PCB Pen Holder Is Over The Top

Like most of us, [Arnov] used a spare coffee mug to hold pens on his desk. But there has to be a better way, right? Surely if you build a better mouse trap… or, in this case, a pen holder. He’d be the first to admit that he might have gotten a little carried away, but the result is an attractive pen holder made from PCB material, one of which is actually an active circuit board.

The pen holder has some power management, as there’s a rechargeable battery that allows it to charge devices such as a smartphone or an embedded board. The power is also available for LEDs in the pen holder. The PCBs are bound together with 3D printed brackets.

The non-functioning PCBs still have patterns etched to make them more interesting looking. This is one of those things that isn’t technically a big deal, but we really liked the look of it, which was quite professional. We’ve seen PCBs used as enclosures before, but making the pattern and improving light transmission by removing the solder mask were nice touches.

If you don’t like the idea of making enclosures from PCB material, don’t forget they can form other components, as well. Clever arrangements can build resistors, capacitors, and inductors not to mention exotic transmission line elements.

Continue reading “PCB Pen Holder Is Over The Top”

Off-Grid Van Build Uses 3D Scanning For Smarter Planning

Folks who refurbish and rebuild vans into off-grid campers (especially with the ability to work in them remotely) put a fantastic amount of planning and work into their projects. [Rob] meticulously documented his finished van conversion and while he does a ton of clever work, we especially liked how he shows modern tools like photogrammetry can improve the process.

Photogrammetry helped turn a bunch of photos from different angles into a textured 3D model with accurate dimensions.

[Rob] used a camera and photogrammetry software to 3D scan the van inside and out. The resulting model means that CAD tools can better assist with the layout and design phase. This is an immense help, because as [Rob] points out, an empty van is anything but a hollow box on wheels. Every surface is curved, none of the sides are identical, and there frankly isn’t a right angle to be found anywhere. When every little scrap of space counts, it’s important to have an accurate reference.

Of course, mapping the work are was just the beginning. It took six months, but he turned a Volkswagen Crafter cargo van into a slick off-grid camper capable of remote work. The full series of videos is on his site, but you can also watch the video highlights, embedded below.

The photogrammetry was done with Meshroom, and if you’d like to know more, we’ve previously explained different 3D scanning methods and how they can help with design work like this.

Continue reading “Off-Grid Van Build Uses 3D Scanning For Smarter Planning”

A four-fingered partial hand prosthesis in fuschia with black fingerpads is attached to a man's left hand (palm and thumb are original). He holds the left hand + prosthetic with his right hand and an aluminum hand prosthetic sits on the table to the left of his hands.

Designing A Simpler Prosthetic Finger

Prosthetic limb design is an area where desktop manufacturing has made huge strides, but there’s always room for improvement. For example, take a look at [Ian Davis] and his attempts to design a simpler prosthetic finger.

[Davis] favors his aluminum partial hand prosthetic for its strength, but because it was scratch built for his particular situation, it isn’t easy to recreate for someone else. To this end, he has started working on a simpler design that might be applicable in the future for people who want to build their own prosthetics. With less than ten major components per finger including the replaceable TPU fingerpads, this is a major step toward that end.

According to [Davis], one of the more exciting parts of the build is that while this hand has a more limited feature set, he was able to get it closer to the size of his natural hand. Because of the durability problems he’s experienced for day-to-day use of plastic prosthetics, he is having the next iteration 3D printed in stainless steel for further testing.

If you want to see some more interesting prosthetic designs, checkout the Kid Who Designed His Own Prosthetic Arm or this Skull Lamp Prosthetic Eye.

DIY capacitor leakage tester nestled among neighbours all mounted underneath a shelf

DIY Capacitor Leakage Tester With A Professional Finish

[Manuel Caldeira] has built a nice electronics work area that would be the envy of many, complete with an under-shelf rail of custom-built instruments that are specific to the needs of areas of electronics that [Manuel] is involved with. The highlighted project here is a capacitor leakage tester, which is very handy for sorting through piles of old parts looking for anything still within spec, or just verifying a part on a board is the culprit you suspect it is.

The thing is, certain types of capacitors have a limited life both in operation and in storage. Usually, we’re talking about electrolytics here, where the electrolyte solution can leak out or dry out, but also the passive oxide layer on the anode plate can deteriorate if the device is left unpowered for long periods — the oxide disintegrates, and the capacitor will start to leak current. Eventually, the breakdown can be bad enough for the capacitor to conduct so well that it overheats and the result can be a surprisingly violent experience. So, if you deal with capacitors a lot, especially electrolytics, then a leakage tester is a very good instrument to own.

We like [Manuel]’s construction method here, with custom PCBs nestled inside a simple bent aluminium enclosure. No need for a top or sides, as these, are intended to bolt underneath a shelf, and butt up against their neighbor. The front panel graphics are done in a simple but very effective manner, using printable sticker sheets, with a clear adhesive over-sheet. They certainly have a professional finish, and this is definitely a construction method worth considering.

For those a little unfamiliar with this important component, why not leap into some theory with this handy dive into the simple parallel plate capacitor? Next, may we suggest a little overview of the different capacitor types and how to best make use of them?

Continue reading “DIY Capacitor Leakage Tester With A Professional Finish”