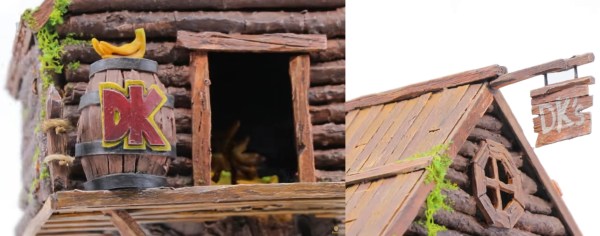
This 3D Printed “Bladeless” Fan Gets It Done Cheap

Not long after Dyson unveiled their “bladeless” fan, a fairly steady stream of ever cheaper clones have been hitting the market. But this 3D printed version created by [Elite Worm] must surely be one of the most budget-friendly takes on the concept. If you’ve got a 3D printer, we’d wager you’ve already got most of the parts required to build your own.

See, there’s a blade.

To be clear, of course there’s a blade. They aren’t magic, obviously. The fan is just small, and hidden inside the base. Air is pulled from the sides and bottom, and into the ring mounted to the top of the unit. When the air eventually exits the thin slit in the ring, it “sticks” to the sides due to the Coandă effect and produces a low pressure zone in the center. That’s all a fancy way of saying that the air flow you get from one of these gadgets is several times greater than what the little dinky fan would be capable of under normal circumstances. That’s the theory, anyway.

We can’t promise that all the physics are working as they should in this 3D printed version, but in the video after the break it certainly appears to be moving a considerable amount of air. It’s also quite loud, but that’s to be expected given it’s using a brushless hobby motor. To get it spinning, [Elite Worm] is using a Digispark ATtiny85 connected to a standard RC electronic speed control (ESC). The MCU reads a potentiometer mounted to the side of the fan and converts that to a PWM signal required by the ESC.

Beyond the electronics, essentially every piece of this project has been printed on a standard desktop 3D printer. An impressive accomplishment, though we probably would have gone with a commercially available propeller for safety’s sake. On the other hand, the base of the fan should nicely contain the shrapnel created should it explode at several thousand RPM. Probably.

Continue reading “This 3D Printed “Bladeless” Fan Gets It Done Cheap”

Two-Part, Four-Wire Air Quality Meter Shows How It’s Done

The Bosch BME680 is a super-capable environmental sensor, and [Random Nerd Tutorials] has married it to the ESP32 to create an air quality meter that serves as a great tutorial on not just getting the sensor up and running, but also in setting up a simple (and optional) web server to deliver the readings. It’s a great project that steps through everything from beginning to end, including how to install the necessary libraries and how to program the ESP32, so it’s the perfect weekend project for anyone who wants to learn.

The BME680 is a small part that communicates over SPI or I2C and combines gas, pressure, temperature, and humidity sensors. The gas sensor part detects a wide range of volatile organic compounds (VOCs) and contaminants, including carbon monoxide, which makes it a useful indoor air quality sensor. It provides only a relative measurement (lower resistance corresponds to lower air quality) so for best results it should be calibrated against a known source.

The tutorial uses the Arduino IDE with an add-on to support the ESP32, and libraries from Adafruit. Unfamiliar with such things? The tutorial walks through the installation of both. There’s a good explanation of the source code, and guidance on entering setup values (such as local air pressure, a function of sea level) for best results.

Once the software is on the ESP32, the results can be read from the serial port monitor. By going one step further, the ESP32 can run a small web server (using ESPAsyncWebServer) to serve the data to any device wirelessly. It’s a well-written tutorial that covers every element well, and complements this other BME680-based air quality meter that uses MQTT and Raspberry Pi.

Cool Off With A Piezo And A Glass Of Water

Some cool-mist humidifiers work by flinging water at a vaporizer, but our favorite kind uses a piezoelectric transducer. These work by using high-frequency sound waves to pound the surface of the water with mechanical energy. That energy introduces standing waves that force the water to break apart into a fine mist on the surface of the piezo disk.

The driving circuit for this DIY mist maker uses a 555 to generate 113 KHz, a trimmer potentiometer to fine-tune it, and a MOSFET to amplify the signal. You don’t need much more than that and a handful of passives to recreate this cool junk box experiment, but the spec of the piezo disk is quite important. The circuit is designed for atomizing transducers, which have a resonant frequency of 113 KHz — much higher than your average junk box piezo. Check out the demo and build video after the break.

Atomizing transducers can do way more than than moisten the air for our comfort. They’re not picky about where the water comes from, so if you have enough of them, you can dry a load of laundry in a few minutes.

Continue reading “Cool Off With A Piezo And A Glass Of Water”

Four Years Later, Off-Grid Office Shed Still Rocks

About four years ago, [Russell Graves] created what was, to him, the ultimate work-from-home environment: an off-grid office shed. The shed might look a bit small, but it’s a considerably larger workspace than most people in an office are granted. Four years later, in the middle of a global pandemic, working from home has become much more common and [Russel] shares some thoughts on working from home and specifically reflects on how his off-grid, solar powered shed office (or “shoffice” as he likes to call it) has worked out. In short, after four years, it rocks hard and is everything he wanted and more.

Its well-insulated plywood walls let him mount monitor arms and just about anything else anywhere he wants, and the solar power system allows him to work all day (and into the night if he wants, which he doesn’t) except for a few spells in the winter where sunlight is just too scarce and a generator picks up the slack. Most importantly, it provides a solid work-life separation — something [Russell] is convinced is critical to basic wellness as a human being.

That’s not to say an off-grid solar shed is the perfect solution for everyone. Not everyone can work from home, but for those who can and who identify with at least some of the motivations [Russell] expressed when we covered how he originally created his office shed, he encourages giving it some serious thought.

The only thing he doesn’t categorically recommend is the off-grid, solar powered part. To be clear, [Russell] is perfectly happy with his setup and even delights in being off-grid, but admits that unless one has a particular interest in solar power, it makes more sense to simply plug a shed office into the grid like any other structure. Solar power might seem like a magic bullet, but four years of experience has taught him that it really does require a lot of work and maintenance. Determined to go solar? Maybe give the solar intensity sensor a look, and find out just how well your location is suited to solar before taking the plunge.

Automating Mini Blinds The Rental-Friendly Way

[Chris Mullins] wanted to automate opening and closing the slats of mini blinds in his apartment, and came up with a system to do it as a fun project. Manually opening and closing the slats means twisting a rod. Seems straightforward to automate that, but as usual when having to work around something that already exists, making no permanent alterations, complications arose.

The blinds are only 1 inch wide, leaving little room for mounting any sort of hardware. While there is a lot of prior art when it comes to automating blinds, nothing he found actually fit the situation [Chris] had, so he rolled his own.

The rod that is normally twisted to control the blinds is removed, and the shaft of a stepper motor takes its place. [Chris]’ mounting solution is made to fit blinds with narrow 1 inch tracks (existing projects he found relied on 2 inch tracks) and the 3D printed mount is fully adjustable, so the 28BYJ stepper motor can be moved into exactly the right position. Speaking of the stepper motor, the 28BYJ motor is unipolar but the A4988 driver he wanted to use is for bipolar steppers only. Luckily, cutting a trace on the motor’s PCB is all it takes to turn a unipolar motor into bipolar.

To drive the motor and provide wireless functionality, the whole thing works with a Wemos D1 ESP8266, an A4988 stepper driver, and a buck converter. While it worked fine as a one-off on a perfboard, [Chris] used the project as an opportunity to learn how to make a PCB using KiCad; the PCB project is here on GitHub and the ESP8266 runs the ESPHome firmware. Be sure to check out the project page on his blog for all the details; [Chris] links to all the resources there, and covers everything from a bill of materials to walking through configuration of ESPHome with integration into the open-source Home Assistant project.

Looking to control natural light but blinds aren’t your thing? Maybe consider automated curtains.

Simple MP3 Player Hides Home Automation Brilliance

Like bubble wrap or the corkscrew, plenty of everyday objects have lost almost all ties to their original purpose. It could be that the original product had no market but was able to find one in an unexpected place, or simply that the original use case disappeared. We think that this MP3 player for children might arrive at a similar fate as a home automation controller thanks to a recent project by [Sebastian].

The MP3 player is known as a Jooki and works by using small figurines (and a few buttons) to control the device. Different figurines cause the MP3 player to change playlists, for example, but it turns out that the device is capable of communicating over MQTT. This means that [Sebastian] was able to use the MQTT messages from the Jooki to do all kinds of things beyond its intended use with openHAB, an open-source home automation system, such as dimming the lights and closing the blinds when he puts his son to bed.

This platform has considerable potential for hacking thanks to the lightweight communications system it uses under the hood. The Jooki is a little pricey, but if you happen to have one around, it’s an impressive tool that can go well beyond its original intended use.

Automatic Cat Weighing Machine Knows Which Pet It Is Feeding

Have you ever tried to weigh a cat? For that matter, have you ever tried to get a cat to do anything they don’t want to do? The wilful independence of our feline companions is a large part of what endears them to us, and must have done ever since the ancient Egyptians first had a hybrid wildcat that became domesticated

No wonder it’s so hard to care for multiple cats with different dietary needs. But the mere act of weighing the cats just might be the key to automating their diets while giving them the choice of when they want to eat. It’s a task that [Psy0rz] has cracked with the Meowton, a weighing machine/feeder combo designed to regulate the diets of his various moggies.

Cat scale uses a load sensor under each corner of the platform

The multi-faceted system involving a scale to weight the cat, a food hopper with dispenser, and a scale for the food bowl. The cat has to stand on the scale to eat, and the dispenser doles out some food when it detects this. It identifies each cat by weight, and controls the quantity dispensed accordingly to spread that cat’s allotted diet over the course of the day.

Behind it all is an ESP32, which delivers the stats to a web interface and makes them available for import to a database. He’s identified a flaw in the system, that two cats of the same weight could cause misidentification. To that end he has an RFID reader under way, but it’s still a work in progress. There is even a live stream of the unit in action.

We’re suckers for cats here, and while the various Hackaday Cats provide plenty of companionship and entertainment we’re always up for more. Over the years we’ve featured plenty of cat feeders, but only one cat elevator.