We love writing about DRM here at Hackaday. Because when we do, it usually means someone found a way to circumvent the forced restrictions laid upon by a vendor, limiting the use of a device we thought is ours once we bought it. The device in question this time: the water filter built into GE’s fridges that would normally allow its “owner” to pour a refreshing glass of cold water. Except the filter is equipped with an RFID tag and an expiration, which will eventually deny you that little luxury. And if that’s already a feature, you can bet it won’t just let you insert any arbitrary filter as replacement either.
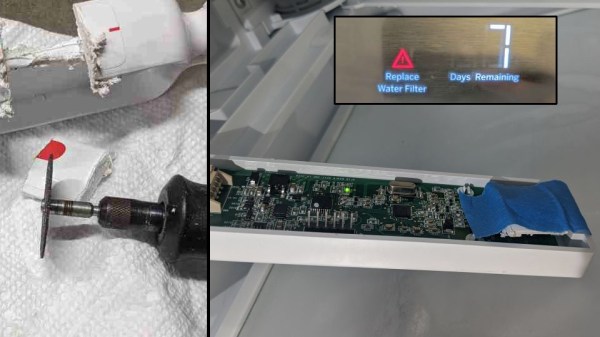
Enraged by every single aspect of that, [Anonymous] made a website to vent the frustration, and ended up tearing the culprit apart and circumvent the problem, with a little help from someone who was in the same situation before. As it turns out, the fridge comes with a “bypass filter” that is just a piece of plastic to fit in place of the actual filter, to pour unfiltered, but still cold water. That bypass filter is also equipped with an RFID tag, so the reader will recognize it as a special-case filter, which luckily enough doesn’t have an expiration counter.
The general idea is to take out that bypass filter’s RFID tag and place it on a generic, way cheaper filter to trick the fridge into thinking it simply doesn’t have a filter in the first place, while still enjoying the filters actual functionality. However, this might not be the most stable solution if the tag isn’t placed in the exact position. Also, retrieving the tag in the first place proved tricky, and [Anonymous] initially ended up with nothing but the antenna pad, while the tag itself remained sturdily glued into the plastic piece.
Continue reading “Defeating Fridge DRM With Duct Tape And A Dremel”