DIY ESP32 Alarm System Leverages 433 MHz Sensors

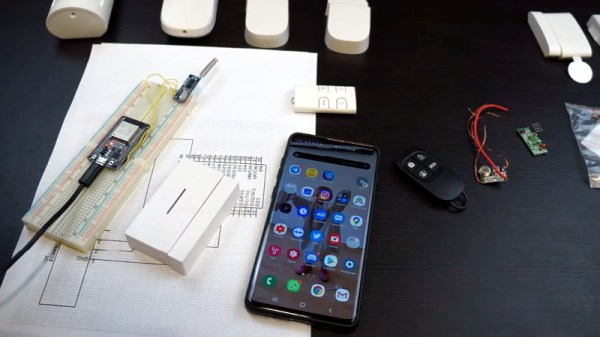
There’s a huge market for 433 MHz alarm system hardware out there, from PIR motion detectors to door and window sensors. If you want to put them to work, all you need is a receiver, a network-enabled microcontroller, and some code. In his latest video, [Aaron Christophel] shows how easy it can be.

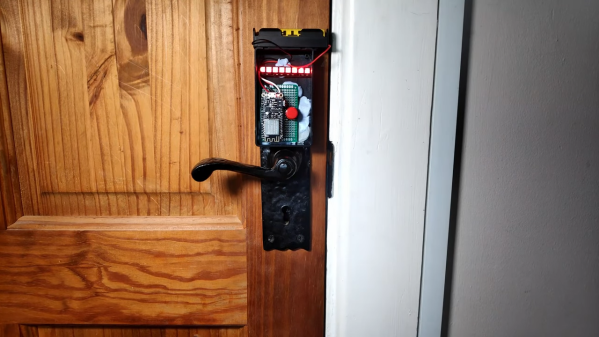
In essence, you connect a common 433 MHz receiver module to an ESP32 or ESP8266 microcontroller, and have it wait until a specific device squawks out. From there, the code on the ESP can fire off using whatever API works for your purposes. In this case [Aaron] is using the Telegram API to send out messages that will pop up with a notification on his phone when a door or window is opened. But you could just as easily use something like MQTT, or if you want to go old-school, have it toggle a relay hooked up to a loud siren.

Even if you aren’t looking to make your own makeshift alarm system, the code and video after the break are a great example to follow if you want to get started with 433 MHz hardware. Specifically, [Aaron] walks the viewer through the process of scanning for new 433 MHz devices and adding their unique IDs to the list the code will listen out for. If you ever wondered how quickly you could get up and running with this stuff, now you’ve got your answer.

In the past we’ve seen the Raspberry Pi fill in as an RF to WiFi gateway for these type of sensors, as well as projects that pulled them all together into a complete home automation system on the cheap.

Continue reading “DIY ESP32 Alarm System Leverages 433 MHz Sensors”

Accurate Dispensing Of Toilet Paper Will Get Us Through The Crisis

As we enter our second week of official COVID-19-related lockdown where this is being written, it’s evident that there are some resources we will have to conserve to help get us through all this. Instead of just using all of something because we can nip out to the store and buy more, we have to look at what we’ve got and treat it as though it will have to get us through the next three months. It’s not always certain that on our infrequent trips to the supermarket they’ll have stocks of what we want.

This is the very last of the toilet paper in my local supermarket, on the 8th of March.

A particular shortage has been of toilet paper. The news was full of footage showing people fighting for the last twelve-pack, and since early last month there has been none to be had for love nor money. To conserve stocks and save us from the desperate measures of having to cut the Daily Mail into squares and hang them on the wall, a technical solution is required. To this end I’ve created a computerised toilet roll dispenser which carefully controls the quantity of the precious sanitary product, in the hope of curbing its consumption to see us through the crisis.

In the midst of a full lockdown it’s difficult to secure immediate delivery of our usual maker essentials, so rather than send off for the controller boards I might have liked it has been necessary to make do with what I had. In the end I selected an older single board computer I had in a box under my bench. The Sinclair ZX81 has a single-core Z80 processor running at 3.25 MHz, dual-channel memory, a Ferranti GPU, and plenty of expansion possibilities from its black plastic case. I chose it because I could repurpose its thermal printer peripheral as a toilet paper printer, and because it has an easily wiped and hygienic membrane keyboard rather than a conventional one that could harbour germs.

Hardware wise I found I was fairly easily able to adapt a standard roll of Cushelle to the ZX printer, and was soon dispensing sheets with the following BASIC code.

10 REM TOILET PAPER PRINTER
20 FOR T=0 TO 44
30 LPRINT ""
40 NEXT T
50 LPRINT "---------- TEAR HERE -----------"

For now it’s working on the bench, but it will soon be mounted with a small portable TV as a monitor on the wall next to the toilet. Dispensing toilet paper will be as simple as typing RUN and hitting the ZX’s NEW LINE key, before watching as a sheet of toilet paper emerges magically from the printer. It’s the little hacks like this one that will be so useful in getting us through the crisis. After all, this Sinclair always has a square to spare.

Reverse Engineering A Ceiling Fan Remote

In the quest to automate everything in your home, you no doubt have things that aren’t made with home automation in mind. Perhaps your window AC unit, or the dimmer in your dining room. [Seb] has several ceiling fans that are controlled by remotes and wanted to connect them to his home automation system. In doing so, [Seb] gives a good overview of how to tackle this problem and how to design a PCB so he doesn’t have a breadboard lying around connected to the guts of his remote control.

There are several things [Seb] needs to figure out in order to connect his fans to Home Assistant, the home automation system he uses: He needs to determine if the circuit in the remote can be powered by 5 or 3.3 V, he needs to connect the circuit to an ESP32 board, and he needs to figure out if he can create a custom PCB that combines the circuit and the ESP32 into one. The video goes through each of these steps and shows the development of each along the way.

There’s a lot of info in the video, so it might need to be slowed down a bit to see all the details. There are some other reverse engineering of home automation gear on the site, here, or, you might want to build your own remote to control your automated devices.

Continue reading “Reverse Engineering A Ceiling Fan Remote”

Printed Door Handle Turns Key With A Servo

[Madalin Valceleanu] had a somewhat unique problem. He wanted to make his front door a bit “smarter”, but none of the IoT door locks he found were compatible with the style of reinforced door he had. So he set out to design and 3D print his own Internet-controlled door handle.

Now we say handle and not lock because the internal mechanisms haven’t actually been replaced. Those aren’t exactly the kind of parts that lend themselves to being recreated in PLA, after all. The printed components simply replace the original plate and handle on the interior of the door.

In that case, you might be wondering what the point of all this was. If he’s still using the same internal mechanism, how does a new handle help? On his new handle, [Madalin] has integrated a servo that’s capable of turning the original key in the door. With the servo wired up to a Raspberry Pi, this allows him to lock and unlock the door through his home automation system.

[Madalin] has made the STLs for his printed handles available on Thingiverse, but like most of these “bolt on” style door modifications, we imagine the design is bespoke enough that it won’t be much practical use to anyone else. Still, it’s an excellent example of solving a real-world problem with some outside of the box thinking. Continue reading “Printed Door Handle Turns Key With A Servo”

It’s Not An Arc Lamp, It’s A Lamp Arc

One wouldn’t expect there to be much to cause envy in the world of desk lamps, after all whether it’s a classic Anglepoise or a dollar store LED affair if it does its job of casting the requisite quantity of light where it’s needed, most of us are happy. But then we saw [Ronny Ziss]’s LED arc desk lamp, and suddenly all other lamps simply aren’t good enough any more. If it’s not a wall-to-wall arc of LEDs spanning the length of the desk, it quite simply no longer cuts the mustard. We’ve entered the world of lamp envy, folks, and it’s a poorly-illuminated place to be.

As you can see in the video below the break both the hardware and the software of this lamp are impressive in their own right, the structure being an aluminium extrusion carrying an addressable white LED strip fitted into an arc between two custom plywood blocks on the walls either side of the desk. The software is controlled through a rotary encoder, and allows command of the position, width, and brightness of the illuminated portion, as well as having a hidden Pong game. Sadly he doesn’t reveal the software or the microcontroller in question, however the task is not an onerous one and it’s likely most Hackaday readers could put it together using their board or processor of choice.

In years of lamp projects on Hackaday, we can’t find another quite like this one. Conventional lamp projects can still be stylish though.

Continue reading “It’s Not An Arc Lamp, It’s A Lamp Arc”

How Constant Is Your Choice Of Lights?

The move from incandescent filament lamps to fluorescent, and then LED lighting over the last couple of decades has delivered immense benefits in terms of energy saving, but had brought with it problems for people sensitive to flicker or to too much of a particular set of wavelengths. It’s not always easy to quantify the propensity of a particular light for flickering. So [kk99] has produced an instrument returning a visual indication of its quality.

At its heart is an M5Stick ESP32 development platform, and a TSL250R light sensor hooked up to one of the ESP’s internal ADCs. The flicker waveform is displayed on the screen as a simple oscillograph, and a Fourier transform is performed to extract its frequency. The result is an extremely accessible and compact instrument, showing the suitability of the M5Stick form factor for such designs. So far we’ve only brought you an M5Stick in a password keeper, but we look forward to seeing more projects featuring it.

You can see the light flicker meter in action in the video below the break.

Continue reading “How Constant Is Your Choice Of Lights?”

Keep The Family At Bay While Working From Home With This WiFi Do Not Disturb Dongle

Those who have been suddenly introduced to the wonderful world of working from home over the last couple of weeks may have experienced a bit of culture shock. Even with today’s open floorplan workspaces and less-formal expectations, work isn’t home. That’s especially true with young children in the house, who’ll probably respond to seeing mommy or daddy working from home much differently than [Bob] from accounting would at the office.

To smooth out the rough spots of transitioning to a full-time work-from-home setup, [Brian Lough] threw together this web-enabled “do not disturb” beacon for his office door. The original idea was to simply provide a red light and a green light to let the rest of the family know when [Brian] would be in a meeting, but in an example of scope creep that turned out to be useful, [Mrs. Lough] rewrote the spec to include a button on the family-facing side so that she could alert him that his presence is requested.

[Brian] went through a couple of prototype using both an ESP32 and an ESP8266. We were rooting for the ESP32, which [Brian] was leveraging for its built-in capacitive touch input. That would have eliminated a physical button, but alas, the ESP8266 made it into the final build, along with lots and lots of Blu-Tack. The video below details the build and the code, and features an adorable Irish lesson as a bonus.

Yes, a simple text message would probably have satisfied the specs, but where’s the sport in that? Then again, as [Brian] points out, this build seemed oddly familiar for a good reason.

Continue reading “Keep The Family At Bay While Working From Home With This WiFi Do Not Disturb Dongle”