Custom Firmware For Cheap Smart Bulbs Is A Cinch To Tinker With

It’s the end of another decade, and while we don’t have real hoverboards, flying cars, or affordable dental care, we do have multicolored lightbulbs you can control over WiFi. [Don Howdeshell] picked up a couple of cheap Merkury branded units in a Black Friday sale, and quickly set about hacking them.

By and large, many of these bulbs are manufactured by various companies and rebranded for whoever happens to place an order. The bulbs tend to use the Tuya IOT ecosystem. Based on the ESP8266, reflashing the bulbs with custom firmware is simple, thanks to the Tuya Convert project. Using a Linux computer with a WiFi card running in Access Point mode, it spoofs a server that tricks the Tuya product into downloading a firmware update. From there, the bulb is an open book, ready to do your bidding.

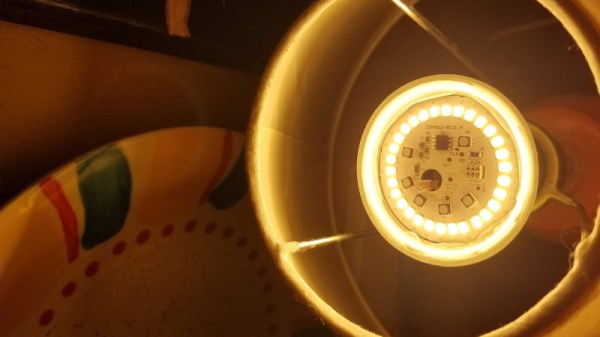
One of [Don]’s attempts didn’t go so swimmingly, however. Flashing the firmware failed and the bulb was non-functional. [Don] elected to to a teardown, photographing it for our perusal, before hooking up to the ESP8266 directly over its serial interface. From there, it was simple to reprogram the bulb with Tasmota firmware, getting it back up and running.

Security alone is a great reason for running your own firmware on IoT devices. It never hurts to know what you’re connecting to your network!

Name That Unknown RF Signal With A Little FFT Magic

Time was once that the amateur radio bands were an aurally predictable place. Spinning the dial up and down the bands, one heard familiar sounds – the staccato of Morse, the [Donald Duck] of sideband voice transmissions, and the occasional flute-like warble of radioteletype signals. Now, the ham bands are full of exotic signals encoding all manner of digital signals, each one with a unique sound and unique demodulation needs. What’s a ham to do?

Help is on the way. [José Carlos Rueda] has made progress toward automatically classifying unknown signals by modifying a Shazam-like app. Shazam is a popular smartphone app that listens to a few seconds of a song, creates an audio fingerprint of it, and searches a massive database of songs for a match. [Rueda] used a homebrew version of the app to search a SQL-lite database of audio fingerprints populated not with a playlist of popular music, but with samples from every known signal type in the Signal Identification Wiki. The database contains hashes for an FFT of each sample, which can be easily searched. With a five to ten second sample of a signal, captured either live over a microphone or from a recording,  he is able to identify the signal automatically.

Whether it be the weird, dissonant wail of PSK-31 or the angry buzzing of PACTOR, the goings-on across the bands no longer have to remain a mystery. We really like the idea here, and wonder if it can be expanded upon to visually decode signals based on their waterfall signatures using TensorFlow. There are some waterfall examples in [Danie Conradie]’s excellent article on RF modulation that could get you started.

[via RTL-SDR.com]

Portable Pizza Oven Does The Job, And Fast

Pizza ovens are a fun thing to have in your back yard, and often wood is the fuel of choice for that smoky, rustic charm. However, [Andrew] is a fan of speed, leading him to prefer propane when it comes time to make a pizza. This guided his portable pizza oven build, with impressive results.

Hot, fresh pizza cooked in just minutes. Pretty attractive, huh?

With this build, [Andrew]’s goal was to have a portable oven that didn’t sacrifice on performance. Commercial offerings were easy to lug around, but tend to cool down too much after cooking a pie, leading to lengthy waits for the oven to return to temperature. Not content to wait, [Andrew] specified his build with two custom tube burners to heat the floor, with separate jet burners to heat the cavity. When two jets proved too much, he refined the design to just one to improve efficiency and reduce carbon build up.

The Instructable is a great read, covering both the design of the oven as well as the necessary techniques to cook high-quality Neapolitan pizzas in minutes flat – right down to the selection of flour and proper insertion techniques to avoid sticking. The home pizza enthusiast could learn a lot here, and it’s great to see [Andrew] continue to improve on his earlier designs. Video after the break.

This is only the most recent of many pizza ovens to grace these pages. How about one in a beer keg?

Continue reading “Portable Pizza Oven Does The Job, And Fast”

Build Your Own Active Load

When it comes to testing power supplies, it’s useful to have a dummy load to put the gear through its paces. While it’s possible to just use some old heating elements or other big resistors, an active load can provide more control over the process. [Charles Ouweland] found himself in need of just such a piece of gear, and decided to build his own.

Commercial units often pack in a raft of features, operating in different modes from constant resistance, constant power, and constant current. For [Charles]’s needs, just constant current would be fine, and thus the design progressed around this constraint.

The IRFP250 MOSFET specified in the build can dissipate up to 190W, but as it heats up, this is reduced. In this design, cooled by a heatsink and PC fan, [Charles] estimates 120W continous output is a safe limit. It’s combined with an LM358 op-amp and TL431A reference voltage source to act as a current sink, controllable between 0 and 10 amps.

We’re sure that the new hardware makes testing power supplies a cinch for [Charles], and it’s always good to have a strong understanding of the workings of your own test gear. We’ve seen open-source designs in this space, too!

Cheap Strain Relief By Casting Hot Glue In A 3D Print

[Daniel Roibert] found a way to add cheap strain relief to JST-XH connectors, better known to hobby aircraft folks as the charging and balance connectors on lithium-polymer battery packs. His solution is to cast them in hot glue, with the help of 3D printed molds. His project provides molds fitted for connectors with anywhere from two to eight conductors, so just pick the appropriate one and get printing. [Daniel] says to print the mold pieces in PETG, so that they can hold up to the temperature of melted glue.

The 3D models aren’t particularly intuitive to look at, but an instructional video makes everything clear. First coat the inside surfaces of the mold with a release agent (something like silicone oil should do the trick) and then a small amount of hot glue goes in the bottom. Next the connector is laid down on top of the glue, more glue is applied, and the top of the mold is pressed in. The small hole in the top isn’t for filling with glue, it’s to let excess escape as the mold is closed. After things cool completely, just pop apart the mold (little cutouts for a screwdriver tip make this easy) and trim any excess. That’s all there is to it.

One last thing: among the downloads you may notice one additional model. That one is provided in split parts, so that one can make a mold of an arbitrary width just by stretching the middle parts as needed, then merging them together. After all, sometimes the STL file is just not quite right and if sharing CAD files is not an option for whatever reason, providing STLs that can be more easily tweaked is a welcome courtesy. You can watch a short video showing how the whole thing works, below.

Continue reading “Cheap Strain Relief By Casting Hot Glue In A 3D Print”

HackIt: Why Aren’t We Hacking On The LED Printer?

Strings of LEDs are a staple of the type of project we see here at Hackaday, with addressable devices such as the WS2812 in particular having changed beyond recognition what is possible on a reasonable budget. They’ve appeared in all kinds of projects, but are perhaps most memorable when used in imaging projects such as screen-like arrays or persistence-of-vision systems. There’s another addressable LED product that we haven’t seen here, which is quite a surprise considering that it can be found with relative ease in junk piles and has been on the market for decades. We’re talking about the LED printer, and the addressable LED product in question is a very high density array of LEDs the width of a page, designed to place an image of the page to be printed on the toner transfer drum.

Continue reading “HackIt: Why Aren’t We Hacking On The LED Printer?”

Airport Split-Flap Letters Carry On As Spotify Display

Today’s tale of being in the right place at the right time comes from [fabe1999], who was doing an intern gig at the airport when the controller on their split-flap display bought a one-way ticket going south. They were just going to throw away thousands of these letters and replace them with monitors, but the intern intervened.

[fabe1999] grabbed an armload, took them home, and set about making them flap again, one letter at a time. An ATtiny worked okay, but it wasn’t really fast enough to flip them at their full clacking potential, so [fabe1999] switched to an ESP8266. So now there is one ESP for each of the 20 characters, and another that runs a web server where text can be directly entered for immediate display.

Each letter uses two sensors to flap to the right letter. The first one acts as a start sensor, detecting the blackness of a blank character. Another sensor counts the letters and makes the ESP stop the motor on the right one. So far, [fabe1999] hasn’t figured out how to recognize when a blank character can stay blank, so they flap all the way around back to blank for now. It certainly adds to the rich, flappy sound, but that can’t be good for the long-term life of the letters. Your flight is now departing for Post Break Island, where the letters are spending part of their retirement showing song titles from Spotify.

No chance of split flaps falling into your lap? Here’s a tip: you can fab your own flip.

Continue reading “Airport Split-Flap Letters Carry On As Spotify Display”