Gimmick Sunglasses Become Easy Custom Helmet Visor

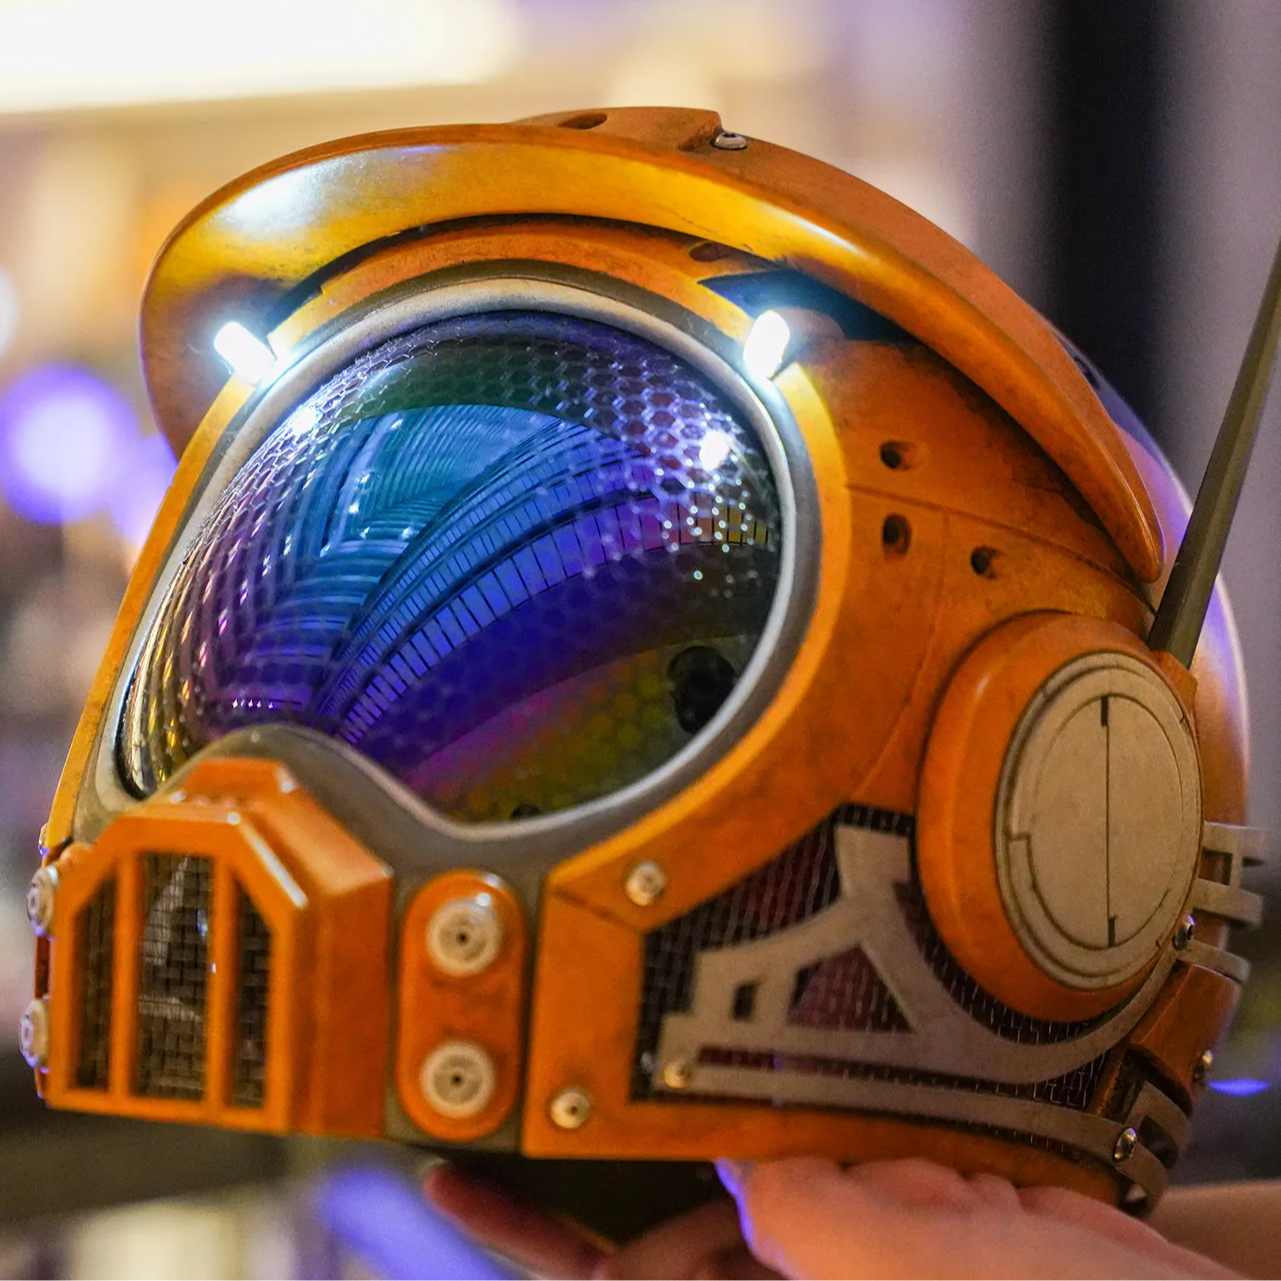
[GizmoThrill] shows off a design for an absolutely gorgeous, high-fidelity replica of the main character’s helmet from the video game Satisfactory. But the best part is the technique used to create the visor: just design around a cheap set of full-face “sunglasses” to completely avoid having to mold your own custom faceplate.

One of the most challenging parts of any custom helmet build is how to make a high-quality visor or faceplate. Most folks heat up a sheet of plastic and form it carefully around a mold, but [GizmoThrill] approached the problem from the other direction. After spotting a full-face sun visor online, they decided to design the helmet around the readily-accessible visor instead of the other way around.

The first thing to do with the visor is cover it with painter’s tape and 3D scan it. Once that’s done, the 3D model of the visor allows the rest of the helmet to be designed around it. In the case of the Satisfactory helmet, the design of the visor is a perfect match for the game’s helmet, but one could easily be designing their own custom headgear with this technique.

The hexagon grid pattern? It’s actually a clear vinyl sticker and doesn’t obstruct vision at all. Another clever touch.

With the helmet 3D printed, [GizmoThrill] heads to the bandsaw to cut away any excess from the visor, and secure it in place. That’s all there is to it! Sure, you don’t have full control over the visor’s actual shape, but it sure beats the tons and tons of sanding involved otherwise.

There’s a video tour of the whole process that shows off a number of other design features we really like. For example, metal mesh in the cheek areas and in front of the mouth means a fan can circulate air easily, so the one doesn’t fog up the inside of the visor with one’s very first breath. The mesh itself is concealed with some greebles mounted on top. You can see all those details up close in the video, embedded just below.

The helmet design is thanks to [Punished Props] and we’ve seen their work before. This trick for turning affordable and somewhat gimmicky sunglasses into something truly time-saving is definitely worth keeping in mind.

Continue reading “Gimmick Sunglasses Become Easy Custom Helmet Visor”

Balancing A Turbine Rotor To 1 Milligram With A DIY Dynamic Balancer

Although jet engines are theoretically quite simple devices, in reality they tread a fine line between working as intended and vaporizing into a cloud of lethal shrapnel. The main reason for this is the high rotational speed of the rotors, with any imbalance due to poor manufacturing or damage leading to undesirable outcomes. It’s for this reason that [AlfMart CNC Garage] on YouTube decided to spend some quality time building a balancer for his DIY RC turbine project and making sure it can prevent such a disaster scenario.

In the previous part of the series the turbine disc was machined out of inconel alloy, as the part will be subjected to significant heat as well when operating. To make sure that the disc is perfectly balanced, a dynamic balancing machine is required. The design that was settled on after a few failed attempts uses an ADXL335 accelerometer and Hall sensor hooked up to an ESP32, which is said to measure imbalance down to ~1 mg at 4,000 RPM.

A big part of the dynamic balancing machine is the isolation of external vibrations using a bearing-supported free-floating structure. With that taken care of, this made measuring the vibrations caused by an imbalanced rotor much easier to distinguish. The ESP32 is here basically just to read out the sensors and output the waveforms to a connected PC via serial, with the real work being a slow and methodical data interpretation and balancing by hand.

Continue reading “Balancing A Turbine Rotor To 1 Milligram With A DIY Dynamic Balancer”

DIY Magnetic Markers Help 3D Scan Tricky Objects

3D scanners rely on being able to identify physical features of an object, and line up what it saw a moment ago with what it sees now in order to build a 3D model. However, not every object is as distinct and visible as others at all angles, particularly in IR. One solution is reflective scanning markers, which are either pre-printed on a mat, or available as stickers that can be applied to objects to give the scanner a bit more to latch onto, visually speaking.

[firstgizmo] shows a slightly different approach: that of surrounding the object to be scanned with 3D printed reflective markers instead of covering the target object itself with reflectors, or relying on a flat scanning mat.

Magnetic mounts allow mixing and matching, as well as attaching directly to some objects to be scanned.

The main advantage (besides not having to remove stickers from the object afterwards) is that these printed markers present the reflective dots at a variety of angles during the scanning process. This makes the scene less sensitive to scanner angle in general, which is good because the angle at which to scan an important feature of an object is not always the angle that responds best.

By giving the scene more structure, the scanner can have a better shot at scanning reliably even if the reflectors aren’t on the target object itself. It also helps by making it easier to combine multiple scans. The more physical features scans have in common, the easier it is to align them.

Just to be clear, using these means one will, in effect, be 3D scanning the markers along with the target object. But once all the post-processing is done, one simply edits the model to remove everything except the target object.

[firstgizmo]’s DIY magnetic 3D scanning markers are an expanded take on an idea first presented by [Payo], who demonstrates the whole concept wonderfully in the video below.

3D scanning can be tremendously handy but it does have its quirks and limitations, and a tool like this can be the difference between a terrible scan and a serviceable one. For a quick catch-up on 3D scanning and its strengths and limitations, read our hands-on tour of using an all-in-one 3D scanner.

Continue reading “DIY Magnetic Markers Help 3D Scan Tricky Objects”

SoundSlab: How To Make A Synthesizer With All The Button Screens

Although arguably redundant on a typical computer keyboard, the idea of embedding small screens into the buttons on devices like audio production gear that often have so many buttons can make a lot of sense. As exemplified by devices with a UX that regularly degrades into scrolling through options on a tiny screen. This was basically the impetus for [Craig J Bishop] a few years ago to set out on a design project called the SoundSlab audio sequencer/sampler/synthesizer and slab that would make those buttons much more functional.

Obviously, the right way to start the project is to bulk buy hundreds of 0.85″ 128×128 LCDs so that you’re firmly locked into that choice. Fortunately, it turned out that the most annoying part of this LCD was the non-standard 0.7 mm pitch on its flat flex cable (FFC). This was worked around with an PCB adapter milled out of some copper-clad FR-1, which gave it a convenient PMOD interface for straightforward hook-up to a Xilinx Artix-7 FPGA board.

The buttons themselves were designed as 3D printed key caps for the LCDs that clipped onto typical Cherry MX-style mechanical keys. This also revealed that the original FFCs were too short, so they had to be replaced with new FFCs, that also adapted it to a standard 0.5 mm pitch. With this a 4×4 button prototype board could be constructed for testing.

Since that prototype [Craig] has built a full-sized SoundSlab grid, with a custom FPGA board and HDMI input, of which a preview can be seen in the post, along with a promise by [Craig] to soon post the rest of the SoundSlab development.

Thanks to [JohnS_AZ] for the tip.

3D Printing A Telescope Is Rewarding, Even If Not Always Cheaper

What can one expect from 3D printing an 8″ Newtonian telescope? [Molly Wakeling] shares her thoughts after doing exactly that. The performance was on par with any solid 8″ telescope, but in the end it wasn’t really any cheaper than purchasing a manufactured unit. Does that mean it wasn’t worth it? Not at all!

[Molly] makes the excellent observation that the process of printing and building one’s own telescope is highly educational and rewarding. Also, the end result is modular, user-serviceable, and customizable in a way that many commercial offerings can only dream of. It’s a great conversation starter with other enthusiasts, as well!

[Molly] printed the 203 Leavitt design (3d models available on Printables) which is an 8″ Newtonian telescope. This telescope design uses a concave parabolic mirror (a significant part of the expense) at the back of the tube to gather and focus light, and a small flat mirror near the front of the tube reflects this light to an eyepiece on the side. The wood stand makes things convenient, and we like the elastic tie-down used as a simple way to put tension on the mounts.

Do you find yourself intrigued but would prefer to start a little smaller and cheaper? Good news, because the same designer of the 203 Leavitt has a very similar design we happen to have featured before: the 114 Hadley. It features easily obtainable, lower-cost optics which perform well and can be easily ordered online, making it a great DIY starter telescope.

Create Aerated Concrete Using Xanthan Gum And Dishwashing Liquid

To make aerated concrete, add a foam-forming agent and stir in a significant amount of air. This serves to make the concrete significantly lighter, better insulating, and more resilient to fire. Making it can however be a bit of an issue, often requiring ingredients that aren’t purchased at the average DIY store. This is where [NightHawkInLight]’s method seems rather promising, requiring effectively only xanthan gum and dishwashing detergent.

For the small-scale demonstration, 15 grams of the thickening agent xanthan gum is mixed with enough alcohol to create a slurry. To this 60 mL of the detergent and 1 liter of water is added and mixed until the xanthan gum has absorbed all the moisture, which takes about 5-10 minutes. This mixture is then added to Portland cement with two parts cement to one part xanthan gum/detergent mixture and mixed for a while.

Of importance here is that this mixture will keep expanding in volume while mixing, so you have to have to keep an eye on the amount of air relative to concrete, as this will determine the strength and other properties of the final aerated concrete. If you continue past a certain point you will even create open-celled aerated concrete that’s completely porous, so you have to know what kind of concrete you want before you start mixing up a big batch.

Continue reading “Create Aerated Concrete Using Xanthan Gum And Dishwashing Liquid”

Mini Battery-Powered Vapor-Compression Air Conditioner

The brushless DC-powered compressor. (Credit: Hyperspace Pirate, YouTube)

When you think of air conditioners, you tend to think of rather bulky units, with the window-mounted appliances probably among the most compact. There’s however no real minimum size limit to these AC units, as long as you can get an appropriate compressor. If you also manage to pick up a small, DC-powered compressor like [Hyperspace Pirate] did, then you might be tempted to make a hand-portable, battery-powered AC unit.

At their core vapor-compression AC units are very simple, featuring the aforementioned compressor, a condensing coil, expansion valve and the evaporator coil. Or in other words, some radiators looted out of other devices, various plumbing supplies and the refrigerant gas to charge the AC unit with.

Since the compressor uses a BLDC motor, it has three terminals that a typical ESC connects to, along with two 2200 mAh Li-on battery packs that can keep the portable AC unit running for a while.

As for the refrigerant gas, although the compressor lists R134a, this is both quite expensive and illegal in parts of the world like the EU. Alternatives are butane (R600) as well as isobutane (R600a), but due to unfortunate circumstances the use of propane (R290) was forced. Fortunately this worked fine, and after some testing and running of numbers it was found that it had about 42 Watt cooling power, with a coefficient of performance (COP) of around 1.

Considering that most AC units have a COP of 3.5 – 5, this shows that there’s still some room for increased efficiency, but at the very least this portable, battery-powered AC unit provides cold air on one side, and hot air on the other while completely blowing Peltier thermocouples out of the water in terms of efficiency.

Continue reading “Mini Battery-Powered Vapor-Compression Air Conditioner”