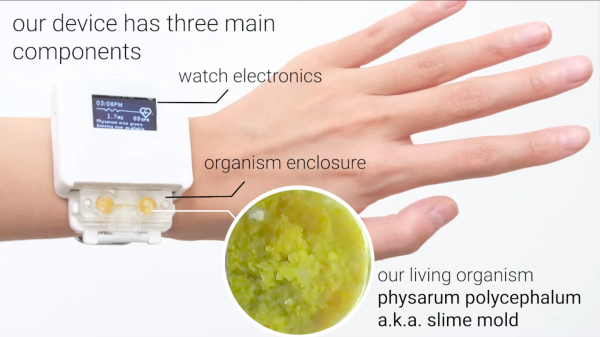
Anr air quality sensor mounted on a bike's handlebar

Measuring Air Quality Using Mobile Sensors For The Masses

Poor air quality is a major problem for city dwellers the world over. Dust, smoke, particles and noxious gases from vehicles, industry and agriculture makes many megacities downright hazardous to live in. Pinpointing the source of pollution and developing strategies for mitigation requires accurate data on pollutant levels, but obtaining these numbers is not always easy.

Enter CanAirIO, a citizen science project that aims to gather air quality data from around the world by putting sensors into the hands of as many people as possible. Its team has developed two different sensor nodes for this purpose: an indoor one that can measure CO2, and a mobile one that can measure particulate matter (PM) levels. Both versions are powered by an ESP32 microcontroller that reads out the air quality sensors and connects to the Internet using WiFi or BlueTooth. The data can then be shared online to create detailed maps showing local variations in air quality.

The design of the sensor nodes is fully open-source, allowing anyone with basic electronic skills to build them. The sensors are a Sensirion SCD30 for CO2 measurement and an SPS30 for PM levels. The mobile version comes with a neat 3D-printed enclosure that can be mounted on a bike’s handlebar, enabling the user to quickly gather data around their neighbourhood. A mobile app simplifies setting up the sensors and sharing the data.

The project has already been successful in gathering detailed data in the city of Bogotá, Colombia, and will no doubt prove useful in many other pollution hotspots around the world. We’ve seen similar community efforts to monitor air pollution and even radiation in various places, both showing how relatively simple devices can help to make a difference in people’s wellbeing. Continue reading “Measuring Air Quality Using Mobile Sensors For The Masses”

An Open Source Detector For Identifying Plastics

One of the challenges involved in recycling plastic is determining the specific type of plastic a given item is actually made of. To keep up with demand, large scale recycling centers rely on various automated systems to separate different types of plastic from a stream of incoming material. But in less technologically advanced parts of the world, workers can find themselves having to manually identify plastic objects; a time consuming and error-prone process.

To try and improve on the situation, [Jerry de Vos], [Armin Straller], and [Jure Vidmar] have been working on a handheld open hardware device that they refer to simply enough as the Plastic Scanner. The hope is that their pocket-sized unit could be used in the field to positively identify various types of plastic by measuring its reflectivity to infrared light. The device promises to be very easy to operate, as users simply need to bring the device close to a piece of plastic, push the button, and wait for the information to pop up on the OLED display.

Or at least, that’s the idea. While the team eventually hopes to release a kit to build your own handheld Plastic Scanner, it seems that the hardware isn’t quite ready for production. The most recent work appears to have been put in, not unexpectedly, the development board that lets the team refine their process. The development unit combines an array of IR LEDs with wavelengths ranging from 850 to 1650 nanometers, a InGaAs photodiode connected to an ADS1256 24-bit analog-to-digital converter (ADC), and an Arduino Uno. In comparison, the final hardware uses a Raspberry Pi Zero and a smaller “breakout board” that contains the sensor and IR LEDs.

Browsing through the software repository for the project, we can see the device uses Python, TensorFlow Lite, and a database of IR reflectivity values for known plastics to try and determine the closest match. Obviously the accuracy of such a system is going to be highly dependent on the quantity of known-good data, but at least for now, it appears the user is responsible for building up their own collection or IR values.

As interesting as this project is, we’re a bit skeptical about its purely optical approach to identifying plastics. Automated recycling centers do use infrared spectroscopy, but it’s only one tool of many that are employed. Without additional data points, such as the density or electrostatic properties of the plastic being tested, it seems like the Plastic Scanner would have a fairly high margin of error. Just taking into account the wide array of textures and colors the user is likely to encounter while using the device will be a considerable challenge.

Continue reading “An Open Source Detector For Identifying Plastics”

DIY Hydroelectric Plant

Impressive Off-Grid Hydroelectric Plant Showcases The Hacker Spirit

We all know the story arc that so many projects take: Build. Fail. Improve. Fail. Repair. Improve. Fail. Rebuild. Success… Tweak! [Kris Harbour] is no stranger to the process, as his impressive YouTube channel testifies.

DIY Hydroelectric Plant
An IOT charge controller makes power management easier.

Among all of [Kris’] off-grid DIY adventures, his 500 W micro hydroelectric turbine has us really pumped up. The impressive feat of engineering features Arduino/IOT based controls, 3D printed components, and large number of custom-machined components, with large amounts of metal fabrication as well.

[Kris] Started the build with a Pelton wheel sourced from everyone’s favorite online auction site paired with an inexpensive MPPT charge controller designed for use with solar panels. Eventually the turbine was replaced with a custom built unit designed to produce more power. An Arduino based turbine valve controller and an IOT enabled charge controller give [Kris] everything he needs to manage the hydroelectric system without having to traipse down to the power house. Self-cleaning 3D printed screens keep intake maintenance to a minimum. Be sure to check out a demonstration of the control system in the video below the break.

As you watch the Hydro electric system playlist, you see the hacker spirit run strong throughout the initial build, the failures, the engineering, the successes, and then finally, the tweaking for more power. Because why stop at working when it can be made better, right? We highly recommend checking it out- but set aside some time. The whole series is oddly addictive, and This Hackaday Writer may have spent inordinate amounts of time watching it instead of writing dailies!

Of course, you don’t need to go full-tilt to get hydroelectric power up and running. Even at a low wattage, its always-on qualities mean that even a re-purposed washing machine can be efficient enough to be quite useful.

Thanks to [Mo] for alerting us to the great series via the Tip Line!

Continue reading “Impressive Off-Grid Hydroelectric Plant Showcases The Hacker Spirit”

A disposable wireless phone charger made from molded cardboard pulp.

Charging Phones With The Power Of Paper Pulp

Here it is, the most exciting reveal since the Hackaday Prize ceremony — [Eric Strebel] uses the pulp mold he designed and built over the three previous videos. In case you missed our coverage so far, [Eric] set out to design an eco-friendly wireless charger that’s meant to be disposable after six months to a year of use, and looks good doing it.

[Eric] started by cutting up a lot of cardboard and pulping it in a brand-new Oster blender that honestly looks to be pretty heavy duty. Pulping consists of blending the cardboard bits with water until a soupy chili-like consistency is reached. That blender lasted all of 20 minutes before breaking, so [Eric] promptly replaced it with a Ninja, which was way more up to the challenge of cardboard.

To do the actual molding, [Eric] mixed his pulpy chili with ~30 L of water in a tub big enough to accommodate the long brass mold. He dipped the mold to gather a layer of pulp and pulled it, and then pressed the wireless charger in place to create a pocket for it in the final, dried piece which he later replaced with an acrylic disk of the same diameter. [Eric] points out that a part like this would probably dry within ten minutes in an industrial setting. Even though he set it on top of a food dehydrator, it still took 4-5 hours to dry. Soup’s on after the break.

This isn’t [Eric]’s first wireless charger. A few years ago, he prototyped a swiveling version in urethane foam that does portrait or landscape.

Continue reading “Charging Phones With The Power Of Paper Pulp”

Brass screen is soldered together into a large mold for cardboard pulp.

How To Make A Classy, Brassy Cardboard Pulp Mold

When we last checked in with prolific prototypist [Eric Strebel], he was perfecting the design of an eco-friendly wireless charger and turning his initial paper prototype into a chipboard version 2.0 that takes manufacturing concerns into consideration. At the end of this second video in a series, [Eric] was printing out the early versions of the form by which he would eventually make a brass screen mold for working with cardboard pulp. You know, the stuff that some egg cartons are made from.

Soldering brass screen into a mold.In the video below, it’s time to build the pulp mold by creating three smaller molds and then joining them into one horizontal mold. The result is a single piece that then gets folded up into a charging stand, much like the egg carton. [Eric] is using brass screen here, but says that copper would be a good choice, too.

After cutting the brass with scissors and pounding them flat, he uses the 3D-printed molds from the previous video to press them into the correct shapes. Each of the three pieces needs a frame, which [Eric] makes from more brass screen, then stitches it to the mold piece with loose screen threads before securing the unions with solder.

Since the weight of all the water would likely bend the brass out of shape, [Eric] finished off the mold by soldering on a frame of flat brass strip. Check out this awesome process below, and stay tuned for the next video when [Eric] pulps some cardboard and pumps out some eco-friendly chargers.

Does this look too complicated? You could always skip the whole mesh mold thing and shape your cardboard confetti directly into 3D printed parts.

Continue reading “How To Make A Classy, Brassy Cardboard Pulp Mold”

Pulp-Molding: A Use For Cardboard Confetti

We’re pretty sure that we don’t have to tell you how great cardboard is. You probably sing the praises yourself and use it for everything from a work surface protective layer to a prototype of your next amazing build. But if you still find yourself flush with cardboard even after all that, here’s one thing you can do with all those pieces that are too small to use for anything else– chuck them in an old blender, whip up some cardboard pulp, and press that gunk into some 3D-printed molds.

In addition to a step-by-step of the process, [flowalistik] offers a mold set of STL files for various useful items like a pencil holder, a box with a lid, a tray, and a coaster, as well as the Fusion 360 files in case you want to change them around. You might want to seal the coaster with something protective so that it doesn’t mold/disintegrate/bloom from condensation.

Each part consists of the walls, the wall clip that keeps them closed, but allows for de-molding and reuse, the bottom lid, and the top lid. All these prints need to be pretty high-res so that they can withstand the pressure of the clamp holding it all together. [flowalistik] recommends a layer height no larger than .03mm and a 20% infill.

The process of making the pulp itself is fairly simple, and the recipe only calls for water and some kind of binder. To start, remove all tape, coatings, staples, and anything else non-soluble from the cardboard. Cut it into bite-sized pieces your blender will enjoy, and add water and PVA glue or rice paste. Mix it up, remove the excess water by squeezing your pulp inside of a piece of cloth, and then use it to fill up your mold. You’ll want to press out the water as you go and fill it further, then finally apply the clamp. You can start de-molding parts on a schedule, starting with the clamp after about six hours. Once it’s fully dried in about two days, you can treat it like MDF and sand, cut, or even drill it. We think some of these would look pretty good with a coat of paint.

Need your objects to be more sturdy? Keep that printer warmed up — you can use prints to cast concrete, too.

The Metabolizer Is Turning Trash Into Treasure Even Faster Now

Do you remember [Sam Smith]’s Metabolizer from a few years back? In case you’ve forgotten, this baby takes trash and turns it into printed plastic objects, and it’s solar-powered to boot. Although the Metabolizer didn’t win the 2018 Hackaday Prize, [Sam] and his machine won many achievements that year, including the Open Hardware Challenge. It’s fantastic to see the project still improving.

To recap, the sun hits the solar panels and charge up the battery bank. Once there’s enough power to start the reaction, it gets dumped into a heating element that turns biomass into biochar. This smoke is cooled, collected, refined, and fed into a small gas generator, which produces DC power to run a 3/4-horsepower shredder and the trash printer.

[Sam] likens this beast to a Rube Goldberg machine in that it performs an overly-complicated chain reaction to do a simple task. We certainly see his point, but we think that this machine is worth so much more than those classic machines, which tend to do nothing useful at all and tend to consume many resources in the process.  On the contrary, the Metabolizer’s chain reaction starts with sunshine and ends with useful objects that keep plastic out of landfills. Honestly, it’s more akin to a compost heap with a PhD in Biology and a handful of steroids and a 3D printer attached.

Unfortunately, [Sam] couldn’t get a prototype working in time for the Prize, and he turned to Patreon to gain support after the $1,000 ran out. Three years and a ton of improvements later, [Sam] has a working prototype that’s cheaper, more efficient, and easier to build. But can it be built relatively easily by someone other than [Sam]? Consider the gauntlet thrown down.

Not happy with your standard-style compost pile? You need a DIY trommel to sift out the bad stuff.