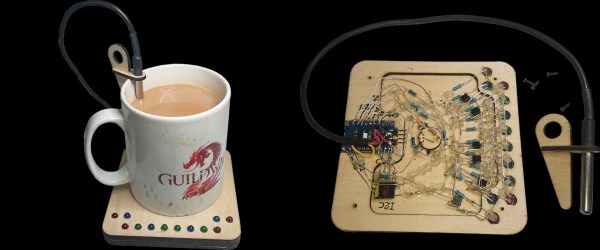
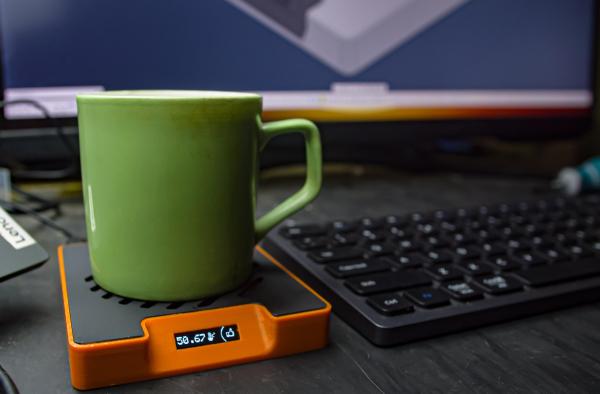
Tricorder Tutorial Isn’t Just For Starfleet Cadets

For many of us, the most difficult aspect of a project comes when it’s time to document the thing. Did you take enough pictures? Did you remember all the little details that it took to put it together? Should you explain those handful of oddball quirks, even though you’re probably the only person in the world that knows how to trigger them?

Well, we can’t speak to how difficult it was for [Mangy_Dog] to put together this training video for his incredible Star Trek: Voyager tricorder replica, but we certainly approve of the final product. Presented with a faux-VHS intro that makes it feel like something that would have been shown to cast members during the legendary run the franchise had in the 1990s, the video covers the use and operation of this phenomenal prop in exquisite detail.

Replaceable batteries are standard again in the 2370s.

Now to be fair, [Mangy_Dog] has sold a few of his replicas to other Trek aficionados, and we’re willing to bet they went for a pretty penny. As such, maybe it’s not a huge surprise he’d need to put together a comprehensive guide on how to operate the device’s varied functions. Had this been a personal project there wouldn’t have been the need to record such a detailed walk-through of how it all works — so in that regard, we’re fortunate.

One of the most interesting things demonstrated in this video is how well [Mangy_Dog] managed to implement mundane features such as brightness and volume control without compromising the look of the prop itself. Rather than adding some incongruous switches or sliders, holding down various touch-sensitive buttons on the device brings up hidden menus that let you adjust system parameters. The project was impressive enough from the existing images and videos, but seeing just how deep the attention to detail goes is really a treat.

Previously we took a look at some of the work that [Mangy_Dog] has put into these gorgeous props, which (unsurprisingly) have taken years to develop. While they might not be able to contact an orbiting starship or diagnose somebody’s illness from across the room, it’s probably fair to say these are the most realistic tricorders ever produced — officially or otherwise.

Continue reading “Tricorder Tutorial Isn’t Just For Starfleet Cadets”

The New Hotness

If there’s one good thing to be said about the chip shortage of 2020-2023 (and counting!) it’s that a number of us were forced out of our ruts, and pushed to explore parts that we never would have otherwise. Or maybe it’s just me.

Back in the old times, I used to be a die-hard Atmel AVR fan for small projects, and an STM32 fan for anything larger. And I’ll freely admit, I got stuck in my ways. The incredible abundance of dev boards in the $2 range also helped keep me lazy. I had my thing, and I was fine sticking with it, admittedly due to the low price of those little blue pills.

An IN-12B Nixie tube on a compact driver PCBAnd then came the drought, and like everyone else, my stockpile of microcontrollers started to dwindle. Replacements at $9 just weren’t an option, so I started looking around. And it’s with no small bit of shame that I’ll admit that I hadn’t been keeping up with the changes as much as I should have. Nowadays, it’s all ESP32s and RP2040s over here, and granted there’s a bit of a price bump, but the performance is there in abundance. But I can’t help feeling like I’m a few years back of the cutting edge.

So when I see work like what [CNLohr] and [Bitluni] are doing with the ultra-cheap CH32V003 microcontrollers, it makes me think that I need to start filling in gaps in my comfortable working-set of chips again. But how the heck am I supposed to keep up? And how do you? It took a global pandemic and silicon drought to force me out of my comfort zone last time. Can the simple allure of dirt-cheap chips get me out? We’ll see!

Four square, unpopulated purple PCBs sit in front of a tube of soldering flux on a light grey work surface. The PCBs are only 1"x1".

BeagleStamp Makes Soldering Linux Into Your Projects Easier

There are a lot of things you can do with today’s powerful microcontrollers, but sometimes you really need a full embedded Linux setup. [Dylan Brophy] wanted to make it easier to add Linux to his own projects and designed the BeagleStamp.

A populated purple PCB propped against a piece of wood on a light grey work surface. The bulk of the PCB is covered in an Ocatavo processor chip.Squeezed onto a 1″ square, the BeagleStamp puts the power of a PocketBeagle into an easy to solder module you can add to a project without all that tedious mucking about with individually soldering all the components of a tiny Linux computer every time. As a bonus, the 4 layer connections are constrained to the stamp as well, so you can use lower layer count boards in your project and have your Linux too.

The first run of boards was delivered with many of the pins unplated, but [Brophy] plans to work around it for the time being so he can spot any other bugs before the next board revision. Might we suggest a future version using RISC-V?

Building A WiFi Picture Frame With An EInk Display

LCD photo frames never really caught on — by emitting light, they didn’t seamlessly blend in with a home’s decor in the way printed photos do. [Sprite_tm] decided to see if a color e-Ink screen could do any better, and whipped up a WiFi-enabled photo frame using a Waveshare display.

The part in question is a 5.65-inch display with 640 x 448 resolution, and is capable of displaying seven colors. It’s not designed to display photorealistic images, so much as display simple graphics with block colors. However, with some dithering, [Sprite_tm] suspected it might do an okay job. An algorithm that uses Floyd-Steinberg diffusion and the CIEDE2000 color space takes regular RGB images and breaks them down into dithered images that are displayed using the screen’s 7 available colors.

The build relies on an ESP32-C3, which drives the display and fetches new images daily over WiFi. Thanks to the e-Ink screen, which uses zero power when not updating, the whole setup runs off two AA batteries and a Natlinear LN2266 boost converter.

There are some limitations; the screen’s color space is altogether quite limited, and images don’t look very high-fidelity in such low resolution. However, it does an able job of displaying photos for a device that was never designed to do so. It looks rather handsome all wrapped up as a 3D printed picture frame, and [Sprite_tm]’s monkey test photos are very cute.

Files are on GitHub for those that wish to roll their own. We’ve seen similar works before, like this e-Ink wall-hanging newspaper display that keeps up with the times. If you’ve got your own neat e-ink build, hit us up on the tipsline!

Make Your ESP32 Talk Like It’s The 80s Again

80s-era electronic speech certainly has a certain retro appeal to it, but it can sometimes be a useful data output method since it can be implemented on very little hardware. [luc] demonstrates this with a talking thermometer project that requires no display and no special hardware to communicate temperatures to a user.

Back in the day, there were chips like the Votrax SC-01A that could play phonemes (distinct sounds that make up a language) on demand. These would be mixed and matched to create identifiable words, in that distinctly synthesized Speak & Spell manner that is so charming-slash-uncanny.

Software-only speech synthesis isn’t new, but it’s better now than it was in Atari’s day.

Nowadays, even hobbyist microcontrollers have more than enough processing power and memory to do a similar job entirely in software, which is exactly what [luc]’s talking thermometer project does. All this is done with the Talkie library, originally written for the Arduino and updated for the ESP32 and other microcontrollers. With it, one only needs headphones or a simple audio amplifier and speaker to output canned voice data from a project.

[luc] uses it to demonstrate how to communicate to a user in a hands-free manner without needing a display, and we also saw this output method in an electric unicycle which had a talking speedometer (judged to better allow the user to keep their eyes on the road, as well as minimizing the parts count.)

Would you like to listen to an authentic, somewhat-understandable 80s-era text-to-speech synthesizer? You’re in luck, because we can show you an authentic vintage MicroVox unit in action. Give it a listen, and compare it to a demo of the Talkie library in the video below.

Continue reading “Make Your ESP32 Talk Like It’s The 80s Again”

Rickrolling SSID With ESP32

Reddit user [nomoreimfull] posted code for a dynamic WiFi beacon to r/arduino.  The simple, but clever, sketch is preloaded with some rather familiar lyrics and is configured to Rickroll wireless LAN users via the broadcast SSID (service set identifier) of an ESP32 WiFi radio.

The ESP32 and its smaller sibling the ESP8266 are tiny microcontrollers that featuring built-in WiFi support. With their miniature size, price, and power consumption characteristics, they’ve become favorites for makers, hackers, and yes pranksters for a wide variety of projects. They can be easily programmed using their own SDK or through a “board support” extension to the Arduino IDE.

For the dynamic WiFi beacon, the ESP32 is placed into AP (access point) mode and broadcasts its human readable name (SSID) as configured. What makes the SSID dynamic, or rolling, is that the sketch periodically updates the SSID to a next line of text stored within the code. Of course, in the Rickroll prank this means the next line of lyrics from “Never Gonna Give You Up” by Rick Astley himself.

Always a favorite prank, we’ve seen Rickrolls take the form of IR remote controls , free WiFi servers, and coin cell throwies.

Rick Astley picture: Wjack12, CC BY-SA 4.0.

Run Linux By Emulating RISC-V On A RISC-V Microcontroller

For years it was a given that it was impossible to run a Linux based operating system on a less powerful computer whose architecture lacked a memory management unit. There were projects such as uCLinux which sought to provide some tidbits to low computing power Linux users, but ultimately they came to naught. It is achievable after a fashion though, by using the limited architecture to emulate a more powerful one. It’s been done on AVR chips emulating ARM, on ARM chips, and now someone’s done it on an ESP32-C3 microcontroller, a RISC-V part running a RISC-V emulator. What’s going on?

RISC-V is an architecture specification that can be implemented at many levels from a simple microcontroller or even a pile of 74 logic to a full-fat application processor. The ESP32-C3 lies towards the less complicated end of this curve, though that’s not the whole reason for the emulation. The PSRAM storage is used by the C3 as data storage and can’t be used to run software, so to access all that memory capacity an emulator is required that in turn can use the PSRAM as its program memory. It’s a necessary trick for Espressif’s implementation of the architecture.

Surprisingly it’s not as slow as might be expected, with a boot-up time under two minutes. It’s not what we’d expect from our desktop powerhouses, but it’s not so long ago that certain lower-power full-fat processors could be just as lethargic. For past glories, see the AVR running Linux, and the RP2040.