An Adjustable High-Voltage Power Supply Built With Safety In Mind

It’s not entirely clear why [Advanced Tinkering] needs a 50,000-volt power supply, but given the amount of work he put into this one, we’re going to guess it will be something interesting.

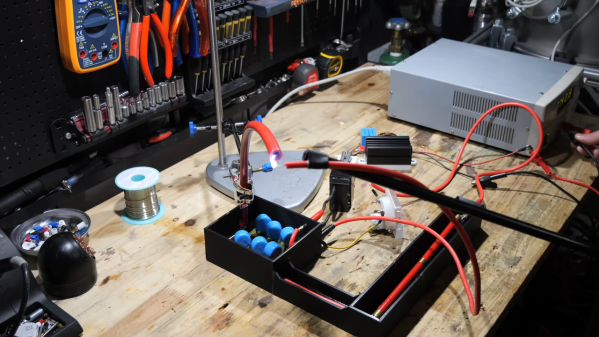
The stated specs for this power supply are pretty simple: a power supply that can be adjusted between 20kV and 50kV. The unstated spec is just as important: don’t kill yourself or anyone else in the process. To that end, [Advanced] put much effort into making things as safe as possible. The basic architecture of the supply is pretty straightforward, with a ZVS driver and an AC flyback transformer. Powered by a 24-volt DC supply and an adjustable DC-DC converter, that setup alone yields something around 20kV — not too shabby, but still far short of the spec. The final push to the final voltage is thanks to a three-stage Cockcroft-Walton multiplier made with satisfyingly chunky capacitors and diodes. To ensure everything stays safe in the high-voltage stage, he took the precaution of potting everything in epoxy. Good thing, too; tests before potting showed arcing in the CW multiplier despite large isolation slots in the PCB.

Aside from the potting, some really interesting details went into this build, especially on the high-voltage side. The 3D-printed and epoxy-filled HV connector is pretty cool, as is the special wire needed to keep arcs at bay. The whole build is nicely detailed, too, with care taken to bond each panel of the rack-mount case to a common ground point.

It’s a nice build, and we can’t wait to see what [Advanced Tinkering] does with it. In the meantime, if you want to get up to speed on handling high voltage safely, check out our HV primer.

Continue reading “An Adjustable High-Voltage Power Supply Built With Safety In Mind”

[Thomas Sanladerer] Gets New Threads

If you do much practical 3D printing, you eventually need some sort of fastener. You can use a screw to bite into plastic. You can create a clearance hole to accommodate a bolt and a nut or even build in a nut trap. You can also heat-set threaded inserts. Which is the best? [Thomas] does his usual complete examination and testing of the options in a recent video you can watch below.

[Thomas] uses inserts from [CNCKitchen] and some cheap inserts for 3D printing and some for injection molding. There are differences in the configuration of the teeth that bite into the plastic. [Thomas] also experimented with thread adapters that grab a 3D-printed thread.

Continue reading “[Thomas Sanladerer] Gets New Threads”

Seeing Fireworks In A Different Light

If you’re worried that [Roman Dvořák]’s spectroscopic analysis of fireworks is going to ruin New Year’s Eve or the Fourth of July, relax — the science of this build only adds to the fun.

Not that there’s nothing to worry about with fireworks, of course; there are plenty of nasty chemicals in there, and we can say from first-hand experience that getting hit in the face and chest with shrapnel from a shell is an unpleasant experience. [Roman]’s goal with this experiment is pretty simple: to see if it’s possible to cobble together a spectrograph to identify the elements that light up the sky during a pyrotechnic display. The camera rig was mainly assembled from readily available gear, including a Chronos monochrome high-speed camera and a 500-mm telescopic lens. A 100 line/mm grating was attached between the lens and the camera, a finding scope was attached, and the whole thing went onto a sturdy tripod.

From a perch above Prague on New Year’s Eve, [Roman] collected a ton of images in RAW12 format. The files were converted to TIFFs by a Python script and converted to video by FFmpeg. Frames with good spectra were selected for analysis using a Jupyter Notebook project. Spectra were selected by moving the cursor across the image using slider controls, converting pixel positions into wavelengths.

There are some optical improvements [Roman] would like to make, especially in aiming and focusing the camera; as he says, the dynamic and unpredictable nature of fireworks makes them difficult to photograph. As for identifying elements in the spectra, that’s on the to-do list until he can find a library of spectra to use. Or, there’s always DIY Raman spectroscopy. Continue reading “Seeing Fireworks In A Different Light”

A Look Inside The Smallest Possible PNG File

What’s inside a PNG file? Graphics, sure. But how is that graphic encoded? [Evan Hahn] shows you what goes into a single black pixel inside a 67-byte file. Why so many bytes? Well, that is exactly what the post is about.

You had to guess there is some overhead, right? There is an 8-byte header. Next up is a 25-byte metadata block. That single pixel takes 22 bytes, and then there is a 12-byte marker for the end of file. Turns out, you could put a bit more in the file, and would still take 67 bytes. The metadata is in a chunk — a block of data with a type, length, and CRC. That’s why it takes 25 bytes to store the dimensions of the image. A chunk has to be at least 12 bytes long. The metadata includes the image dimensions, the bit depth, and so on.

The next chunk, of course, is the data. The data is compressed, but in the case of one pixel, compression is a misnomer. There will be ten data bytes in the data chunk. That doesn’t include the 12 bytes of the chunk overhead so that one pixel takes a whopping 22 bytes.

The end of file marker is another chunk with no data. The total? 67 bytes. However, you can add more than one bit and still wind up with 67 bytes. For all the details, check out the post.

Luckily, it is easy to pronounce PNG. You can even use the format for circuit simulation.

1D Fireworks Are Nice And Quiet

Maybe you do it out of respect for the dogs and parents of young children in the neighborhood. Or maybe you do it because they’re harmful to the environment, or just because it’s too darn cold outside. Whatever your reasoning for not setting off fireworks, don’t fret — you can probably put together your own silent one-dimensional “fireworks” display from what you’ve got in the parts bin.

[Daniel Westhof]’s design is simple, requiring little more than a Wemos D1 Mini and a strip of WS2812 LEDs. Once activated, a red rocket shoots up from the ground and detonates, sending lights in both directions on the strip to imitate the bombs bursting in air. It’s controlled with a small push button switch, and there’s a deliciously large red LED indicator that shows the thing is ready for detonation.

You might be surprised to find that there’s a wide array of 1D gaming and animation projects out there, many of which made possible by the ubiquitous addressable RGB LED strip. We’ve seen a dungeon crawler, at least two different versions of the classic PONG, and even the makings of a simplified Wolfenstein.

New Year’s Resolutions

As we stand here looking at the brand-new year ahead, we find ourselves taking stock, and maybe thinking how we can all be better people in the next year. More exercise, being nicer to your neighbors, consuming more or less of this or that, depending on whether it’s healthy or un. Those are the standard fare. But what’s your hacker new year’s resolution?

Mine, this year, is to branch out into a new microcontroller family, to learn a new toolchain, and maybe to finally dip my toes into Bluetooth Low Energy. Although that last one is admittedly a stretch.

But the former is great resolution material, if you allow me. New programming tooling is always a little unpleasant to set up, but there’s also payoff at the end of the ordeal. It’s a lot like picking up a new exercise – it makes you stronger. Or course, it helps to have an application in mind, the equivalent of that suit you want to be able to fit into at the end of the diet. I’ve got one. I’ve also been out of programming in straight C for a year or so, and I’m faced with a new HAL, so there’s bound to be enough of a challenge to make it worthwhile.

Honestly, I’m looking forward to getting started, but with the usual mix of optimism, over-optimism, and mild dread. It’s the perfect setup for a resolution! What’s yours?

(And yes, the art is from another story, but setting up a good backup regime isn’t a bad resolution either.)

No DAC? Try PDM

Ever notice that the ESP32-S3 doesn’t have a digital-to-analog converter? [Chris] did and asserts that he doesn’t care because he can just use the PDM system to get the same result. PDM — pulse density modulation — is similar to PWM and, like PWM, requires a filter that could range from a simple RC network to an active filter. You can see the result in the video below.

There are several ways [Chris] could produce the output he wanted. PWM was one choice, and some example code uses a timer to do PDM. However, that is not very efficient. The other alternative is to use the I2S output. However, this does require a few workarounds.

In particular, the I2S output is always stereo and incorporates a clock output that isn’t needed for this application. [Chris] simply output the same value on both channels and routed the clock to some pins that are normally used for startup options. That means they can’t easily be used for your own inputs, but it’s OK to use them for unimportant outputs.

We always enjoy seeing solutions like this because it can give you ideas for use in your own projects. Of course, this won’t apply to every project where you need a DAC, but it still might give you some ideas.

We have looked at PDM before. You could, too, build your own DAC hardware.

Continue reading “No DAC? Try PDM”