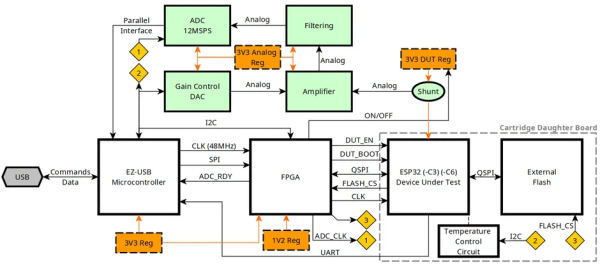
One of the PCB projects involved being held in the author's hands - a large-ish green board, with two Pi Picos visible on it

RP2040 And 5V Logic – Best Friends? This FX9000P Confirms!

Over the years, we’ve seen some modern microcontrollers turn out to be 5V-tolerant – now, RP2040 joins the crowd. Half a year ago, when we covered an ISA card based on a Pi Pico, [Eben Upton] left a comment saying that RP2040 is, technically, 5V tolerant for GPIO input purposes. The datasheets don’t state this because the reality of 5V tolerance isn’t the same as for natively 5V-tolerant chips – for instance, it doesn’t extend all the way to 5.5V for it to be ‘legally’ 5V-tolerant, as in, what 5V tolerance typically means when mentioned in a datasheet.

Having read that comment, [Andrew Menadue] has set out to test-drive the RP2040 GPIO capabilities, in a perfectly suited real-world scenario. He’s working with retro tech like Z80-era computers, using RP2040 boards for substituting entire RAM and ROM chips that have died in his FX9000P. Not only do the RP2040-driven replacements work wonders, using RP2040 boards also turns out to be way cheaper than sourcing replacements for chips long out of production!

Previously, [Andrew] used level shifter chips for interfacing the RP2040 with 5V systems, but he’s rebuilt a few designs of his without level shifters for the sake of this experiment. Now, he reports that, so far, those boards have been running long-term without problems. Together with [Eben]’s comment, this instills confidence in us when it comes to our RP2040 forays and 5V inputs.

There are a number of important caveats to this, that you should read up on. Some major points – certain GPIOs (like ADC ones) can’t take it, the GPIOs aren’t 5V-tolerant when set to output, and you shouldn’t feed the GPIOs 5V when the RP2040’s VDDIO is not powered up. [Andrew] points out one such case himself – one board of his has shed all level shifters except for the 8-bit address bus, which is driven by either the CPU or the RP2040 at different times, and that would result in 5V on an output-set GPIO when contention happens. All in all, if you’re working with 5V logic and your application is more hacking than business-critical stuff, you can shed the level shifters, too.

Continue reading “RP2040 And 5V Logic – Best Friends? This FX9000P Confirms!”

Kitchen timer project in a angled green 3d printed case with a 7 segment display and knob.

Printing A Brutalist Kitchen Timer

A kitchen timer is one of those projects that’s well defined enough to have a clear goal, but allows plenty of room for experimentation with functionality and aesthetics. [Hggh]’s exploration of the idea is a clean, Brutalist kitchen timer.

The case for [Hggh]’s kitchen timer is 3D printed with openings for a TM1637 four digit, seven segment display and for a KY-040 rotary encoder with knob attached. The internals are driven by an ATmega328P powered from a 18650 cell with a DW01-P battery protection chip and a TP4056 chip for charging. On the back of the case is a power switch and USB-C connector for power. It looks like the 3D printed case was sanded down to give it a smooth matte surface finish.

All the project files, including the STLs, OpenSCAD code, and KiCAD design, are available on GitHub. This Brutalist kitchen timer project is a nice addition to some of the kitchen timers we’ve featured in the past, including a minimalist LED matrix timer and a Nixie timer with keypad.

Could 1080p Video Output From The RP2040 Be Possible?

Modern microcontrollers often have specs comparable with or exceeding early gaming consoles. However, where they tend to fall short is in the video department, due to their lack of dedicated graphics hardware. With some nifty coding, though, great things can be achieved  — as demonstrated by [TEC_IST]’s project that gets the RP2040 outputting 1080p video over HDMI.

The project builds on earlier work that saw the RP2040 outputting digital video over DVI. [TEC_IST] realized that earlier methods already used up 30% of the chip’s processing power just to reach 320×240 output. To get to 1080p resolution would require a different tack. The idea involved using the 32-bit architecture of the RP2040 to output a greater data rate to suit the higher resolution. The RP2040 can do a 32-bit move instruction in a single clock cycle, which, with 30 GPIO pins, would be capable of a data rate of 3.99 Gbits/second at the normal 133 MHz clock speed. That’s more than enough for 1080p at 60 Hz with a 24-bit color depth.

Due to the limitations of the chip, though, some extra hardware would be required. [TEC_IST] has drawn up a design that uses external RAM as a framebuffer, while using shift registers and other supporting logic to handle dumping out signals over HDMI. This would just leave the RP2040 to handle drawing new content, without having to redraw existing content every frame.

[TEC_IST] has shared the design for a potential 1080p HDMI output board for the RP2040 on GitHub and is inviting comment from the broader community. They’re yet to be built and tested, so it’s all theoretical at this stage. Obviously, a lot of heavy lifting is being done off-board the microcontroller here, but it’s still fun to think of such a humble chip doing such heavy-duty video output. Continue reading “Could 1080p Video Output From The RP2040 Be Possible?”

Cold War Military Telephones Now Usable Thanks To DIY Switch Build

The TA-1042 is the most badass looking telephone you’ll ever see. It’s a digital military telephone from the 1980s, but sadly non-functional unless it’s hooked up to the military phone switches it was designed to work with. These days, they’re really only useful as a heavy object to throw at somebody… that is, unless you had the suitable supporting hardware. As it turns out, [Nick] and [Rob] were able to whip up exactly that.

Their project involved implementing the TA-1042’s proprietary switching protocol on a Raspberry Pi Pico. The microcontroller’s unique Programmable I/O subsystem proved perfect for the task. With a little programming and a hat for the Pico to interface with the hardware, they were able to get the TA-1042 working as intended. It involved learning how to encode and decode the Manchester encoded data used by the Digital Non-secure Voice Terminal equipment. Notably, the TA-1042 isn’t the only phone you can use with this setup. You can also hook up other US military DNVT phones, like the TA-954 or TA-1035.

If you want this hardware for yourself, you can simply buy one of [Nick] and [Rob]’s DNVT switches from Tindie. Alternatively, you can roll your own with the source code provided on GitHub.

We’ve seen these phones before repurposed in an altogether different fashion. We’ve also taken a deep dive into the details of the military’s AUTOVON network.

Continue reading “Cold War Military Telephones Now Usable Thanks To DIY Switch Build”

A 1960s Copal flip clock

Classic 1960s Flip Clock Gets NTP Makeover

Many of the clocks we feature here on Hackaday are entirely built from scratch, or perhaps reuse an unusual display type. But sometimes, an old clock is just perfect as it is, and only needs a bit of an upgrade to help it fit into the modern world. One such example is the lovely 1960s Copal flip clock (in German, Google Translate link) that [Wolfgang Jung] has been working with — he managed to bring it squarely into the 21st century without changing its appearance one bit.

Like most flip clocks from the 60s and 70s, the Copal clock uses a small synchronous AC motor to advance the digits. Because this motor runs in step with the mains frequency, it also acts as the clock’s timing reference. However the original motor had died, and a direct replacement was impossible to find. So [Wolfgang] decided to replace it with a modern stepper motor. He designed a small PCB that fit the original housing, on which he placed a Trinamic TMC2225 stepper motor driver, a Wemos D1 Mini and a small 5 V power supply.

A flip clock mechanism with a PCB attached to itThanks to its WiFi connection, the D1 can find out the correct time by contacting a Network Time Protocol (NTP) server. Displaying that time would be tricky with the original hardware though, because there is no indication of which numbers are displayed at any time. [Wolfgang] cleverly solved this problem by placing an IR proximity sensor near the lowest digit, allowing the D1 to count the number of digits that have flipped over and thereby deduce the current state of the display.

There’s plenty of fun to be had with classic flip clocks like this, and with a bit of hacking any old split-flap display should be usable for your own clock project. If none are available at your local thrift store or yard sales, you can always roll your own.

Coffee Grinder Gets Bluetooth Weighing

Some people take their coffee grinding seriously. So what do you do when the hot new grinders automatically weigh coffee, and yours doesn’t? Well, if you are like [Tech Dregs] and the rest of us, you hack your existing grinder, of course. The link is to the source code, but for a quick overview, check out the video below.

In true hacker fashion, the first order of business was to pull a load cell out of a cheap scale. Originally, he intended to reuse the processor inside, too, but it was epoxied, so it was a good excuse to use some more modules. A load cell amplifier, an OLED display, and a tiny Xiao processor, which he describes as “ridiculous.” From the context, we think he means ridiculously small in the physical sense and ridiculously powerful for such a tiny board.

With the modules, the wiring wasn’t too hard, but you still need some kind of app. Thanks to App Inventor, an Android app was a matter of gluing some blocks together in a GUI. Of course, the devil is in the details, and it took a lot of “focused cursing” to get everything working correctly.

The coffee grinder has a relay to turn the motor on and off, so that’s the point the scale needs to turn the motor on and off. Conveniently, the grinder’s PCB had an unpopulated pin header for just this purpose.

This is one of those simple projects you can use daily if you drink coffee. We are always impressed that the infrastructure exists today and that you can throw something like this together in very little time without much trouble.

WiFi hacking coffee makers is a popular Java project in these parts. Upgrading a machine can get pretty serious with PID control loops and more.

Continue reading “Coffee Grinder Gets Bluetooth Weighing”

E-Paper Wall Paper

Just like the clock clock of old, there’s something magical about a giant wall of smaller pieces working together to make a larger version of that thing. The E-Paper Wall 2.0 by [Aaron Christophel] is no exception as it has now upgraded from 2.9″ to 7.4″ screens.

On the 1.0 version, the bezels made it harder to make out the image. The larger screens still have bezels but the larger screen area makes it much easier to make out the image. 3D-printed clips hold the displays onto a plywood backer. We can marvel that e-ink price tags brought the price of e-ink down so that building a wall is still expensive but not eye-wateringly so. The 5×9 array likely uses a module sold on DigiKey for $47 each.

So aside from being willing to drop some money on a custom piece of art, what’s special about this? The real magic comes with the firmware and tooling that [Aaron] developed to flash custom firmware onto each of the 45 displays. A 100MHz ZBS243/SEM9110 8051-based controller lives inside each display and [Aaron] even has a Ghidra plugin to reverse-engineer the existing firmware. It only has 64kb of flash onboard, so [Aaron] devised a clever compression technique that enabled him to store complex images on the displays. A 3D-printed jig with pogo pins means flashing them doesn’t require soldering pins or headers, just drop it on and flash it with an Arduino with a helpful library [Aaron] wrote. A central station communicates with the various displays over ZigBee to send image updates.

The 8051 has a funny way of showing up in projects like this portable soldering iron or the TV Guardian. In many ways, it is a boon for us hackers as it makes it easier to reverse engineer and write new custom firmware when so many devices use the same architecture.

Continue reading “E-Paper Wall Paper”