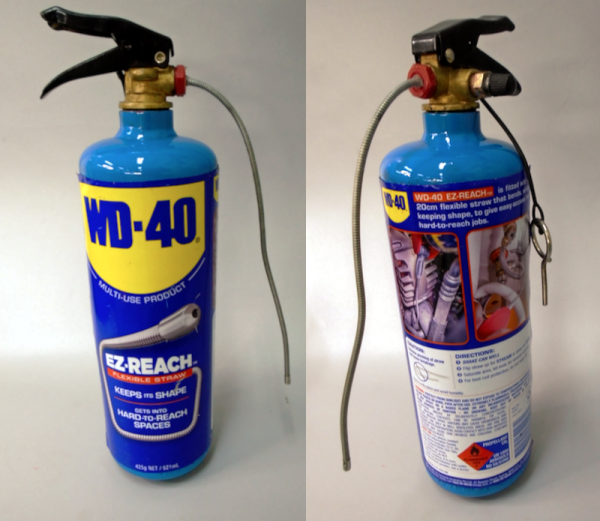
The Bright Side Of The Moon Lamp: It’s Any Colour You Like

One of the easiest ways to get into hardware hacking is by piecing together a few modules and shoehorning them into a really cool home. For example, why buy a commercial moon lamp when you can spend 30+ hours printing your own, and a few more hours hacking the guts together?

[Amit_Jain] was inspired by a project that combined a color map and bump map of the moon into a highly-detailed printable model. Displeased with the lack of features like portability and pretty colors, [Amit] took it to the next level by designing a threaded cap that unscrews to show the streamlined guts of an off-the-shelf RGB LED controller.

[Amit] freed the controller board from its plastic box and soldered the LED strip’s wires directly to it. For power, [Amit] taped the board to the battery from an old cell phone and stepped it up to 12 V with a boost converter. We think this looks quite nice and professional, especially with the stand. A brief demo is on the rise after the break.

If you’ve got the room for a much, much larger light-up moon, you should go for it.

Continue reading “The Bright Side Of The Moon Lamp: It’s Any Colour You Like”

Sensing Danger With Spinach

Do you need more proof that we’re living in the future? A group of MIT engineers have found a way for spinach, aka Popeye’s favorite short-term strength booster, to send potentially lifesaving emails regarding explosives in the area.

As the team outlined in a paper published in 2016, the field of plant nanobionics uses nanotechnology to enhance the natural abilities of plants and make them do new tricks. Here’s how this one works: the roots of the spinach plants absorb nitroaromatic compounds such as picric acid from the groundwater, and these transpire up through the stem and into the leaves along with water and other nutrients. When the compounds reach the leaves, they accumulate in the plants’ mesophyll — the inner tissue of the leaves.

A pair of sensors made of single-walled carbon nanotubes are built into the leaves. One sensor is engineered to detect nitroaromatic compounds using near-infrared fluorescent emission, and the other is used as a reference signal. As the the compounds build up in the mesophyll, the IR signal gets stronger. This change is detected by a camera, which triggers an email alert to the researchers within a matter of minutes. After running the experiments with a fancy-pants indium-gallium-arsenide camera, the researchers were able to duplicate the results using a Raspberry Pi and a CCD camera module with the infrared filter removed.

Plants have an ear to the groundwater like none other and absorb a lot of information about the environment around them, so the researchers believe that detecting explosive materials is only the beginning — they could also be harbingers of pollution and other environmental concerns.

Even if there is no threat of landmines in the vicinity, weeds are a problem everywhere. There’s a Raspberry Pi-based solution for those, too.

Cap-Gun Lighter Built From Scratch

For most of us, a lighter is a cheap $2 plastic tool that serves a purpose, and little more. Some of us may go so far as to have a nice Zippo, or perhaps a windproof lighter for better outdoor performance. But if you’re a machinist, you could consider whipping yourself up something special, like this build by [W&M Levsha].

There’s plenty to love here for those who love making chips. The body is crafted out of brass and copper, soldered together by blowtorch. The lighter works by an unusual mechanism. The fluid tank is stuffed with cotton wool and filled with lighter fluid, which feeds a wick, which by itself, is fairly ordinary. However, ignition is via a spring-loaded aluminium hammer, which fires off a paper cap, igniting the wick. The flame can then be extinguished by blowing it out.

It’s a lighter that’s sure to be a conversation piece, though we wonder how welcome it’s cracking report will be at a quiet, reserved cigar bar. The mechanism may have more consumables than a typical lighter, but that’s the price paid to be truly unique. There are other creative designs out there too, like this lighter which uses a platinum catalyst for ignition. Video after the break.

Continue reading “Cap-Gun Lighter Built From Scratch”

Building A Continuously Variable Transmission With Lego

The first continuously variable transmission fitted to an automobile actually has its roots in the late 19th century, though the technology has only become popular in the last two decades or so. While a relatively complex technology in its modern automotive form, it’s still possible to illustrate the basic principles with everyone’s favourite mechanical learning toy – Lego.

The transmission as built isn’t great at high torque delivery, as the belt tends to slip on the smooth plastic of the cones. Increasing friction would help.

The build consists of a Lego motor driving the transmission’s input shaft, upon which a cone is mounted. A similar cone is mounted on the output shaft, and a rubber belt stretched between the two. With the cones mounted in opposing directions, the gear ratio can be continually varied by changing where upon the cones the belt rides. By riding on the small diameter section of the input cone, the belt correspondingly rides on the large diameter section of the output cone, leading to a slower, high torque output. By sliding the belt to the other end of the cone, the ratios are reversed, leading to high output speed with less torque.

The demonstration works somewhat differently than modern automotive models, but the basic concept is the same. It’s also limited in its torque transfer ability by the coefficient of friction of the plastic Lego parts. Despite this, it’s a quick way to illustrate the mechanisms at play, and where some of the common losses are in such a system. If you prefer your gearboxes of a more classic sequential design, we’ve seen those too, of course. Video after the break.

Continue reading “Building A Continuously Variable Transmission With Lego”

Reverse-Engineering An Elevator Control Panel Results In Clicky Goodness

We have to admit that in the hardware hacking universe, there aren’t generally too many chances to hack elevators. Well, at least not opportunities that don’t also include the risk of incarceration. But fortune favors the bold, and when he found the remains of an elevator control panel in an abandoned Croatian resort hotel, [Davor Cihlar] undertook an extensive and instructive reverse-engineering of the panel.

The video below highlights his efforts, which were considerable given the age and state of the panel. This is a relay-only control panel, after all, with most of the relays missing and a rat’s nest of wires connecting the sockets. So [Davor] put his “RevIng” concept to work. This uses a custom PCB with a microcontroller on-board that plugs into each relay socket and probes the connections between it and every other socket. Very clever stuff, and it presented him with the data needed to develop a ladder-logic diagram of the board, with the help of some custom software.

With the original logic in hand, [Davor] set about building a simulator for the panel. It’s a lovely piece of work, with buttons and lights to mimic the control panel inside the elevator car, as well as the call stations that would have graced each lobby of the hotel. Interestingly, he found logic that prevented the elevator from being called to some floors from anywhere but inside the car. The reason remains a mystery, but we suppose that a hotel built by Penthouse publisher [Bob Guccione] would have plenty of secrets.

We love the supremely satisfying clickiness of this build, and the reverse engineering prowess on display, but we can’t find much practical use for something like this. Then again, DIY elevators are a thing.

Continue reading “Reverse-Engineering An Elevator Control Panel Results In Clicky Goodness”

Mechanical Seven-Segment Display, Smaller And Better Than The Original

One thing we love here at Hackaday is when we get to track the evolution of a project over time. Seeing a project grow over time is pretty typical — scope creep is real, after all. But watching a project shrink can be a real treat too, as early versions get refined into sleeker and more elegant solutions.

This slimmed-down mechanical seven-segment display is a perfect example of that downsizing trend. When we saw [IndoorGeek]’s first vision of an electromechanical display, it was pretty chunky. Then as now, each segment is a 3D-printed piece with a magnet attached to the rear. The segments hover over solenoid coils, which when energized repel the magnet and protrude the segment, forming the desired digit. The old version used large, hand-wound coils, though, making the display pretty bulky front to back.

Version 2 of the display takes a page from [Carl Bugeja]’s playbook and replaces the wound coils with PCB coils. We’ve seen [Carl]’s coils on both rigid substrates and flex PCBs; [IndoorGeek] used plain old FR4 here. The coils occupy four layers so they have enough oomph to extend and retract each segment, and the PCB includes space for H-bridge drivers for each segment. The PCB forms the rear cover for the display, which is also considerably slimmed down for this version. What’s the same, though, is how good this display looks, especially with strong side-lighting — the shadows cast by the extended segments are striking against the plain white face of the display.

Congratulations to [IndoorGeek] on a great-looking build and a useful improvement over the original.

Continue reading “Mechanical Seven-Segment Display, Smaller And Better Than The Original”

Sewage Maceration Is As Gross As It Sounds

Day to day, few of us really contemplate what’s happening on a deep, mechanical level when we use the toilet. The business is done, the toilet is flushed, and we go about our day. However, the magnificent technology of indoor sanitation should not be sniffed at, given the manner in which it facilitates a cleaner, more comfortable existence for us all.

The vast majority of flush toilets rely on the benefit of gravity to remove waste from the house. This necessitates that the toilet be installed above the sewage lines that exit the house. For most installations at ground floor and above, this isn’t a problem. However, on occasions you may encounter basements or houses with rooms at lower levels where a regular toilet simply won’t work. Obviously, a pump is in order, but human sewage being a mixture of liquids and solids makes this impractical. Instead, it must be turned into a slurry that can be pumped; a process known as sewage maceration. Buckle up!

Continue reading “Sewage Maceration Is As Gross As It Sounds”