Cooking Eggs With Hand Warmers

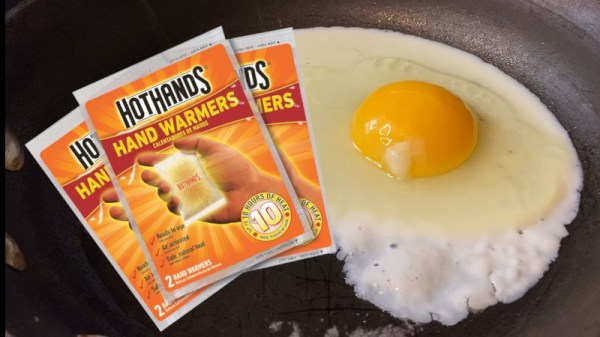
Handwarmers are great to keep your fingers functional in icy weather, but can they do more? [Greg] wondered if they could be put to good use cooking an egg, and got down to work.

The handwarmers in question are the HotHands brand, based on an iron chemistry. The warmers create their heat from the exothermic reaction between iron and oxygen that creates rust. Thus, these handwarmers need plenty of airflow to heat up. To enable this, [Greg] 3D printed a small crate with plenty of vents, into which he stacked six hand warmer sachets. An egg was nestled in the center – a perfect choice as it can be cooked in its own packaging. The pile reached temperatures of 160 F and was able to maintain that level for an hour, important as egg proteins tend to start coagulating and denaturing around 150 F. Once removed, [Greg] hoped to find a solid egg, but instead was rewarded with a somewhat gooey, semi-solid result instead. Regardless, the egg had reached an elevated temperature and shown some signs of cooking, and as [Greg] appears to be still putting out videos, we’ll assume he hasn’t yet died of salmonella.

We’d love to see this turn into an engineering competition, though, with prizes for the best cooked egg with the least amount of handwarmers. We’ve featured other egg cooking apparatus before, too. Video after the break.

Continue reading “Cooking Eggs With Hand Warmers”

Hacking Hardware Bitcoin Wallets: Extracting The Cryptographic Seed From A Trezor

It’s long been common wisdom that one of the safest places to keep your cryptocurrency holdings is in a hardware wallet. These are small, portable devices that encrypt your keys and offer a bit more peace of mind than holding your coins in a soft or web wallet.

But of course, as we know, nothing is totally secure.

And we were reminded of this fact by Kraken Security Labs, when they showed us how they bypassed all of the safeguards in a popular wallet, the Trezor, to dump and decrypt it’s seed.

It’s worth noting that the hack does require physical access to the wallet — albeit only about fifteen minutes worth. And by “physical access” we mean that the hack leaves the device thoroughly mutilated. The Kraken team started by desoldering the heart of the wallet, a STM32 processor. They then dropped it into a socket on an interface board, and got to glitching.

The hack relies on an attack known as voltage glitching. Essentially, at a precisely-timed moment during the device’s boot sequence, the supply voltage is fluctuated. This enables the chip’s factory bootloader, which can read out the contents of it’s onboard flash memory. The memory is read-protected, but can be accessed 256 bytes at a time through a second voltage glitch. Neither of these attacks work 100% of the time, so if the device fails to boot or the memory remains locked, the FPGA performing the attacks simply tries again. After enough iterations, the Kraken team was able to fully dump the chip’s flash memory.

Continue reading “Hacking Hardware Bitcoin Wallets: Extracting The Cryptographic Seed From A Trezor”

Bike Wheel Light Flashes Just Right

When it comes to safely riding a bike around cars, the more lights, the better. Ideally, these lights would come on by themselves, so you don’t have to remember to turn them on and off every time. That’s exactly the idea behind [Jeremy Cook]’s latest build — it’s an automatic bike light that detects vibration and lights up some LEDs in response.

The build is pretty simple — a coin cell-powered ATtiny85 reads input from a spring vibration sensor and flashes the LEDs. This is meant to complement [Jeremy]’s primary bike light, which is manually operated and always on. We especially like that form follows function here — the board shape is designed to be zip-tied to the spokes so it’s as close to the action as possible. He cleverly used cardboard and a laser cutter to mock up a prototype for a board that fits between the spokes. Pretty cool for your second professionally-fabbed PCB ever, if you ask us. Ride past the break to check out the build video.

If you don’t think fireflies on your spokes are enough to keep you safe, go full rainbow party bike.

Continue reading “Bike Wheel Light Flashes Just Right”

Twisted Tea Launcher Refreshes At 104 MPH

A few weeks ago, a video went viral on social media that depicted a rather unsavory individual receiving what could be described as a “percussive reminder” of social norms courtesy of a bystander armed with a can of Twisted Tea. The video served as inspiration for many a meme, but perhaps none more technically intricate than this air cannon that launches 24 ounces of hard iced tea at better than 100 miles per hour built by [Greg Bejtlich].

It’s all fun and games until somebody brings out the weaponized bead seater.

Technically we’re looking at two different hacks here. The first is the pneumatic launcher put together using a low-cost eBay tire bead seater. These tools are designed to unleash a large volume of air into a tire so it can be properly seated onto the rim, but it doesn’t take much more than a few pieces of PVC pipe from the hardware store to turn it into an impromptu mortar. It’s even got a convenient trigger and a handle to help control the recoil. Though as you can see in the video after the break, it still ends up being a bit too energetic for [Greg] to keep a grip on.

For the projectiles, [Greg] has 3D printed a nose cone and tail fin that snap onto the 24 oz cans in hopes of making them more aerodynamically stable. The slow motion video seems to indicate they aren’t terribly effective, but they certainly look impressive. Spring-loaded control surfaces that deploy after the can leaves the muzzle could be the answer, though at some point you have to ask yourself how far you’re willing to go for an Internet meme.

It probably goes without saying that you definitely shouldn’t try firing cans of alcoholic iced tea off in your backyard. But the launcher itself might be useful for lofting antennas or hurling the occasional potato.

Continue reading “Twisted Tea Launcher Refreshes At 104 MPH”

Reverse-Engineering An Elevator Control Panel Results In Clicky Goodness

We have to admit that in the hardware hacking universe, there aren’t generally too many chances to hack elevators. Well, at least not opportunities that don’t also include the risk of incarceration. But fortune favors the bold, and when he found the remains of an elevator control panel in an abandoned Croatian resort hotel, [Davor Cihlar] undertook an extensive and instructive reverse-engineering of the panel.

The video below highlights his efforts, which were considerable given the age and state of the panel. This is a relay-only control panel, after all, with most of the relays missing and a rat’s nest of wires connecting the sockets. So [Davor] put his “RevIng” concept to work. This uses a custom PCB with a microcontroller on-board that plugs into each relay socket and probes the connections between it and every other socket. Very clever stuff, and it presented him with the data needed to develop a ladder-logic diagram of the board, with the help of some custom software.

With the original logic in hand, [Davor] set about building a simulator for the panel. It’s a lovely piece of work, with buttons and lights to mimic the control panel inside the elevator car, as well as the call stations that would have graced each lobby of the hotel. Interestingly, he found logic that prevented the elevator from being called to some floors from anywhere but inside the car. The reason remains a mystery, but we suppose that a hotel built by Penthouse publisher [Bob Guccione] would have plenty of secrets.

We love the supremely satisfying clickiness of this build, and the reverse engineering prowess on display, but we can’t find much practical use for something like this. Then again, DIY elevators are a thing.

Continue reading “Reverse-Engineering An Elevator Control Panel Results In Clicky Goodness”

Feeling The KiCad 6 Electricity

In 2018, when KiCad Version 5 modernized the venerable 4.X series, it helped push KiCad to become the stable and productive member of the open source EDA landscape that we know today. It has supported users through board designs both simple and complex, and like a tool whose handle is worn into a perfect grip, it has become familiar and comfortable. For those KiCad users that don’t live on the bleeding edge with nightly builds it may not be obvious that the time of version 6 is nearly upon us, but as we start 2021 it rapidly approaches. Earlier this month [Peter Dalmaris] published a preview of the changes coming version 6 and we have to admit, this is shaping up to be a very substantial release.

Don’t be mistaken, this blog post may be a preview of new KiCad features but the post itself is extensive in its coverage. We haven’t spent time playing with this release yet so we can’t vouch for completeness, but with a printed length of nearly 100 pages it’s hard to imagine [Peter] left anything out! We skimmed through the post to extract a few choice morsels for reproduction here, but obviously take a look at the source if you’re as excited as we are. Continue reading “Feeling The KiCad 6 Electricity”

Mechanical Seven-Segment Display, Smaller And Better Than The Original

One thing we love here at Hackaday is when we get to track the evolution of a project over time. Seeing a project grow over time is pretty typical — scope creep is real, after all. But watching a project shrink can be a real treat too, as early versions get refined into sleeker and more elegant solutions.

This slimmed-down mechanical seven-segment display is a perfect example of that downsizing trend. When we saw [IndoorGeek]’s first vision of an electromechanical display, it was pretty chunky. Then as now, each segment is a 3D-printed piece with a magnet attached to the rear. The segments hover over solenoid coils, which when energized repel the magnet and protrude the segment, forming the desired digit. The old version used large, hand-wound coils, though, making the display pretty bulky front to back.

Version 2 of the display takes a page from [Carl Bugeja]’s playbook and replaces the wound coils with PCB coils. We’ve seen [Carl]’s coils on both rigid substrates and flex PCBs; [IndoorGeek] used plain old FR4 here. The coils occupy four layers so they have enough oomph to extend and retract each segment, and the PCB includes space for H-bridge drivers for each segment. The PCB forms the rear cover for the display, which is also considerably slimmed down for this version. What’s the same, though, is how good this display looks, especially with strong side-lighting — the shadows cast by the extended segments are striking against the plain white face of the display.

Congratulations to [IndoorGeek] on a great-looking build and a useful improvement over the original.

Continue reading “Mechanical Seven-Segment Display, Smaller And Better Than The Original”