The dark winter months are still a bit ahead of us, but with night returning even to the northernmost places, it might be a good time to get your next mood lighting project started. Despite the ubiquitousness of LED strips, cave-time nostalgia makes it hard to beat the coziness of an actual flame here — well, assuming it’s a controlled flame. While modern LED candles do a decent enough job to fool you from a distance, there’s one apparatus they’ll have a hard time to replicate though: the Rubens’ tube. Tired of their usual straight pipe construct, [RyanMake] added some twists and turns to the concept and created a flexible Ruben’s tube made from semi-rigid aluminum ducts.
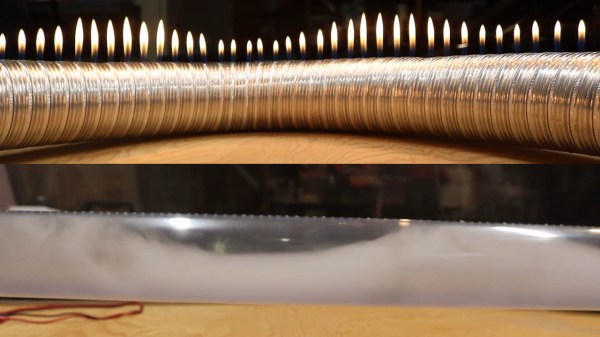
If you’re not familiar with the Rubens’ tube, it’s a combination of science, fun, and danger to visualize standing waves with fire by attaching a loudspeaker to a pipe with equally spaced holes that’s filled with flammable gas, and light it up. As the resulting visual effect depends on the audio signal’s wavelength, and by that the length of the tube itself, [RyanMake]’s flexible duct approach adds some variety to the usual fixed-length pipe versions of it. But that’s not all he did. After seeing the flames in person, he got curious about what’s actually going on inside that tube and decided to build another one, this time using a clear plastic tube and a fog machine. While the fog escapes the tube rather unimpressively (and could hardly compete with fire anyway), it gives a nice insight of what’s going on inside those tubes. See for yourself in the videos after the break.
Of course, no experiment is truly conducted without failure, and after seeing his first tube go up in flames several times, you should probably hold on to building one as decorative item for indoors. On the other hand, if shooting fire is what you’re looking for, you might be interested in this vortex cannon. And for some more twists on a standard Rubens’ tube, check out the two-dimensional Pyro Board.
Continue reading “A Song Of Fog And Fire – Taking A Look Inside A Rubens’ Tube”