Shipping is not a clean business. The global economy is fueled by trade, and much of that trade involves hauling product from point A to point B. A great deal of that product goes by water. Shipping it around uses a great deal of fuel, and creates a great deal of greenhouse gas emissions. It’s bad for the environment, and it’s costly for shipping companies.
Any gain in efficiency can be an edge in this regard, and beneficial for the planet to boot. Now, it appears that good old fashioned sails might just be the tool that companies need to clean up their fleets. And it’s not some theory—real world numbers back it up!
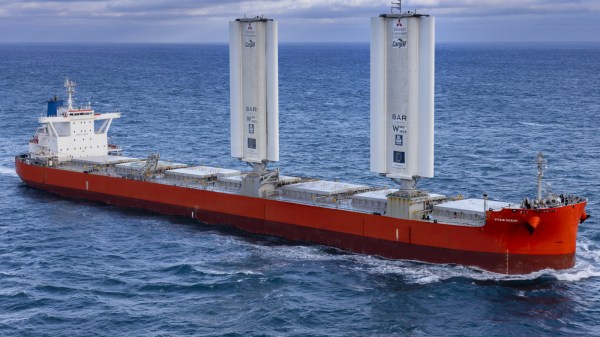
Where The Wind Takes You
Sea transport has been branded as a significant contributor to global greenhouse gas emissions, accounting for about 3% of the total. Shipping companies in turn are under increasing pressure to innovate and adapt, both for the good of the planet and their own coffers. It’s perhaps a small blessing that saving fuel and slashing emissions go hand in hand, and companies are desperate for any technology that can deliver on those goals.
Enter the WindWings, a revolutionary “wind assisted propulsion” concept developed by BAR Technologies. In partnership with ocean freight firm Cargill, these radical sails were installed aboard the Pyxis Ocean, a Kamsarmax bulk carrier chartered from Mitsubishi. These aren’t the canvas and rope constructs of yore . Instead, they’re a set of towering metal sails that stand 123 feet tall, designed to harness the wind’s power and propel the massive bulk carrier across the oceans. Continue reading “Giant Sails Actually Help Cargo Ships Save Fuel, And The Planet In Turn” →