
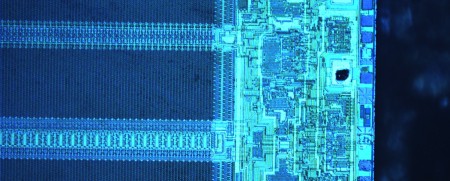
The Last HOPE is off and running in NYC. [Karsten Nohl] started the day by presenting The (Im)possibility of Hardware Obfuscation. [Karsten] is well versed in this subject having worked on a team that the broke the MiFare crypto1 RFID chip. The algorithm used is proprietary so part of their investigation was looking directly at the hardware. As [bunnie] mentioned in his Toorcon silicon hacking talk, silicon is hard to design even before considering security, it must obey the laws of physics (everything the hardware does has to be physically built), and in the manufacturing process the chip is reverse engineered to verify it. All of these elements make it very interesting for hackers. For the MiFare crack, they shaved off layers of silicon and photographed them. Using Matlab they visually identified the various gates and looked for crypto like parts. If you’re interested in what these logic cells look like, [Karsten] has assembled The Silicon Zoo. The Zoo has pictures of standard cells like inverters, buffers, latches, flip-flops, etc. Have a look at [Chris Tarnovsky]’s work to learn about how he processes smart cards or [nico]’s guide to exposing standard chips we covered earlier in the week.
Misc Hacks4161 Articles
Nodeblinky, Rechargeable And Full Of Blink
[youtube=http://www.youtube.com/watch?v=Si—o0fEto&hl=en&fs=1]
Over 2500 unique patterns and up to 25 hours of winky blinky fun, that’s what you get with Nodeblinky. This contraption was designed by the Image Node crew as a learning platform and a way to raise money for their upcoming Burning Man display.
The kit measures 4″ square and has 28 LEDs spread across its surface. An AVR ATmega168, rechargeable 9 volt battery, and two LED drivers power it. One section of their site states that it has over 2500 unique patterns, while another area says 5000 combinations of patterns. Either way, its pretty trippy as you can see in the video above. There are 4 brightness levels as well as 4 running modes to keep you amused. The kit can be purchased for $40 or the assembled unit for $80. They do freely give out all the details though, so if you really felt like building one yourself, you probably could.
Machine Embroidered LED Matrix
Our favorite electric textiles expert, [Leah Buechley], put together this machine embroidered LED matrix proof of concept. For the vertical rows, the top thread is conductive, while the thread on the underside (the bobbin) is not. For the horizontal rows, the the thread is swapped and the fabric acts as an insulator between the two layers of wiring. You can see a small brown bunch of thread next to each LED: this is the via to wiring on the backside of the fabric. The matrix is being controlled by a LilyPad Arduino. This is an interesting idea and has the potential to make prototyping wearable projects much faster. Here are two more pictures of the project.
Tennis For Two Resurrected

The first video game every created is attributed to physicist William Higinbotham. Tennis for Two is played on an oscilloscope using two controllers. Each one has a knob that controls the trajectory and a button to hit the ball. The fine folks at Evil Mad Scientist Laboratories have recreated the game so you can play it on any oscilloscope. An ATmega168 is used to control everything. It takes user input from the paddles and outputs an the X and Y analog signals for the scope. An R-2R style DAC is used for the output stage which gives a 256×256 resolution. Everything is built on top of one of their business card sized project boards-which really shows how useful such a simple board can be. The source code is free and the write up includes plenty of detail. We’d love to see what modifications people come up with since the base game doesn’t even have scoring. There’s a video of EMSL’s system embedded below.
Turn Any Motor Into A Servo With RepRaps New Board

[Zach] just let us know about a new board that’s available from the RepRap project. It uses an AS5040 magnetic rotary encoder to measure the absolute position of the rotor of whatever motor you’re using. This is actually pretty damn exciting. Powerful servo motors are expensive, but with one of these, you can use whatever motor you can get your hands on. Big DC motors are cheap, but even used DC servo motors expensive. Best of all, the encoder is open source and you can score a kit version for a paltry $20. Now we can make that 8 horse power servo…
Exposing And Photographing Silicon
Have you ever wanted to break open your IC and see where those pins really go? [nico] goes through his process of dissolving ICs to their core and photographing the tiny die. The technique involves liquefying the package in sulfuric acid until all the packaging material and pins are gone. He even explains how to use sodium bicarbonate (common baking soda) to neutralize the solution thus allowing for simple sink disposal. Although silicon hacking is generally done by funded hackers with a really nice lab, it is certainly possible to execute some of these techniques with limited equipment and chemical access. For instance, if you can’t get sulfuric acid, send your IC off to a failure analysis lab like MEFAS. For more information and stories on silicon hacking, check out [Chris Tarnovsky]’s process for hacking smartcards and [bunnie]’s talk Hacking silicon: secrets behind the epoxy curtain.
ATmega88 Webserver
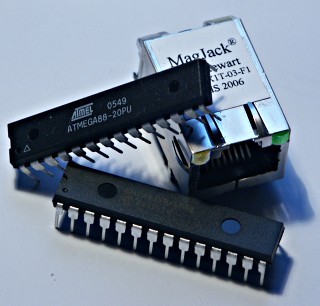
If you are an Atmel fan, you may enjoy this webserver built around the ATmega88. Since it has full TCP and HTTP support, communication can be done using a standard web browser on any system. We also noticed that the code uses AVR Libc and the processor can be replaced with an ATmega168, both used on the Arduino platform. Honestly, we think the most interesting part about this project is the firmware. The author has assumed that the webserver will only be sending one packet per request and the code is optimized for this setup. This leaves around 50% of the memory for the web application.
[via YourITronics]


