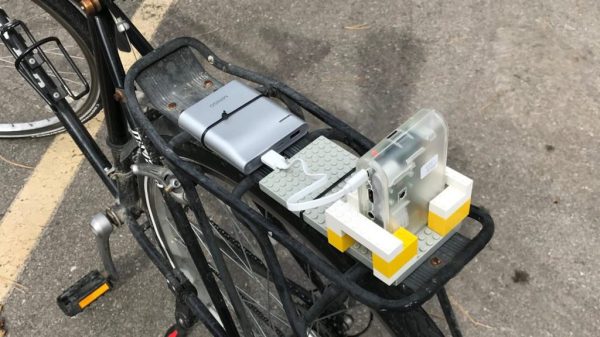
Klein Hidden Bolt and Tool

Tricky Screw Heads Have Disappearing Slots

Perhaps you’ve seen them, demonstrations of a machined piece of metal that upon further inspection is actually two pieces machined so perfectly that they appear as one. With extremely tight tolerances, it’s not possible to determine where one piece of metal ends and another begins — that is, until the secret is revealed. Inspired by such pieces of art, [Andrew Klein] sought to put this high level of machine work to practical use. And so it was that his as-yet-unnamed Screw With No Slot came to be.

Klein Hidden Bolt depressed by brass rod
A brass rod pushes down to reveal the keyed center section.

The screw’s disc-like appearance looks as if it’s a metal trim piece to cover a bolt hole. But in the video below [Andrew] shows us the trick, pushing a brass rod into the middle of the disc to reveal the hidden three-point slot. The center of the disk is actually a separate bit of finely machined metal that is spring loaded to stay flush. A specially designed wrench keys into the rounded concave triangle shape cut into the face.

The wrench is made with brass to avoid marring the precision surface. It uses three magnets to hold tight to the screw’s 410 magnetic stainless steel. [Andrew] didn’t spill the beans on how this was done, but we haven’t seen any process other than electrical discharge machining (EDM) that can achieve this level of mating precision. If that topic is new to you, we recommend checking out [Ben Krasnow’s] lab experiments on the topic.

We can’t help but be taken in by the beauty of the fastener, and it immediately sent our imaginations into a National Treasure induced dream-like state. [Andrew Klein] has yet to name this fastener, and he’s soliciting ideas for names in the video below the break. If you have such an idea, you can comment on his video. He’s also exploring the viability of the as-yet-named fastener as a commercial product for high end furniture builders.

This is not the first time we’ve featured [Andrew Klein]’s work. His previous featured projects include a custom sawblade for perfectly foldable joints and an unveiling of the magnetic magic behind switchable permanent magnets. Be sure to submit the neat hacks, builds, and inspiring projects that you come across to our Tip Line!

Continue reading “Tricky Screw Heads Have Disappearing Slots”

Line of electromechanical water valves dispensing a pattern of water droplets

Gravity-Defying Water Drop Display Shows Potential

[3DPrintedLife aka Andrew DeGonge] saw that advert for gatorade that shows some slick stop-motion animation using a so-called ‘liquid printer’ and wondered how they built the machine and got it to work so well. The answer, it would seem, involves a lot of hard work and experimentation.

Conceptually it’s not hard to grasp. A water reservoir sits at the top, which gravity-feeds into a a series of electromechanical valves below, which feed into nozzles. From there, the timing of the valve and water pressure dictate the droplet size. The droplets fall under the influence of gravity, to be collected at the bottom. From that point it’s a ‘simple’ matter of timing droplets with respect to a lighting strobe or camera shutter and hey-presto! instant animation.

As will become evident from the video, it’s just not as easy as that. After an initial wobble when [Andrew] realised that cheap “air-only” solenoids actually are for air-only when they rusted up, he took a slight detour to design and 3D print his own valve body. Using a resin printer to produce fine detailed prints, enabled the production of small internal passages including an ‘air spring’ which is just a small chamber of air. After a lot of testing, proved to be a step in the right direction. Whether this could have been achieved with an FDM printer, is open to speculation, but we suspect the superior fine detail capabilities of modern resin printers are a big help here.

In a nice twist, [Andrew] ripped open and dissolved a fluorescent marker pen, and used that in place of plain water, so when illuminated with suitably triggered UV LED strips, discernable animation was achieved, with an eerie green glow which we think looks pretty neat. All he needs to do now is upgrade the hardware to make a 3D array with more resolution, and he can start approaching the capability of the thing that inspired him. Work on some custom electronics to drive it has started, so this is one to watch in the coming months!

We’ve seen many water-based display device before, like this one that projects directly onto a thin stream of water, and this strangely satisfying hack using paraffin and water, but a full 3D Open Source display device seems elusive so far.

All project details can be found on the associated GitHub.

Continue reading “Gravity-Defying Water Drop Display Shows Potential”

Automating Pool Monitoring And Chemical Dosing

Anyone who has had a backyard pool will know that it only takes a little lapsed attention to turn the whole thing green. For those sick of having to stay on top of things, the idea of automating pool care may be attractive. This project from [Discreet Mayor] hopes to do just that.

Data is graphed for easy analysis using Grafana.

The project uses a TI SimpleLink wireless-enabled microcontroller to run the show, which allows data to be offloaded to a base station for graphing with Grafana. The system can monitor pH levels as well as ORP (oxidation/reduction potential) levels using probes attached via BNC connectors. Based on these readings, the device can dose chlorine into the pool as needed using a peristaltic pump driven by a TI DRV8426 stepper motor driver.

We’d want to keep a close eye on the system for some time, making sure it wasn’t over or underdosing the pool with chemicals. However, that’s easy enough to do when all the data is logged neatly in a web-accessible graph.

We’ve seen other hackers implement similar controls to their own pools, too. If you’ve been working on your own home automation projects, be sure to drop us a line.

A 2nd gen Amazon Echo Dot inside a 1980s answering machine.

An Echo Dot For The 1980s

There’s so much obsolete technology out there with great design. It’s really sad to see it end up in the landfill, because even though the insides may be outdated, good design is forever. Take this 1980s Panasonic answering machine, for instance. The smoky plastic of the cassette lid is the perfect screen for Dot, because it lets the light through while hiding the modernity of the thing in the process. Check it out in action after the break.

What [ehans_makes] has written is really more of an overall guide to repurposing old electronics and fighting e-waste in the process. First, they non-destructively figure out what needs to be done to both the old thing and the newer thing to get them to play nicely together — what 3D printed parts need to be added, what can be salvaged and reused from the old thing, and what parts of the old enclosure can be Dremeled away. In this case, [ehans_makes] ended up printing an adapter to be able to re-use the original speaker’s mounting points inside the answering machine, and printed a mount for the Dot as well. The STLs are available if you happen to find the same answering machine at your local thrift store or neighbor’s estate sale.

While we’ve always managed to hold on to the screws when we disassemble something, [ehans_makes] has an even better idea: draw a diagram of where they go, and tape the actual screws to the diagram as you remove them.

Some of the best designs never really existed, at least not on a commercial scale. If you can’t find a cool old enclosure, you can always build one yourself.

Continue reading “An Echo Dot For The 1980s”

You Can Build A Lego Rubik’s Cube

Rubik’s cubes are a popular puzzle — one found exciting or infuriating depending on your personal bent. [PuzzLEGO] has designed a LEGO Rubik’s cube, with the latest revision improving on flimsy earlier designs.

The first step was to design a core that would allow the cube to rotate freely without being too loose. This involved a lot of trial and error until [PuzzLEGO] found just the right combination of parts to do the job. From there, it was a matter of introducing the edge pieces and corner pieces without jamming everything up.

It took some experimenting to get everything moving together smoothly, but the end result is pretty impressive. It’s certainly not a build you’d use for speedcubing; the fragility meant that it took 20 minutes to solve just one face. [PuzzLEGO] hopes to make further improvements to increase playability.

If you want to replicate the feat, you’ll need plenty of little Lego bits and pieces, but it’s definitely a replicable build. Alternatively, consider using Lego to build a Rubik’s Solver, instead. Video after the break.

Continue reading “You Can Build A Lego Rubik’s Cube”

New Part Day: Raspberry Pi LEGO HAT

The Raspberry Pi Foundation have been busy little bees for the last couple of years producing their own silicon, new boards and now in collaboration with the LEGO Education team a new HAT to connect to the LEGO SPIKE education platform. This new HAT board will work with every Raspberry Pi board with a 40-pin GPIO header.

Based on the RPI2040 microcontroller, it makes an interesting detour away from dumb slave boards, although it looks like the firmware is closed (for now) so you’ll have to make do with the pre-baked capabilities and talk to it with the supplied python library.

According to the documentation, the communication between the Pi and the RPI2040 nestled beneath the HAT PCB is plaintext-over-serial, freeing up the majority of the GPIO pins for other uses. The board uses a surface mount pass-through type header which allows pins from the Pi to protrude through the PCB, allowing stacking more HATs on top. Curiously they decided to mount the PCB with active parts facing down, giving a flat rear surface to park things on. We suspect that decision was made to improve access to the LPF2 connectors, especially if they were surface mount parts.

Continue reading “New Part Day: Raspberry Pi LEGO HAT”

Smokeless Burn Barrel Makes Your Backyard Fire Much Cleaner

Old 55-gallon drums are often repurposed into fire barrels with the simple addition of a few holes cut into the walls. Generally, they’re fit enough for purpose but can have a very smoky output, particularly when overloaded.  However, this design from [Building Stuff Is Fun] combines two drums into one to create a barrel that burns far more efficiently with less smoke! (Video, embedded below.)

Note the vent holes feeding oxygen to the fire just before the barrel outlet.

Through some clever cuts and folding of steel, a single burn barrel is created from the original two that helps eliminate smoke entirely, through two clever design features. First of all, plentiful air is provided to the fire thanks to the intakes at the bottom of the barrel. Secondly, the barrel-in-barrel design, paired with some smart vents, helps provide fresh air to the fire just before it leaves the barrel. This extra oxygen supply helps create secondary combustion at the outlet which burns up all the matter that would normally be passed out as smoke.

The design involves a lot more work than just hacking some holes in an old drum, but the results are undeniably impressive. The output of the smokeless burn barrel looks far hotter and cleaner. We’ve seen similar designs used to supply workshop heat, too. Video after the break.

Continue reading “Smokeless Burn Barrel Makes Your Backyard Fire Much Cleaner”