Typically, electroplating is used to put coatings of one metal upon another, often for reasons of corrosion protection or to reduce wear. However, other conductive materials can be electroplated, as demonstrated by [Michaɫ Baran].
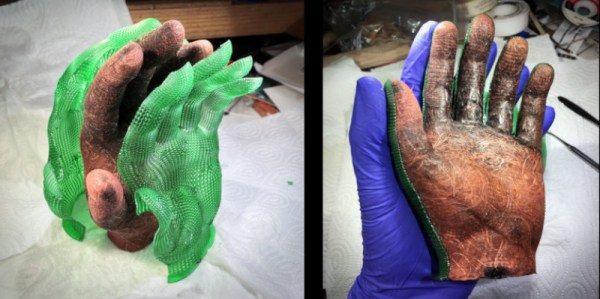
Finer details are sparse, but [Michaɫ’s] images show the basic concept behind producing a composite metal material hand sculpture. The initial steps involve 3D printing a perforated plastic shell of a hand, and stuffing it with carbon fibers. It appears some kind of plastic balls are also used in order to help fill out the space inside the hand mold.
Then, it’s a simple matter of dunking the plastic hand in a solution for what appears to be copper electroplating, with the carbon fiber hooked up as one of the electrodes. The carbon fibers are then knitted together by the copper attached by the electroplating process. The mold can then be cut away, and the plastic filling removed, and a metal composite hand is all that’s left.
[Michaɫ] has experimented with other forms too, but the basic concept is that these conductive fibers can readily be stuffed into molds or held in various shapes, and then coated with metal. We’d love to see the results more closely to determine the strength and usefulness of the material.
Similar techniques can be used to strengthen 3D printed parts, too. If you’ve got your own ideas on how to best use this technique, sound off below. If you’ve already done it, though, do drop us a line!
[Thanks to Krzysztof for the tip]