The Ultimate 1541 Talk by Michael Steil, presented at the Vintage Computer Festival West

The Ultimate Commodore 1541 Drive Talk: A Deep Dive Into Disks, Controllers, And Much More

When we think of retrocomputing, it’s very often the computers themselves that get all the glory.  There’s nothing wrong with this of course- the computers of the late 70’s and 80’s were incredible machines that were chock full of hacks in their own right. But some of the most interesting hacks of the day happened not in the computers, but rather in their peripherals. A devotee of such periphery is [Michael Steil], who was driven to compile years of research, knowledge, and hard data into The Ultimate Commodore 1541 Drive Talk which you can view below the break.

In the talk, [Michael] covers the physical disk composition and construction, the disk drives, controller hardware, and the evolution thereof. The bit-by-bit breakdown of the tracks, sectors, and header information on the disks themselves is fascinating, as is the discussion of various copy protection techniques used by vendors to prevent piracy at a time when sneakernet was in full swing.

The descent into the circuitry of the controller reveals a venerable 6502 CPU which powered many vintage computers. Further discussion divulges the secrets for getting higher performance from the 1541 drive using innovations that are as recent as 2013.

A computer historian and archaeologist, [Michael] discusses how using modified vintage hardware is sometimes enough to save your old floppy collection. He also shows how modern interfaces that read disks all the way down to the magnetic flux level can be used to reconstruct missing data.

[Michael] masterfully lays bare the complexity, engineering, and hackery that went into storing less than 200kb of data. Whether you’re a Commodore enthusiast or not, your appreciation for the 32GB USB stick collecting dust on your desk is bound to grow!

We’ve covered [Michael]’s exploits before, and you may wish to check out the Ultimate Apollo Guidance Computer Talk or the Ultimate Gameboy Talk. Do you have your own favorite retrocomputer hacks and insights to share? Be sure to let us know via the Tip Line!

Continue reading “The Ultimate Commodore 1541 Drive Talk: A Deep Dive Into Disks, Controllers, And Much More”

Tracking Maximum Power Point For Solar Efficiency

In days of yore when solar panels weren’t dirt cheap, many people (and even large energy companies) used solar trackers to ensure their panels were always physically pointed at the sun to make sure they harvested every watt of energy possible. Since the price of panels has plummeted, though, it’s not economical to install complex machines to track the sun anymore. But all solar farms still track something else, called the Maximum Power Point (MPP), which ensures that even stationary panels are optimized for power production.

While small MPP trackers (MPPT) are available in solar charge controllers in the $200 range that are quite capable for small off-grid setups, [ASCAS] aka [TechBuilder] decided to roll out an open source version with a much lower price tag since most of the costs of these units are in R&D rather than in the actual components themselves. To that end, the methods that he uses for his MPPT are essentially the same as any commercial unit, known as synchronous buck conversion. This uses a specially configured switch-mode power supply (SMPS) in order to match the power output of the panels to the best power point for any given set of conditions extremely rapidly. It even works on many different battery configurations and chemistries, all configurable in software.

This build is incredibly extensive and goes deep into electrical theory and design choices. One design choice of note is the use of an ESP32 over an Arduino due to the higher resolution available when doing analog to digital conversion. There’s even a lengthy lecture on inductor core designs, and of course everything on this project is open source. We have also seen the ESP32 put to work with MPPT before, although in a slightly less refined but still intriguing way.

Thanks to [Sofia] for the tip!

Continue reading “Tracking Maximum Power Point For Solar Efficiency”

Hackaday Links Column Banner

Hackaday Links: September 19, 2021

Things might be getting a bit dicey out in Jezero crater for Ingenuity. The little helicopter that could is starting to have trouble dealing with the thinning Martian atmosphere, and may start pressing against its margin of safety for continued operation. Ingenuity was designed for five flights that would all take place around the time its mothership Perseverance touched down on Mars back in February, at which time the mean atmospheric pressure was at a seasonal high. Over the last few months, the density of the Martian atmosphere has decreased a wee bit, but when you’re starting with a plan for a pressure that’s only 1.4% of Earth’s soupy atmosphere, every little bit counts. The solution to keeping Ingenuity flying is simple: run the rotors faster. NASA has run a test on that, spinning the rotors up to 2,800 RPM, and Ingenuity handled the extra stresses and power draw well. A 14th flight is planned to see how well the rotors bite into the rarefied air, but Ingenuity’s days as a scout for Perseverance could be numbered.

If you thought privacy concerns and government backdoors into encryption technology were 21st-century problems, think again. IEEE Spectrum has a story about “The Scandalous History of the Last Rotor Cipher Machine,” and it’s a great read — almost like a Tom Clancy novel. The story will appeal to crypto — not cryptocurrency — fans, especially those fascinated by Enigma machines, because it revolves around a Swiss rotor cipher machine called the HX-63, which was essentially a refinement of the original Enigma technology. With the equivalent of 2,000-bit encryption, it was considered unbreakable, and it was offered for sale to any and all — at least until the US National Security Agency sprung into action to persuade the inventor, Boris Hagelin, to shelve the HX-63 project in favor of electronic encryption. The NSA naturally helped Hagelin design this next generation of crypto machines, which of course all had backdoors built into them. While the cloak and dagger aspects of the story — including a possible assassination of Boris Hagelin’s son in 1970, when it became clear he wouldn’t “play ball” as his father had — are intriguing, the peek inside the HX-63, with its Swiss engineering, is the real treat.

One of the great things about the internet is how easy it is to quickly answer completely meaningless questions. For me, that usually involves looking up the lyrics of a song I just heard and finding out that, no, Robert Plant didn’t sing “Whoopie Cat” during Misty Mountain Hop. But it also let me answer a simple question the other day: what’s the largest single-piece metal object ever created? I figured it would have to be a casting of some sort, and likely something from the middle of the previous century. But as it turns out, the largest casting ever appears to have been manufactured in Sheffield, England in 2015. The company, Sheffield Forgemaster International, produced eleven castings for the offshore oil industry, each weighing in at over 320 tonnes. The scale of each piece is mind-boggling, and the technology that went into making them would be really interesting to learn about. And it goes without saying that my search was far from exhaustive; if you know of a single-piece metal part larger than 320 tonnes, I’ll be glad to stand corrected.

Have you heard about “teledriving” yet? On the face of it, a remote-controlled car where a qualified driver sits in an office somewhere watching video feeds from the car makes little sense. But as you dig into the details, the idea of remotely piloted cars starts to look like one of those “Why didn’t I think of that?” ideas. The company behind this is called Vay, and the idea is to remotely drive a ride-share vehicle to its next customer. Basically, when you hail a ride, a remote driver connects to an available car and drives it to your location. You get in and take over the controls to drive to your destination. When you arrive, another remote drive pilots the car to its next pickup. There are obvious problems to work out, but the idea is really the tacit admission that all things considered, humans are way better at driving than machines are, at least right now.

PCB Metro Maps Are A Gorgeous Labor Of Love

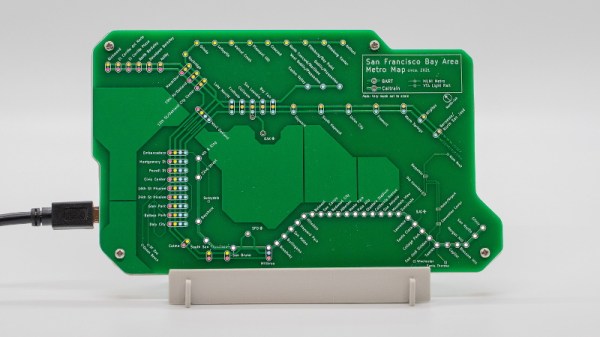
Is your love of public transportation matched only by your passion for designing custom PCBs? If so, then you’re going to love these phenomenal transit maps created by [Chai Jia Xun]. Using the painstakingly refined principles outlined in his detailed write-up, he’s created versions for Tokyo, Singapore, and the comparatively spartan San Francisco Bay Area. All you need to make one up for your home town is an incredible amount of patience and dedication. No problem, right?

As [Xun] explains, the first part of creating one of these maps isn’t unlike generating a normal PCB. Just make a footprint for the stations, consult with Google Maps as to where they should be placed on the board, and then connect them all up with traces to stand in for the rail lines. A little silkscreen work, and you’re done.

Well…unless you want them to light up, anyway. To pull that off, [Xun] created a second PCB that places an LED behind each station hole drilled in the previous board. With a microcontroller and shift register, he’s able to selectively illuminate individual lines and run through different patterns. To combat light bleeding through the PCB, a CNC-cut piece of 3 mm MDF sits between the two boards to make sure each LED is only visible through the respective hole in the top surface.

You could call the map finished here as well, assuming you don’t mind all the stations lighting up white. If you want them to be different colors, you’ll need to insert some colored diffusers. [Xun] went through several different approaches here, but in the end, the idea that seemed to work best was to simply print out all the colored dots on a piece of transparency paper and use a second sheet of tracing paper to soften the light. Alignment here is critical, but once everything is dialed in, the results are quite impressive.

It’s quite a bit of work, and we haven’t even mentioned the fact that [Xun] had to modify the circuit when it came time to do the Tokyo map, as some MOSFETs had to be added into the mix for the microcontroller to reliably control 350+ LEDs. So there’s certainly no shame in simply buying one of them when they go on sale instead of trying to recreate it from scratch. Assuming you live in one of the cities he’s offering, anyway. Otherwise, you might want to take a look at our HackadayU class on KiCad and get yourself a comfortable chair.

Recharged Dehumidifier Put Back Into Service

For the average consumer, repairing relatively low-cost home devices such as microwaves and TVs just isn’t economically viable. You can hardly blame them when the repair bill could easily be higher than the cost of just buying a new model. Luckily for folks like us, that means you can often find cheap or even free appliances on the second hand market that can be brought back online with a bit of troubleshooting and some spare parts.

Take for example the non-functional dehumidifier [HowToLou] recently came across. You probably couldn’t find a professional repair shop that would be willing to bother with one of these things if you tried, but as he shows in the video below, that doesn’t mean the DIY’er can’t run through some probable failure modes and get the unit back up and running. As a bonus, he also walks viewers through how your typical compressor-based dehumidifier operates.

The failed thermal switch.

Beyond the lack of water in the collection compartment, the first sign that something was wrong with this dehumidifier was that the compressor wasn’t running. Upon closer inspection, [HowToLou] determined that the thermal cut-off switch had failed and was stuck open. Luckily it had a visible part number so he could order a replacement, and in the meantime, all he had to do was cut the switch out of the circuit and wire up the compressor’s power directly.

Unfortunately, even with the compressor running, no water was being collected. Noticing that the evaporator coils weren’t getting very cold, [HowToLou] thought the unit might be low on refrigerant. Usually these systems aren’t meant to be recharged, but with a clever piercing tap valve, you can add a quick-connect port to the low pressure side. This particular dehumidifier happened to be filled with the same R134a used in automotive A/C systems, so a quick trip to the auto parts store got him a can of refrigerant complete with a handy pressure gauge.

After getting juiced up, [HowToLou] shows ice forming on the coils and plenty of water getting dumped into the tank. Automotive A/C refill cans usually include some substance to stop or reduce leaks in the system, so hopefully this will end up being a long-term fix. It might not be the most elaborate dehumidifier repair we’ve ever seen, but it’s certainly the most approachable. If you ever see one of these things laying on the side of the road, maybe you should pick it up and see what ails it.

Continue reading “Recharged Dehumidifier Put Back Into Service”

Lego Submarine Gets Balloon Ballast System

Lego is a fun building block which vast numbers of the world’s children play with every day. However, the mechanical Technic line of Lego building blocks has long offered greater options to the budding engineer. [Brick Experiment Channel] is one such soul, working hard on their latest Lego submarine.

The sub is built inside of a glass food container, chosen for its removable plastic lid with a watertight seal. This keeps all the mechanics dry, as well as the custom electronics built to allow a 27MHz RC controller to send signals to the Lego electronics. This is key as higher frequency radios such as Bluetooth or WiFi can’t penetrate water nearly as well.

A magnetic coupling fitted to a Lego motor is used to drive the propeller in the water without the leaks common when trying to seal a rotating shaft. A second coupling on a Lego servo along with a creative steering arrangement allows the propeller to be turned to steer the craft.

The ballast system is simple. A balloon is filled by a Lego motor running an air pump, capable of 3.0 mL a second and capable of creating a maximum pressure of 2.0 bar. When the balloon is inflated, the buoyancy goes up and the sub rises. Run the motor the other way and the balloon is emptied by a clever clutch and valve arrangement, reducing buoyancy and causing the sub to sink.

The sub isn’t perfect. Maintaining a set depth underwater can be difficult with the rudimentary ballast system, perhaps as the balloon changes shape with varying water pressure. Sometimes, Lego axles slip out of their gears, too, and the radio only works for a few meters under water.

However, simply building a Lego sub of any sort is a remarkable feat. It’s interesting to see the variances in the design compared to earlier projects from [Brick Experiment Channel], too, as we’ve featured their earlier subs before. Video after the break.

Continue reading “Lego Submarine Gets Balloon Ballast System”

Optical Theremin Makes Eerie Audio With Few Parts

[Fearless Night]’s optical theremin project takes advantage of the kind of highly-integrated parts that are available to the modern hacker and hobbyist in all the right ways. The result is a compact instrument with software that can be modified using the Arduino IDE to take it places the original Theremin design could never go.

The design is based on a ‘Blue Pill’ STM32 MCU development board and two Avago APDS-9960 gesture sensor breakout boards, along with a few other supporting components. Where the original Theremin sensed hand proximity using two antenna-like capacitive sensors to control note frequency and volume, this design relies on two optical sensors to do the same job.

[Fearless Night] provides downloads for the schematic, code, parts list, and even 3D models for the enclosure. PCB files are also included for a convenient assembly, but since the component count is fairly low, a patient hacker should be able to get away with soldering it up by hand without much trouble.

This project creates the audio using the STM32’s Direct Digital Synthesis (DDS) capability and a simple low-pass filter, and has several ways to fine-tune the output. What’s DDS? Our own Elliot Williams explains it in terms of audio output for microcontrollers, and if you’d like a more comprehensive overview, Bil Herd will happily tell you all about it.