Liquid cooled Raspberry Pi with mineral oil

Liquid Cooling Overclocked Raspberry Pi With Style

[HydroGraphix HeadQuarters] has earned his name with this one. While he is using mineral oil instead of hydro, he’s certainly done a nice job with the graphics of it. The ‘it’ in questions is an overclocked Raspberry Pi 3 in a transparent container filled with mineral oil, and with a circulating fan.

He’s had no problem running the Pi at 1.45 GHz while running a Nintendo 64 emulator, getting between 40 °C and 50 °C. The circulating fan is a five volt computer USB fan. It’s hard to tell if the oil is actually moving, but we’re pretty sure we see some doing so near the end of the video below the break.

Mineral oil is not electrically conductive, and is often used to prevent arcing between components on high voltage multiplier boards, but those components are always soldered together. If you’ve ever worked with mineral oil, you know that it creeps into every nook and cranny, making us wonder if it might work its way between some of the (non-soldered) contacts in the various USB connectors on this Raspberry Pi. Probably not, but those of us with experience with it can attest to it’s insidiousness.

Continue reading “Liquid Cooling Overclocked Raspberry Pi With Style”

Featured image

Keep The Burglars Away With Some Pi

Ten years ago, we never imagined we would be able to ward off burglars with Pi. However, that is exactly what [Nick] is doing with his Raspberry Pi home security system.

We like how, instead of using a standard siren, [Nick] utilized his existing stereo system to play a custom audio file that he created. (Oh the possibilities!) How many off the shelf alarm systems can you do that with?

The Pi is the brains of the operation, running an open source software program called Home Assistant. If any of the Z-Wave sensors in his house are triggered while the alarm system is armed, the system begins taking several actions. The stereo system is turned on via IR so that the digital alarm audio file can be played. Lights flash on and off. An IP camera takes several snapshots and emails them to [Nick].

Home Assistant didn’t actually have the ability to send images in an email inline at the time that [Nick] was putting together his system. What did [Nick] do about that? He wrote some code to give it that ability, and submitted it through GitHub. That new code was put into a later version of the program. Ah, the beauty of open source software.

Perhaps the most important part of this project is that there were steps taken to help keep the wife-approval factor of the system on the positive side. For example, he configured one of the scripts so that even if the alarm is tripped multiple times in succession, the alarm won’t play over itself repeatedly.

This isn’t [Nick’s] first time being featured here. Check out another project of his which involves a couple of Pi’s communicating with each other via lasers.


Conflict Escalates Between Brilliant Rat And 555 Timer

After [Casey Connor] captured and relocated a number of unwanted rodents in his home using commercially available live traps, he was presented with a problem: a rat had learned to avoid them.

In an epic, and adorable, conflict caught on video (and embedded below),  he documents the  designs used and how the rat escaped them by either recognizing the trap, or sheer agility. We can only tip our hat to the determination of both parties.

All the trap mechanisms are based on a 555 monostable solenoid triggering circuit that ensures that a pulse of sufficient duration is sent to the solenoid to trigger the trap correctly. This way even intermittent contacts will trigger the trap rather than just causing the solenoid to twitch without fully actuating. This is the same technique used to debounce a switch using a 555 timer.

A Raspberry Pi Zero detects motion using an IR camera to film the interesting parts. This is also a good indicator for when you’ve trapped your quarry – if you’re trying be humane then leaving it in a trap for days is counterproductive.

With the time and effort we spend building better and more complex rodent traps, we sometimes wonder who has cleverly trapped whom.

Continue reading “Conflict Escalates Between Brilliant Rat And 555 Timer”

Google AIY: Artificial Intelligence Yourself

When Amazon released the API to their voice service Alexa, they basically forced any serious players in this domain to bring their offerings out into the hacker/maker market as well. Now Google and Raspberry Pi have come together to bring us ‘Artificial Intelligence Yourself’ or AIY.

A free hardware kit made by Google was distributed with Issue 57 of the MagPi Magazine which is targeted at makers and hobbyists which you can see in the video after the break. The kit contains a Raspberry Pi Voice Hat, a microphone board, a speaker and a number of small bits to mount the kit on a Raspberry Pi 3. Putting all of it together and following the instruction on the official site gets you a Google Voice Interaction Kit with a bunch of IOs just screaming to be put to good use.

The source code for the python app can be downloaded from GitHub and consists of a loop that awaits a trigger. This trigger can be a press of a button or a clap near the microphones. When a trigger is detected, the recorder function takes over sending the stream to the Google Cloud. Speech-to-Text conversion happens there and the result is returned via a Text-To-Speech engine that helps the system talk back. The repository suggests that the official Voice Kit SD Image (893 MB download) is based on Raspbian so don’t go reflashing a memory card right away, you should be able to add this to an existing install.

Continue reading “Google AIY: Artificial Intelligence Yourself”

The Raspberry Pi Becomes A SCSI Device

SCSI devices were found in hundreds of different models of computers from the 80s, from SUN boxes to cute little Macs. These hard drives and CDROMs are slowly dying, and with that goes an entire generation of technology down the drain. Currently, the best method of preserving these computers with SCSI drives is the SCSI2SD device designed by [Michael McMaster]. While this device does exactly what it says it’ll do — turn an SD card into a drive on a SCSI chain — it’s fairly expensive at $70.

[GIMONS] has a better, cheaper solution. It’s a SCSI device emulator for the Raspberry Pi (original link dead, here’s the new location of this writeup). It turns a Raspberry Pi into a SCSI hard drive, magneto-optical drive, CDROM, or an Ethernet adapter using only some glue logic and a bit of code.

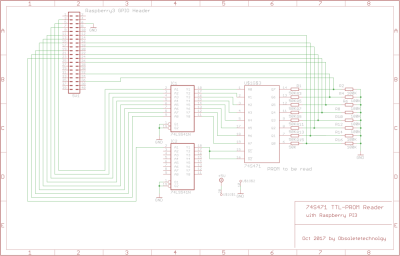
As far as the hardware goes, this is a pretty simple build. The 40-pin GPIO connector on the Pi is attached to the 50-pin SCSI connector through a few 74LS641 transceivers with a few resistor packs for pullups and pulldowns. The software allows for virtual disk devices – either a hard drive, magneto-optical drive, or a CDROM – to be presented from the Raspberry Pi. There’s also the option of putting Ethernet on the SCSI chain, a helpful addition since Ethernet to SCSI conversion devices are usually rare and expensive.

Officially, [GIMONS] built this SCSI hard drive emulator for the x68000 computer, developed by Sharp in the late 80s. While these are popular machines for retrocomputing aficionados in Japan, they’re exceptionally rare elsewhere — although [Dave Jones] got his mitts on one for a teardown. SCSI was extraordinarily popular for computers from the 70s through the 90s, though, and since SCSI was a standard this build should work with all of them.

If your retrocomputer doesn’t need a SCSI drive, and you’re feeling left out of the drive-emulation club, the good news is there’s a Raspberry Pi solution for that, too: this Hackaday Prize entry turns a Pi into an IDE hard drive.

Thanks [Gokhan] for the tip!

Linger Keeps You Around After You’ve Gone

We’re not sure if this is art, anti-snooping guerilla warfare, or just a cheeky hack, but we do know that we like it! [Jasper van Loenen]’s Linger keeps the SSIDs that your cell phone (for example) spits out whenever it’s not connected to a WiFi network, and replays them after you’re gone.

Some retail stores and other shady characters use MAC addresses and/or the unique collection of SSIDs that your phone submits in probe requests to fingerprint you and track your movement, either through their particular store or across stores that share a tracking provider. Did you know that you were buying into this when you enabled “location services”? Did the tracking firms ask you if that was ok? Of course not. What are you going to do about it?

Linger replays the probe requests of people who have already moved on, making it appear to these systems as if nobody ever leaves. Under the hood, it’s a Raspberry Pi Zero, two WiFi dongles, and some simple Python software that stores probe requests in a database. There’s also a seven-segment display to indicate how many different probe-request profiles Linger has seen. We’re not sure the price point on this device is quite down to “throwie” level, but we’d love to see some of these installed in the local mall.  Continue reading “Linger Keeps You Around After You’ve Gone”

Get Up Close To Your Soldering With A Pi Zero Microscope

Do your Mark 1 Eyeballs no longer hold their own when it comes to fine work close up? Soldering can be a literal pain under such conditions, and even for the Elf-eyed among us, dealing with pads at a 0.4-mm pitch is probably best tackled with a little optical assistance. When the times comes for a little help, consider building a soldering microscope from a Pi Zero and a few bits and bobs from around the shop.

Affordable commercial soldering scopes aren’t terribly hard to come by, but [magkopian] decided to roll his own by taking advantage of the streaming capabilities of the Raspberry Pi platform, not to mention its affordability. This is a really simple hack — nothing is 3D-printed or custom milled. The stage base is a simple aluminum project box for heat resistance and extra weight, and the arm is a cheap plastic dial caliper. The PiCam is mounted to the sliding jaw of the caliper on a scrap of plastic ruler. The lens assembly of the camera needs to be hacked a little to change the focal length to work within 10 centimeters or so; alternatively, you could splurge and get a camera module with an adjustable lens. The Pi is set up for streaming, and your work area is presented in glorious, lag-free HDMI video.

Is [magkopian]’s scope going to give you the depth perception of a stereo microscope? Of course not. But for most jobs, it’ll probably be enough, and the fact that it can be built on the cheap makes it a great hack in our book.

Continue reading “Get Up Close To Your Soldering With A Pi Zero Microscope”