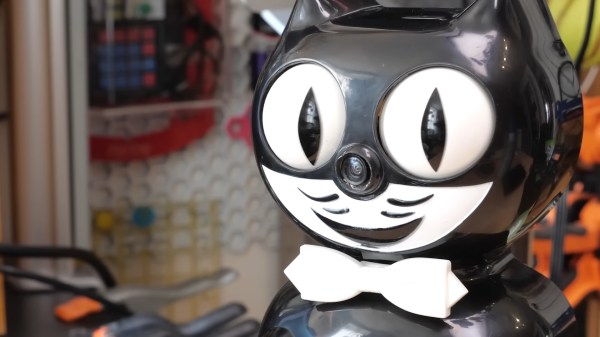
Is This The Smallest CP/M Machine Ever?

If you had an office word processor in the late 1970s, the chances are it ran Digital Research’s CP/M operating system. IBM went for Microsoft in the 1980s and the once-dominant player fell on hard times, but it survives today as a popular choice on retrocomputer platforms. Even the more compact Z80 systems are a little large for 2022, so when [Kian Ryan] needed the ultimate in CP/M portability it fell on a more modern piece of silicon. Hence he’s put it on a tiny RP2040-based board from Pimoroni alongside an Adafruit micro SD card breakout.

The tiny hardware is neat of course, but the real star of the show is the software. Non-CP/M aficionados will be interested to learn about RunCPM, and for this project, RunCPM 2040. This provides an emulated environment on a host microcontroller to run CP/M, allowing the operating system to be hosted on easier hardware than some of the original machines.

All this makes for a tiny development machine, but perhaps of more interest would be a machine that’s all-in-one with a display and perhaps a keyboard. The RP2040 is interesting in this case because of those programmable state machines. Could it be made to run a video display alongside RunCPM? We hope someone has a go at writing it.

Sprig Is An Open Source Handheld Game Console

[Hack Club] is a group that aims to teach teenagers about tech by involving them in open-source projects. One of the group’s latest efforts is Sprig, an open-source handheld game console, and [Hack Club] has even been giving them away!

The console is based around a Raspberry Pi Pico, paired up with a TFT7735 screen. There’s also a MAX98357A audio amp on board to provide sound. Other than that, there’s a full ten buttons for control, some LEDs for feedback, and it’s all assembled on a custom PCB designed for easy soldering.

Plenty of work has been done to make Sprig an accessible platform for first-time developers. Games can be created for Sprig and run either on the device, or in an online web-based editor. [Hack Club] is even running a program that will give Sprig hardware away to kids and teens worldwide who write a game for the platform and submit it to the online gallery.

If you’re eager to get into game development while understanding both the hardware and software side of things, Sprig might be just what you’re looking for. With today’s microcontrollers being so cheap and so powerful, we’ve seen some other great handheld designs recently, too!

An RP2040 Powered Pick And Place

Pick and place machines are a wonder to behold, as they delicately and accurately place part after part. Unfortunately, they have to have a similarly wondrous price tag. Luckily, they aren’t too difficult to make yourself as they share many properties of a 3D printer with some extra constraints. [Stargirl Flowers] released Starfish, an open-source pick-and-place control board based around an RP2040 to help people make their own.

She purchased a LumenPnP, and the itch to tinker became too much to ignore. The STM32 on the stock controller also happened to get fried, leaving an obvious opening to create a custom board. [Stargirl] chose Trinamic TMC2209 motor controllers to drive the three stepper motors. The power circuit is impressively overbuilt with a 3A fuse, a TVS diode for shunting voltage spikes, a P-channel MOSFET for reverse polarity protection, a low-pass filter for AC ripple, and a large 100μF capacitor.

The RP2040 is a good choice since it’s easy to get and has plenty of digital I/O. USB connects the board to the outside work and includes ESD TVS diodes to protect the board when connecting and disconnecting the USB port. Motors for vacuums are controlled by a 74HC2G34 buffer that drives enable lines to two MOSFETs. Solenoids are similar but with a high current peak and a much smaller current to keep them open. The DRV120 fits the bill as it is a single-channel relay with current regulation. I2C vacuum sensors are the same ones on the Lumen motherboard; they just required an I2C multiplexer.

It’s an extremely well-documented project explaining why each part was chosen and why. If you want to create an RP2040 project that needs to last, we consider this a guiding star. It’s all up on GitHub for you to take a look at.

This isn’t the first time we’ve seen RP2040 as part of a motor controller, and we suspect we’ll see more.

A Pi Pico Oscilloscope

At the budget end of the oscilloscope range lie the so-called pocket ‘scopes. About the size of a deck of cards, they combine a microcontroller and an LCD screen to make an instrument with a bandwidth in the tens of kilohertz and a not-too-sparkling performance. They’re something of a toy, but then again, if all that’s needed is a simple ‘scope for audio frequencies, they make a passable choice in a small package. Now [jgpeiro] has made one which is light years ahead of the toy kits, using a Raspberry Pi Pico, a 100 MHz ADC, and an effort to design a better input circuit.

At its simplest this could be a straightforward op-amp and ADC circuit feeding the Pico, but instead it has multiple stages carefully designed to offer the full bandwidth, and with gain, offset, and trigger settings being set by a series of DAC chips under software control. This and the decent bandwidth make this a much more viable oscilloscope, and one we’d like to see further developed.

By comparison, we took a look at the best of the competition a few years ago.

An Easy-To-Make Pi-Powered Pocket Password Pal

Sometimes, we see a project where it’s clear – its creator seriously wants to make a project idea accessible to newcomers; and today’s project is one of these cases. The BYOPM – Bring Your Own Password Manager, a project by [novamostra] – is a Pi Zero-powered device to carry your passwords around in. This project takes the now well-explored USB gadget feature of the Pi Zero, integrates it into a Bitwarden-backed password management toolkit to make a local-network-connected password storage, and makes a tutorial simple enough that anybody can follow it to build their own.

For the physical part, assembly instructions are short and sweet – you only need to solder a single button to fulfill the hardware requirements, and there’s a thin 3D-printable case if you’d like to make the Pi Zero way more pocket-friendly, too! For the software part, the instructions walk you step-by-step through setting up an SD card with a Raspbian image, then installing all the tools and configuring a system with networking exposed over the USB gadget interface. From there, you set up a Bitwarden instance, and optionally learn to connect it to the corresponding browser extensions. Since the device’s goal is password management and storage, it also reminds you to do backups, pointing out specifically the files you’ll want to keep track of.

Overall, such a device helps you carry your passwords with you wherever you need them, you can build this even if your Raspberry Pi skills are minimal so far, and it’s guaranteed to provide you with a feeling that only a self-built pocket gadget with a clear purpose can give you! Looking for something less reliant on networking and more down-to-commandline? Here’s a buttons-and-screen-enabled Pi Zero gadget that uses pass.

A Pi Pico plugged into a breadboard, with an I2C OLED display connected to it

Need An USB-I2C Adapter? Use Your Pico!

Given its abundance and simplicity, the RP2040 has no doubt become a favourite for USB peripheral building – in particular, USB-connected tools for electronics experiments. Today, we see one more addition to our Pico-based tool arsenal – a USB-I2C adapter firmware for RP2040 by [Renze Nicolai]. This is a reimplementation of the ATTiny-based I2C-Tiny-USB project and complies to the same protocol – thus, it’s compatible with the i2c-tiny-usb driver that’s been in the Linux kernel for ages. Just drag&drop the .uf2, run a script on your Linux system, and you will get a /dev/i2c-X device you can work with from userspace code, or attach other kernel drivers to.

The software will work with any RP2040 devboard – just connect your I2C devices to the defined pins and you’ll have them show up in i2cdetect output on your Linux workstation. As a demo, [Renze] has written a userspace Python driver for one of these SSD1306 128×64 OLEDs, and gives us a commandline that has the driver accept output of an ffmpeg command capturing your main display’s contents, duplicating your screen on the OLED – in a similar fashion that we’ve seen with the “HDMI” I2C-driven display a few months back. Everything you might need is available on the GitHub page, including usage instructions and examples, and the few scripts you can use if you want to add an udev rule or change the I2C clock frequency.

Just to name a few purposes, you can use a Pi Pico as a tool for SWD, JTAG, CAN, a logic analyser with both digital and analog channels, or even as a small EMP-driven chip glitching tool. The now-omnipresent $3 Pi Pico boards, it seems, are a serious contender to fondly remembered hacker tools of the past, such as the legendary BusPirate.

Continue reading “Need An USB-I2C Adapter? Use Your Pico!”

A terminal window with a search for "Guineau Pig Olympics" is inset on a photo of an ortholinear keyboard attached by a yellow USB cable to a 70s aluminum and plastic Super 8 film editor/viewer. The device has a large screen on the right hand side, a silver grate on the left, and a tray at the bottom for slotting in film.

Super 8 Film Editor Reborn As A YouTube Terminal

We love hacks that give new life to old gadgets, and [edwardianpug]’s YouTube Terminal certainly fits the bill by putting new hardware inside a Super 8 film editor.

[edwardianpug] could have relegated this classy-looking piece of A/V history to a shelf for display, but instead she decided to refresh its components so it could display any YouTube video instead of just one strip of film at a time. The Boost-Box keeps the retrofuturistic theme going by using the terminal to search for and play videos via Ytfzf.

The original screen has been replaced by an 800×600 LCD, and the yellow USB cord gives a nice splash of color to connect the ortholinear keyboard to the device. Lest you think that this “ruined” a working piece of retro-tech, [edwardianpug] says that 20 minutes would get this device back to watching old movies.

Are you looking for more modern and retro mashups? Check out these Dice Towers Built In Beautiful Retro Cases, a Vacuum Tube and Microcontroller Ham Transmitter, or this Cyberdeck in a Retro Speaker.

Continue reading “Super 8 Film Editor Reborn As A YouTube Terminal”