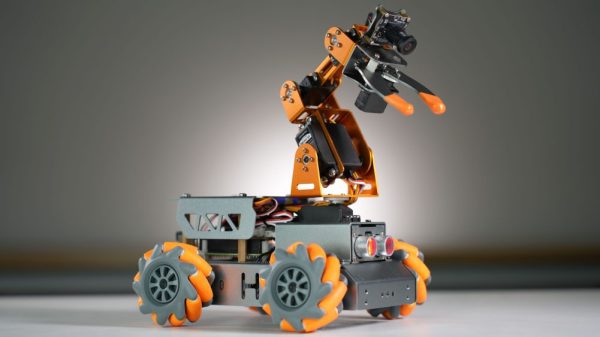
Four DC gear-motors are fitted to a metal chassis, each one driving a mecanum wheel. These are special wheels with rollers fitted around their circumference at an angle that allows the robot to move in all directions and rotate in various ways depending on how each wheel is driven.
On top of this highly maneuverable chassis is placed a 5-degree-of-freedom robotic arm. The robot also gets a ultrasonic sensor for avoiding objects, as well as a camera for line-following duties. The camera also allows the robot to pick up blocks and identify their color, and it can then sort them into boxes. It’s all powered by a Raspberry Pi, running a bunch of Python code to make everything happen.
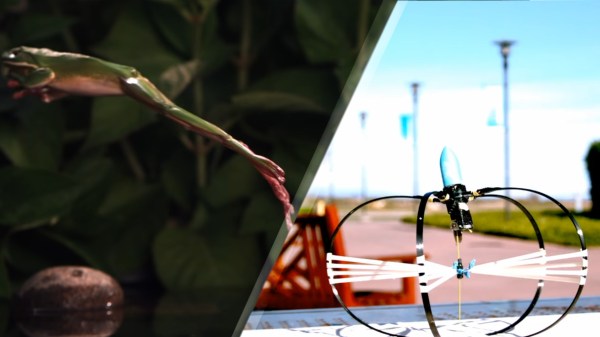
How can a few grams of battery, geared motor, and some nifty materials get a jumping robot over 30 meters into the air? It wasn’t by copying a grasshopper, kangaroo, or an easily scared kitty. How was it done, then?
It’s been observed that of all the things that are possible in nature, out of all the wonderful mechanisms, fluid and aerodynamics, and chemistry, there’s one thing that is so far undiscovered in a living thing: continuous rotation. Yes, that’s right, the simple act of going roundy-round is unique to mechanical devices rather than biological organisms. And when it comes to jumping robots, biomimicry can only go so far.
With this distinct mechanical advantage in mind, [Elliot Hawkes] of the University of California Santa Barbara decided to look beyond biomimicry. As explained in the paper in Nature and demonstrated in the video below the break, the jumping robot being considered uses rubber bands, carbon fiber bows, and commodity items such as a geared motor and LiPo batteries to essentially wind up the spring mechanism and then, like a trap being sprung, release the pent up energy all at once. The result? The little jumper can go almost 100 feet into the air. Be sure to check it out!
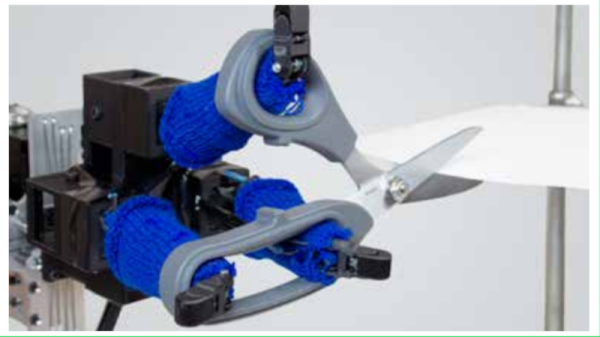
MIT complains that designing a robot hand is time-consuming and takes a lot of iterations. They want to improve that using a unique approach by giving a modular hand tactile sensors. They claim this can reduce the design time down to minutes for many practical applications. For example, cutting paper. You can see a video about the paper below as well as read the text itself.
Each style of manipulator has an associated graph. Predefined elements let you assemble a palm and specialized fingers. You deform the fingers to match the use of the hand. Then a sensor that looks like a mitten provides feedback fo the task.
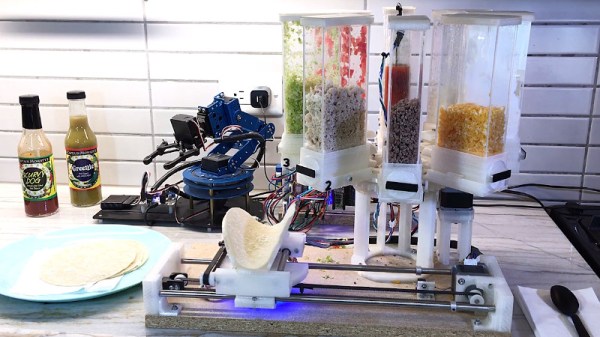
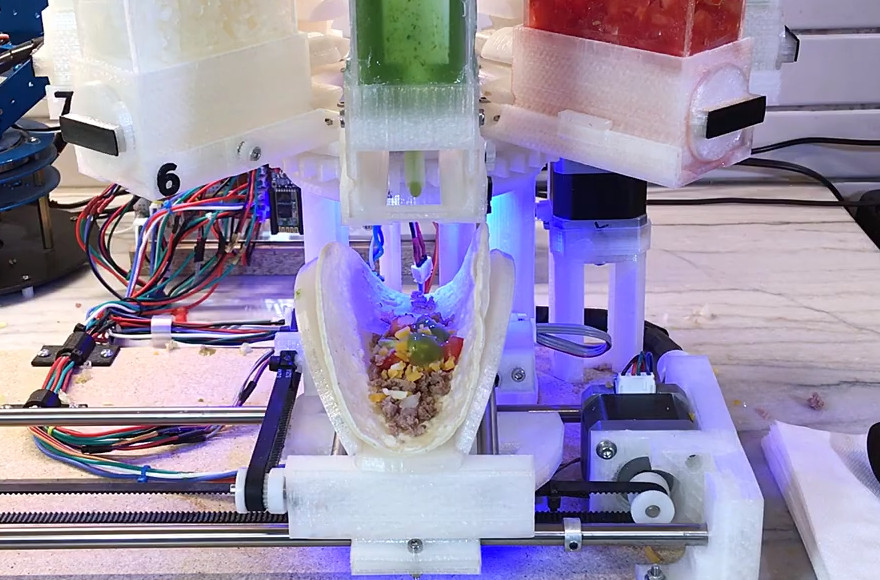
We’re big fans of useless machines here at Hackaday, there’s something undeniably entertaining about watching a gadget flail about dramatically without actually making any progress towards a defined goal. But what happens when one of these meme machines ends up working too well? We think that’s just what we might be witnessing here with the Tacobot from [Vije Miller].
On the surface, building an elaborate robotic contraption to (slowly) produce tacos is patently ridiculous. Doubly so when you tack on the need to give it voice commands like it’s some kind of one-dish version of the Star Trek food replicator. The whole thing sounds like the setup for a joke, an assumption that’s only reinforced after watching the dramatized video at the break. But in the end, we still can’t get over how well the thing appears to work.
After [Vije] gives it a list of ingredients to dispense, a robotic arm drops a tortilla on a fantastically articulated rotating platform that can not only spin and move in two dimensions, but can form the soft shell into the appropriate taco configuration. The empty shell is then brought under a rotating dispenser that doles out (or at least attempts to) the requested ingredients such as beef, onions, cheese, and lettuce. With a final flourish, it squirts out a few pumps of the selected sauce, and then presents the completed taco to the user.
The only failing appears to be the machine’s ability to dispense some of the ingredients. The ground beef seems to drop into place without issue, but it visibly struggles with the wetter foodstuffs such as the tomatoes and onions. All we know is that if a robot handed us a taco with that little lettuce on it, we’d have a problem. On the project page [Vije] acknowledges the issue, and says that a redesigned dispenser could help alleviate some of the problem.
The issue immediately brought to mind the fascinating series of posts dedicated to handling bulk material penned by our very own [Anne Ogborn]. While the application here might be a bit tongue-in-cheek, it’s still a perfect example of the interesting phenomena that you run into when trying to meter out different types of materials.
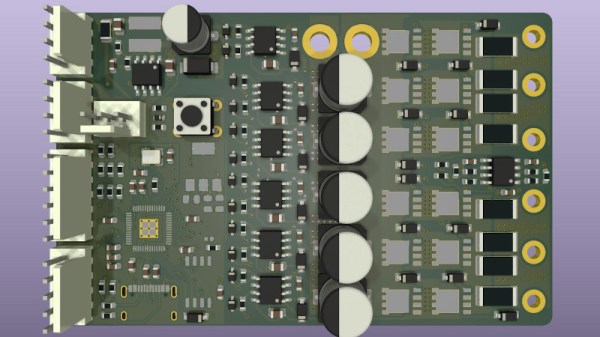
When the Raspberry Pi people launched their RP2040 microcontroller, it seemed as though it might be destined as a niche product for those areas in which the Pi has traditionally been strong. But during the global semiconductor shortage, it has remained almost alone among microcontrollers in having plenty of fab capacity to keep the supplies rolling. That, and its very vanilla set of ARM peripherals alongside those programmable state machines have thus seen it find a home in many places it might not otherwise have seen. Take the dual RP2040 motor controller from [Twisted Fields] as an example, would it have been more likely to have sported an STM32 in previous years?
It’s been produced as part of the Acorn Precision Farming Robot platform, and it’s a fully open-source two-channel controller on a board the same size as a credit card. The schematic appears fairly conventional through a cursory glance at the PDF, but we know from experience that motor controllers are never as deceptively simple to get right as their circuit would lead the unwary engineer to believe. The heat dissipation, current, and transient handling all play a part in a successful design, and we expect this one to evolve to fix any issues it might still contain.
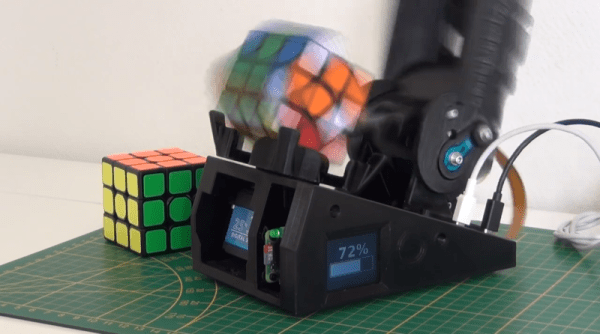
[AndreaFavero] says that the CuboTino emphasizes simplicity and cost-savings over speed. However, solving the puzzle in about 90 seconds is still better than we can do. The plucky solver uses a Pi and a camera to understand what the cube looks like and then runs it through a solver to determine how to move.
Watching the video below, we were impressed with the mechanics. The titled surface solves a few problems and makes manipulation easier. The way the mechanics are arranged, it only takes a pair of servos to flip the cube around as you like. Continue reading “Another Rubik’s Cube Robot Is Simple But Slow”→
When we think of robotics, the first thing that usually comes to mind for many of us is some sort of industrial arm that’s bolted to the floor, or perhaps a semi-autonomous rover trudging its way across the dusty Martian landscape. While these two environments are about as different as can be, the basic “rules” are pretty much the same. Being on firm ground ground gives the robot a clear understanding of its position and orientation, which greatly simplifies tasks such as avoiding collisions or interacting with nearby objects.
But what happens when that reference point goes away? How does a robot navigate when it’s flying through open space or hovering in mid-air? That’s just one of the problems that fascinates Nick Rehm, who stopped by to host this week’s Aerial Robotics Hack Chat to talk about his passion for flying robots. He’s currently an aerospace engineer at Johns Hopkins Applied Physics Laboratory, where he works on the unique challenges faced by autonomous flying vehicles such as the detection and avoidance of mid-air collisions, as well as the development of vertical take-off and landing (VTOL) systems. But before he had his Master’s in Aerospace Engineering and Rotorcraft, he got started the same way many of us did, by playing around with DIY projects.
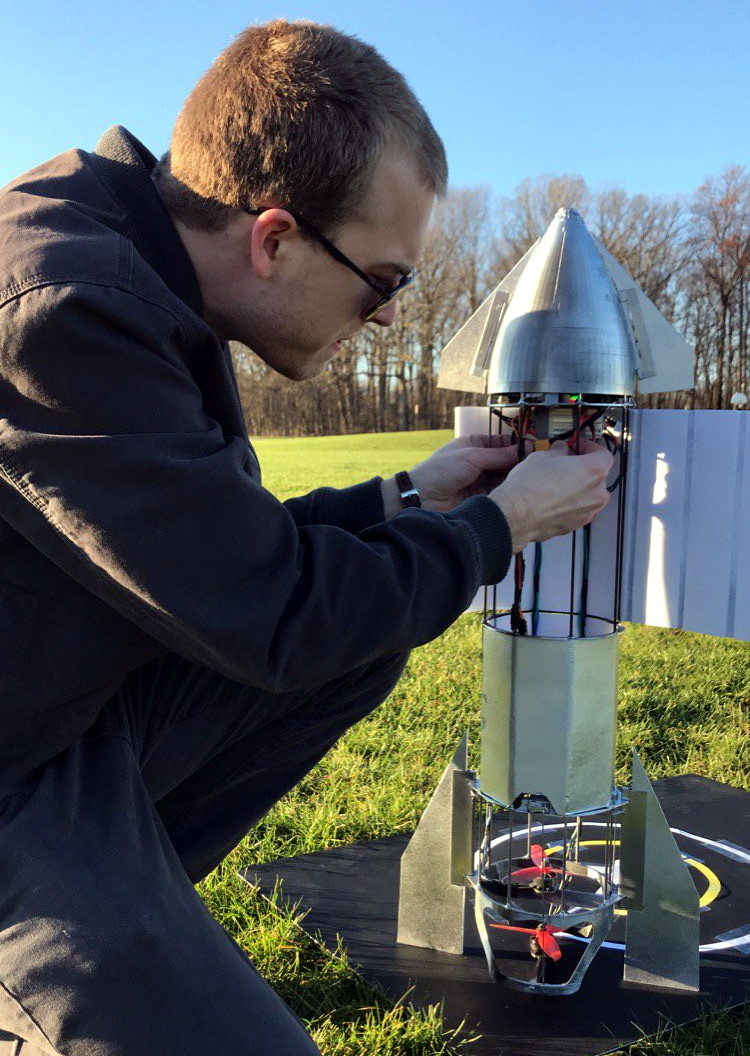
In fact, regular Hackaday readers will likely recall seeing some of his impressive builds. His autonomous ekranoplan designed to follow a target using computer vision graced the front page in April. Back in 2020, we took a look at his recreation of SpaceX’s Starship prototype, which used a realistic arrangement of control surfaces and vectored thrust to perform the spacecraft’s signature “Belly Flop” maneuver — albeit with RC motors and propellers instead of rocket engines. But even before that, Nick recalls asking his mother for permission to pull apart a Wii controller so he could use its inertial measurement unit (IMU) in a wooden-framed tricopter he was working on.
Discussing some of these hobby builds leads the Chat towards Nick’s dRehmFlight project, a GPLv3 licensed flight control package that can run on relatively low-cost hardware, namely a Teensy 4.0 microcontroller paired with the GY-521 MPU6050 IMU. The project is designed to let hobbyists easily experiment with VTOL craft, specifically those that transition between vertical and horizontal flight profiles, and has powered the bulk of Nick’s own flying craft.
Moving onto more technical questions, Nick says one of the most difficult aspects when designing an autonomous flying vehicle is getting your constraints nailed down. What he means by that is having a clear goal of what the craft needs to do, and critically, how long it needs to do it. How far does the craft need to be able to fly? How fast? Does it need to loiter at the target location, and if so, for how long? The answers to these questions will largely dictate the form of the final vehicle, and are key to determining if it’s worth implementing the complexity of transitioning from VTOL to fixed-wing horizontal flight.
But according to Nick, the biggest challenge in aerial robotics is onboard state estimation. That is, the ability for the craft to know its position and orientation relative to the ground. While high-performance computers have gotten lighter and sensors have improved, he says there’s still no substitute for having a ground-based tracking system. He mentions that those fancy demonstrations you’ve seen with drones flying in formation and working collaboratively towards a task will almost certainly have an array of motion capture cameras tucked off to the side. This makes for an impressive show, but greatly limits the practical application of these drone swarms.
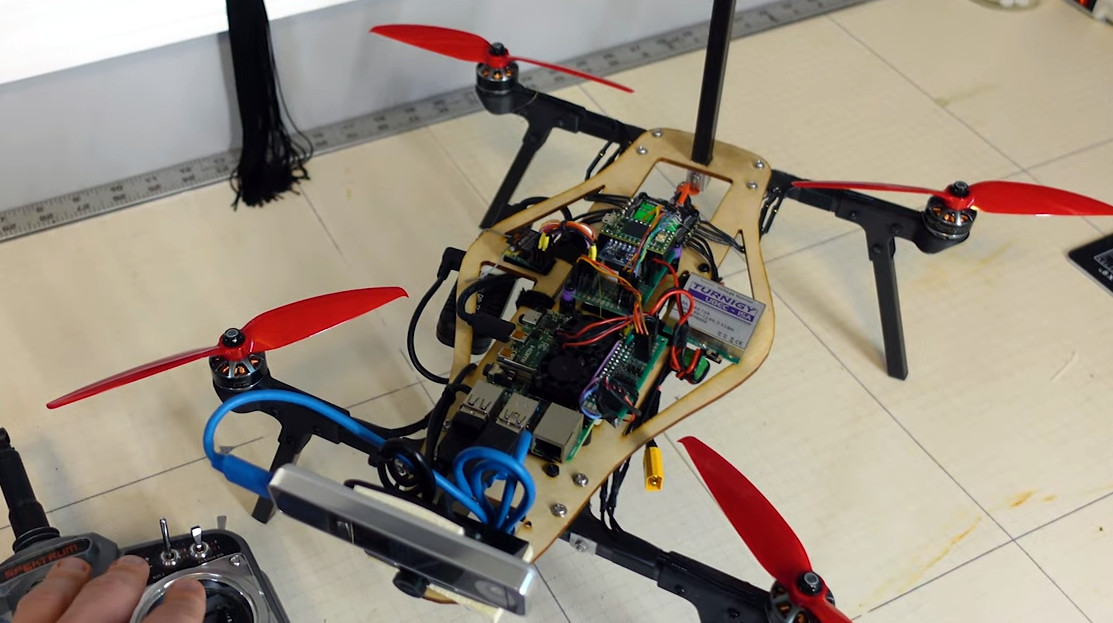
Nick’s custom Raspberry Pi 4-powered quadcopter lets him test autonomous flight techniques.
So what does the future of aerial robotics look like? Nick says open source projects like ArduPilot and PX4 are still great choices for hobbyists, but sees promise in newer platforms which pair the traditional autopilot with more onboard computing power, such as Auterion’s Skynode. More powerful flight controllers can enable techniques such as simultaneous localization and mapping (SLAM), which uses 3D scans of the environment to help the robot orient itself. He’s also very interested in technologies that enable autonomous flight in GPS-denied environments, which is critical for robotic craft that need to operate indoors or in situations where satellite navigation is unavailable or unreliable. In light of the incredible success of NASA’s Ingenuity helicopter, we imagine these techniques will also play an invaluable role in the future airborne exploration of Mars.
We want to thank Nick for hosting this week’s Aerial Robotics Hack Chat, which turned out to be one of the fastest hours in recent memory. His experience as both an avid hobbyist and a professional in the field provided exactly the sort of insight the Hackaday community looks for, and his gracious offer to keep in touch with several of those who attended the Chat to further discuss their projects speaks to how passionate he is about this topic. We expect to see great things from Nick going forward, and would love to have him join us again in the future to see what he’s been up to.
The Hack Chat is a weekly online chat session hosted by leading experts from all corners of the hardware hacking universe. It’s a great way for hackers connect in a fun and informal way, but if you can’t make it live, these overview posts as well as the transcripts posted to Hackaday.io make sure you don’t miss out.