We love 3D printing. We’ll print brackets, brackets for brackets, and brackets to hold other brackets in place. Perhaps even a guilty-pleasure Benchy. But 3D printed shoes? That’s where we start to have questions.
Every few months, someone announces a new line of 3D-printed footwear. Do you really want your next pair of sneakers to come out of a nozzle? Most of the shoes are either limited editions or fail to become very popular.
First World Problem
You might be thinking, “Really? Is this a problem that 3D printing is uniquely situated to solve?” You might assume that this is just some funny designs on some of the 3D model download sites. But no. Adidas, Nike, and Puma have shoes that are at least partially 3D printed. We have to ask why.
We are pretty happy with our shoes just the way that they are. But we will admit, if you insist on getting a perfect fitting shoe, maybe having a scan of your foot and a custom or semi-custom shoe printed is a good idea. Zellerfield lets you scan your feet with your phone, for example. [Stefan] at CNC Kitchen had a look at those in a recent video. The company is also in many partnerships, so when you hear that Hugo Boss, Mallet London, and Sean Watherspoon have a 3D-printed shoe, it might actually be their design from Zellerfield.
It should probably come as no surprise to anyone that the images which we look at every day – whether printed or on a display – are simply illusions. That cat picture isn’t actually a cat, but rather a collection of dots that when looked at from far enough away tricks our brain into thinking that we are indeed looking at a two-dimensional cat and happily fills in the blanks. These dots can use the full CMYK color model for prints, RGB(A) for digital images or a limited color space including greyscale.
Perhaps more interesting is the use of dithering to further trick the mind into seeing things that aren’t truly there by adding noise. Simply put, dithering is the process of adding noise to reduce quantization error, which in images shows up as artefacts like color banding. Within the field of digital audio dithering is also used, for similar reasons. Part of the process of going from an analog signal to a digital one involves throwing away data that falls outside the sampling rate and quantization depth.
By adding dithering noise these quantization errors are smoothed out, with the final effect depending on the dithering algorithm used.
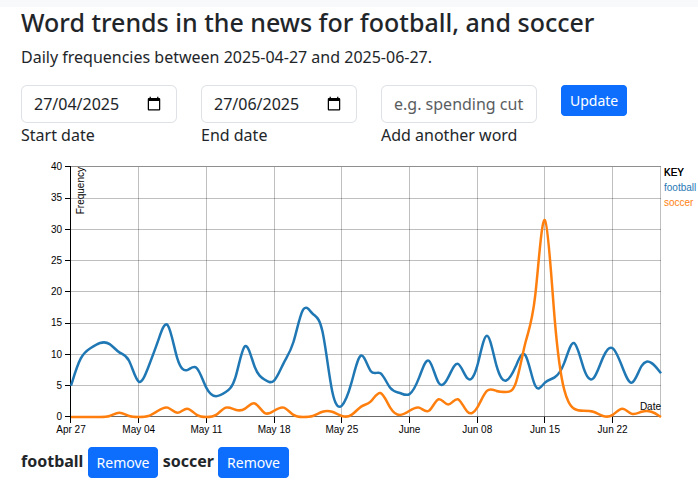
Do you ever look at the news, and wonder about the process behind the news cycle? I did, and for the last couple of decades it’s been the subject of one of my projects. The Raspberry Pi on my shelf runs my word trend analysis tool for news content, and since my journey from curious geek to having my own large corpus analysis system has taken twenty years it’s worth a second look.
How Career Turmoil Led To A Two Decade Project
This is very much a minority spelling. Colin Smith, CC BY-SA 2.0.
In the middle of the 2000s I had come out of the dotcom crash mostly intact, and was working for a small web shop. When they went bust I was casting around as one does, and spent a while as a Google quality rater while I looked for a new permie job. These teams are employed by the search giant through temporary employment agencies, and in loose terms their job is to be the trained monkeys against whom the algorithm is tested. The algorithm chose X, and if the humans also chose X, the algorithm is probably getting it right. Being a quality rater is not in any way a high-profile job, but with the big shiny G on my CV I soon found myself in demand from web companies seeking some white-hat search engine marketing expertise. What I learned mirrored my lesson from a decade earlier in the CD-ROM business, that on the web as in any other electronic publishing medium, good content well presented has priority over any black-hat tricks.
But what makes good content? Forget an obsession with stuffing bogus keywords in the text, and instead talk about the right things, and do it authoritatively. What are the right things in this context? If you are covering a subject, you need to do so using the right language; that which the majority uses rather than language only you use. I can think of a bunch of examples which I probably shouldn’t talk about, but an example close to home for me comes in cider. In the UK, cider is a fermented alcoholic drink made from apples, and as a craft cidermaker of many years standing I have a good grasp of its vocabulary. The accepted spelling is “Cider”, but there’s an alternate spelling of “Cyder” used by some commercial producers of the drink. It doesn’t take long to realise that online, hardly anyone uses cyder with a Y, and thus pages concentrating on that word will do less well than those talking about cider.
We Brits rarely use the word “soccer” unless there’s a story about the Club World Cup in America.
I started to build software to analyse language around a given topic, with the aim of discerning the metaphorical cider from the cyder. It was a great surprise a few years later to discover that I had invented for myself the already-existing field of computational linguistics, something that would have saved me a lot of time had I known about it when I began. I was taking a corpus of text and computing the frequencies and collocates (words that appear alongside each other) of the words within it, and from that I could quickly see which wording mattered around a subject, and which didn’t. This led seamlessly to an interest in what the same process would look like for news data with a time axis added, so I created a version which harvested its corpus from RSS feeds. Thus began my decades-long project.
Taking delivery of a new vehicle from a dealership is an emotional mixed bag. On the one hand, you’ve had to endure the sales rep’s hunger to close the deal, the tedious negotiations with the classic “Let me run that by my manager,” and the closer who tries to tack on ridiculous extras like paint sealer and ashtray protection. On the other hand, you’re finally at the end of the process, and now you get to play with the Shiny New Thing in your life while pretending it hasn’t caused your financial ruin. Wouldn’t it be nice to skip all those steps in the run-up and just cut right to the delivery? That’s been Tesla’s pitch for a while now, and they finally made good on the promise with their first self-driving delivery. Continue reading “Hackaday Links: July 6, 2025”→
So if the thought of having missed the deadline fills you with regret, here’s your second chance. We have spots for both 40-minute and 20-minute talks still open. We love to have a mix of newcomers as well as longtime Hackaday friends, so don’t be shy.
Supercon is a super fun time, and the crowd is full of energy and excitement for projects of all kinds. There is no better audience to present your feats of hardware derring-do, stories of reverse engineering, or other plans for world domination. Where else will you find such a density of like-minded hackers?
Great Scott! If my calculations are correct, when this baby hits 88 miles per hour, you’re gonna see some serious shit. — Doc Brown
On this day, forty years ago, July 3rd, 1985 the movie Back to the Future was released. While not as fundamental as Hackers or realistic as Sneakers, this movie worked its way into our pantheon. We thought it would be appropriate to commemorate this element of hacker culture on this day, its forty year anniversary.
If you just never got around to watching it, or if it has been a few decades since you did, then you might not recall that the movie is set in two periods. It opens in 1985 and then goes back to 1955. Most of the movie is set in 1955 with Marty trying to get back to 1985 — “back to the future”. The movie celebrates the advanced technology and fashions of 1985 and is all about how silly the technology and fashions of 1955 are as compared with the advancements of 1985. But now it’s the far future, the year 2025, and we thought we might take a look at some of the technology that was enchanting in 1985 but that turned out to be obsolete in “the future”, forty years on. Continue reading “Back To The Future, 40 Years Old, Looks Like The Past”→
This week Jonathan chats with benny Vasquez about AlmaLinux! Why is AlmaLinux the choice for slightly older hardware? What is the deal with RISC-V? And how does EPEL fit in? Tune in to find out!