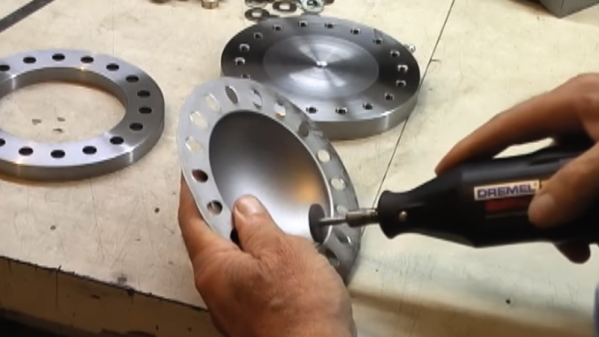
Never underestimate the power of an incompressible fluid at high pressure. Properly constrained and with a full understanding of the forces involved, hydraulic pressure can be harnessed to do some interesting things in the home shop, like hydroforming stainless steel into custom motorcycle parts.
From the look of [Clarence Elias]’s video below, it seems like he has a 100% custom motorcycle build going on in his shop. That means making every part, including the reflectors for the lights. While he certainly could have used a traditional approach, like beating sheet stainless with a planishing hammer or subjecting it to the dreaded English wheel, [Clarence] built a simple yet sturdy hydroforming die for the job. A thick steel ring clamps the sheet stainless to a basal platen with an inlet from the forming fluid, which is ordinary grease. [Clarence] goes through the math and the numbers are impressive — a 1,500-psi grease gun can be mighty persuasive under such circumstances. The result is a perfectly formed dish with no tool marks, in need of only a little polishing to be put into service.
My basement workshop is so crammed full of stuff I literally can’t use it. My workbench, a sturdy hardwood library table, is covered in junk to the point that I couldn’t find a square foot that didn’t have two layers of detritus on it — the top layer is big things like old projects that no longer work, boxes of stuff, fragile but light things perched on top. Underneath is the magma of bent resistors, snippets of LED strip, #4 screws, mystery fasteners I’ll never use, purple circuit boards from old versions of projects, and a surprising number of SparkFun and Adafruit breakouts that have filtered down from higher up in the heap.
When work on something I bring the parts up to the dining room and work on the table, which is great for many reasons — more space, better light, and superior noms access top the list. The down side is that I don’t devote any time to making my real shop into a viable working place, and it becomes a cluttered store room by default.
I am therefore focusing on a four-part plan to reclaim my work space from heaps of junk.
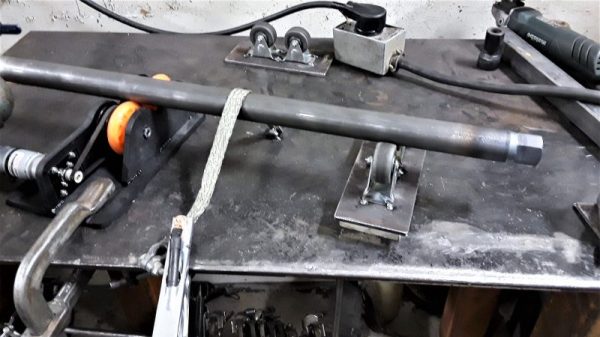
You can tell a lot about a person by the company they keep, and you can tell a lot about a craftsman by the tools and jigs he or she builds. Whether for one-off jobs or long-term use, these ad hoc tools, like this tubing rotator for a welding shop, help deliver results beyond the ordinary.
What we appreciate about [Delrin]’s tool is not how complex it is — with just a motor from an old satellite dish and a couple of scooter wheels, it’s anything but complicated. What we like is that to fabricate some steering links, each of which required three passes of TIG welding to attach a threaded bung to the end of a rod, [Delrin] took the time to build just the tool for the job. The tools slowly rotates the rod, letting the welder keep the torch in one position as the workpiece moves under it. The grounding method is also simple but clever — just a wide strap of braid draped over the rod. The result is some of the prettiest and most consistent welds we’ve seen in a while, and with an order for 28 steering links, it ought to be a huge time saver.
It may be time for a little more TIG welding love around here. Sure, we’ve covered the basics of oxy-acetylene welding, and even talked about brazing aluminum. Perhaps your humble Hackaday writer will take the plunge into a new TIG welder and report from a newbie’s perspective. You know, for science.
When men were men, and oscilloscopes were oscillographs.
Do you remember your first oscilloscope? Maybe we have entered the era in which younger readers think of a sleek model with an LCD screen, but for the slightly older among us the image that will come to mind is likely to be a CRT-based behemoth. Mine was a 2MHz bandwidth Cossor from the 1950s, wildly outdated by the 1980s, but it came to me at no cost. It proudly proclaims itself as a “Portable Oscillograph”, but requires its owner to be a weightlifter to move it. I still have it, as a relic and curio.
For most of us a new ‘scope is still a significant investment. Even affordable current models such as the extremely popular Rigol instruments are likely to cost several hundred dollars, but offer measurement functions undreamed of by those 1950s engineers who would have looked on the Cossor as an object of desire.
Oscilloscope buyers on a budget may not have the cash for a Rigol, a Hantek, or any of the other affordable ‘scopes. Someone starting on the road of electronic engineering can scout around for a cheap or free second-hand CRT model, but thanks to the ever advancing march of technology they also have another option. Modern microprocessors and microcontrollers have analogue-to-digital converters and processor cores that are fast enough to provide the functions of a simple oscilloscope, and to that end a variety of very cheap ‘scopes and ‘scope kits have come on the market. These invariably have a rather small LCD screen and a relatively low bandwidth, but since they can be had for almost pocket-money prices their shortcomings can be overlooked in the name of value. It’s been a matter of curiosity for some time then: are these instruments any good? For around £16 ($21) and the minor effort of an online order from China, we decided to find out.
If you look at most stockists of electronic kits these days, you are likely to find an oscilloscope kit in their range. These are volume produced in China, and the same design trends appear across different models. You can buy surface mount or through-hole, and most of them feature a bare board with maybe a piece of laser-cut Perspex standing in for a case. There are one or two models appearing that come with a case though, and it was one of these that we ordered. The JYE Tech DSO150 is a single-channel ‘scope with a 2.4″ 320×240 pixel colour LCD screen and a 200kHz bandwidth. Its specification is typical of the crop of similar kits, though its smart case sets it apart and made it an easy choice.
In the Box
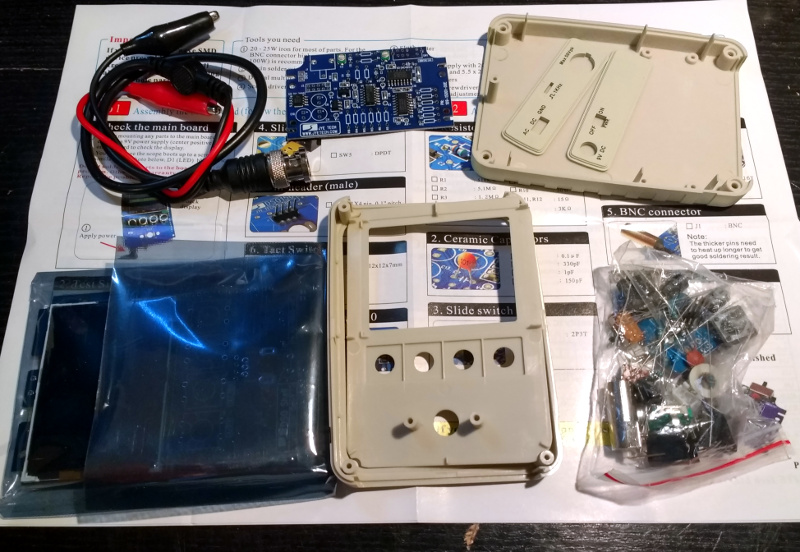
We ordered one, and when it arrived, it was packed in a small cardboard carton that had suffered some crushing in transit, but had protected the internal contents well enough that no harm had been done. A layer of foam protected the LCD, and the case parts appeared rigid enough to protect the rest of the components. There was a bag of discretes, the case parts, two PCBs, a test lead with crocodile clips, and two pages of instructions.
When looking at a kit, it’s best to start with the instructions, because no matter the quality of the kit itself it is the quality of the instructions that make or break a kit. If you can’t build it then it doesn’t matter how good it might be, it’s effectively junk.
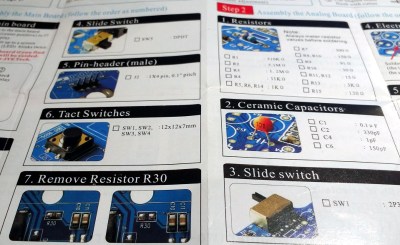
The DSO150 instructions are two sheets of high quality double-sided colour print, with the emphasis on pictures rather than words, The front page introduces the kit and gives a quick soldering guide, then the next two pages step through each stage of construction. The final page has basic instructions for use, specification, and a troubleshooting guide. Our kit had all surface-mount parts already fitted, if we’d known the kit could also be had with SMD parts to fit we’d have bought that version instead.
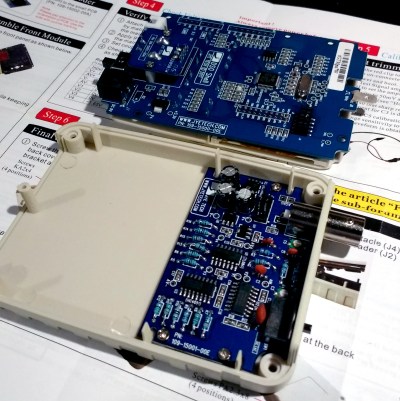
Inside the DSO100.
The instruction steps are long on images and short on text, but there are sometimes few cues as to where the component in question lies on the board. Sometimes some careful examination of board and picture is necessary to ensure correct placement. The first step though doesn’t involve any soldering, wire the main board up to a 9V supply, and watch the LCD boot into the oscilloscope software. There is support via a forum on the JYE Tech website, we presume you’d go there if it failed to boot out of the box. A 9V PSU isn’t included, you’ll need to find one with a 2.1mm centre positive plug. Fortunately a suitable candidate was in the box of wall warts here, formerly being used by a router.
The main board assembly is straightforward enough, being the assembly of larger through-hole parts such as switches and connectors. The analogue board has a brace of small through-hole resistors and ceramic capacitors to fit, of these the resistors were of the tiny variety which made distinguishing between some of their colour stripes a little difficult. Bring your multimeter to check. There is a BNC connector that requires significant heat on there too, so make sure you have a suitably beefy iron to hand. Finally there is a small board for the rotary encoder, then the front of the case can be assembled to the main board, the analogue board attached, and the ‘scope set up. Verify on-board voltages, attach the test clip to the calibration output and adjust the compensation capacitors for a square wave, and the rest of the case can be added to complete the unit.
Functionality
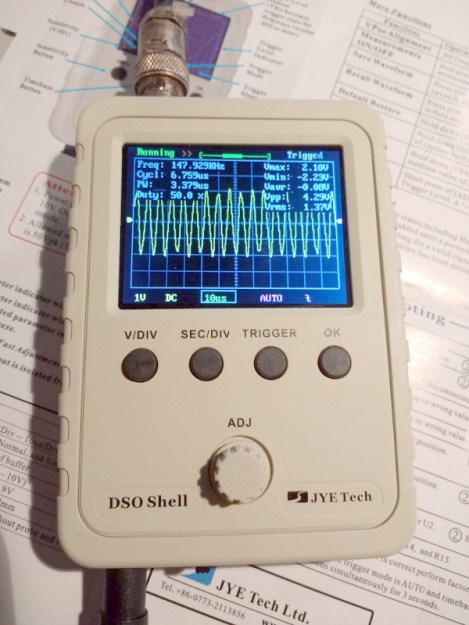
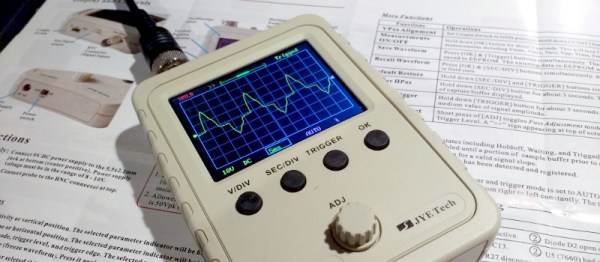
The DSO150 showing the upper end of its bandwidth.
In use, the DSO150 makes a simple and straightforward enough oscilloscope. The usual volts/division and timebase selection is easy enough, and the various trigger modes can quickly be selected. If you’ve used an oscilloscope before then you will have no problems getting started with it. But of course, the DSO150 isn’t just a simple oscilloscope, it’s a digital storage ‘scope. And with 1024 sampling points it can do the usual storage ‘scope thing of allowing the user to examine a stored waveform in great detail, scrolling back and forth through the stored points. Here the instruction sheet falls short, not mentioning that a double tap on the V/div or Sec/div buttons allows you to scroll.
Connecting the signal generator to our DSO150 allowed the exploration of its bandwidth. The claimed 200kHz is pretty spot-on, winding the signal generator far beyond that point showed a tail-off in displayed amplitude. Also the minimum 10µS per division limits the usefulness of a waveform display at these frequencies.
The DSO150 is supplied with a short test lead terminated in a pair of crocodile clips. This is somewhat less useful than the oscilloscope probes we’re used to, though happily it can also be used with a standard 1x/10x probe. Looking at the square wave on the test terminal through a standard probe reveals a sharp corner on the waveform, so there seems not to be any problems between the compensation on-board and that in the probe. It’s likely that either the DSO150 here will be used with a standard probe, or that the crocodile clip will swiftly be replaced with a probe of some kind.
Closing Thoughts
So then, the JYE Tech DSO150 oscilloscope kit. A nice little ‘scope within the limitations of the STM32F103C8 microcontroller that drives it. If you can put up with a 200kHz bandwidth and a 50V peak input voltage then it’s a useful pocket instrument. Its calibration will depend on the STM’s crystal and voltage reference, but as with the rest of its specification, when you consider its pocket-money price those become minor considerations. Add in that its software is open-source, and you have a very nice platform indeed. If we wanted to nitpick we’d ask for a battery compartment and a proper probe, but since both of those would put up the price we wouldn’t make too much noise about it. If you need a pocket ‘scope to supplement your bench scope when working on lower frequencies, or if you have a youngster in the family looking for their first ‘scope, buy one! Our review unit will definitely see some use rather than gathering dust.
Anyone keeping up with financial news today is surely inundated with stories about Bitcoin and other cryptocurrencies. While most of the news is about the potentially inflated value of some of these coins, and how drastically they have changed in price in just a decade, there are other interesting things going on behind the scenes. For example, the currency Ethereum allows for a distributed programming platform of sorts to be implemented in the blockchain, which [GusGorman402] has taken advantage of in his latest project (YouTube link, embedded below).
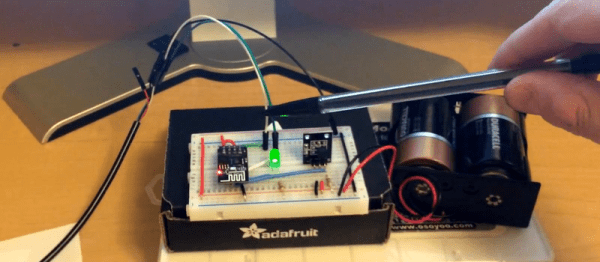
The device that he built is based on an ESP8266 which connects to a router running an instance of a Go Ethereum node. Essentially, he uses the Ethereum blockchain to control an LED connected to the ESP8266 using a feature of Ethereum called a smart contract. While this might be a misleading name, a smart contract is basically an autonomous program that can do virtually anything a programmer writes into it. While this is a roundabout way to write a “Hello World” program, it does demonstrate the power of the Ethereum platform when compared to other cryptocurrencies.
If you’re interested in currency trading, blockchains, cryptography, or the future of computing, be sure to check out the detailed video after the break. It’s a curious new tool, and it will be interesting to see how developers and hackers alike use it to accomplish things we’ve never thought of yet.
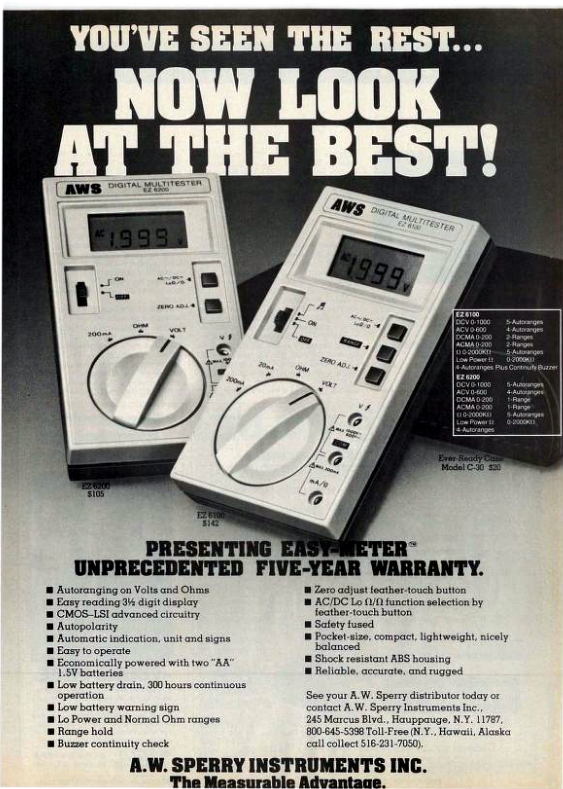
If you were to ask a random Hackaday reader what their most fundamental piece of electronic test equipment was, it’s likely that they would respond with “multimeter”. If you asked them to produce it, out would come a familiar item, a handheld brick with a 7-segment LCD at the top, a chunky rotary selector switch, and a pair of test probes. They can be had with varying quality and features for anything from a few dollars to a few hundred dollars, though they will nearly all share the same basic set of capabilities. Voltage in both AC and DC, DC current, resistance from ohms to mega ohms, and maybe a continuity tester. More expensive models have more features, may be autoranging, and will certainly have better electrical safety than the cheaper ones, but by and large they are a pretty standard item.
If Hackaday had been around forty years ago and you’d asked the same question, you’d have had a completely different set of multimeters pulled out for your inspection. Probably still a handheld brick with the big selector switch, but instead of that LCD you’d have seen a large moving-coil meter with a selection of scales for the different ranges. It would have done substantially the same job as the digital equivalent from today, but in those intervening decades it’s a piece of equipment that’s largely gone. So today I’m going to investigate moving coil multimeters, why you see them a lot less these days than you used to, and why you should still consider having one in your armoury. Continue reading “Why You Shouldn’t Quite Forget The Moving Coil Multimeter”→
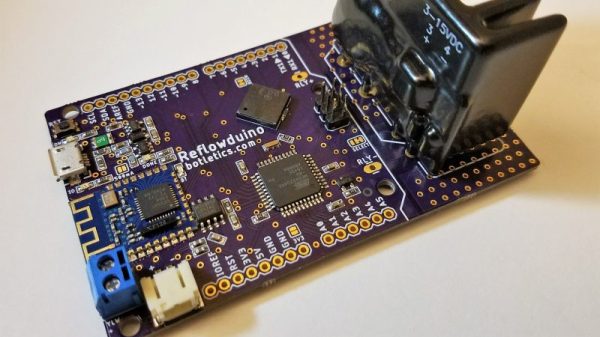
Face it — you want a reflow oven. Even the steadiest hands and best eyes only yield “meh” results with a manual iron on SMD boards, and forget about being able to scale up to production. But what controller should you use when you build your oven, and what features should it support? Don’t worry — you can have all the features with this open source reflow oven controller.
Dubbed the Reflowduino for obvious reasons, [Timothy Woo]’s Hackaday Prize entry has everything you need in a reflow oven controller, and a few things you never knew you needed. Based on an ATMega32, the Reflowduino takes care of the usual tasks of a reflow controller, namely running the PID loop needed to accurately control the oven’s temperature and control the heating profile. We thought the inclusion of a Bluetooth module was a bit strange at first, but [Timothy] explains that it’s a whole lot easier to implement the controller’s UI in software than in hardware, and it saves a bunch of IO on the microcontroller. The support for a LiPo battery is somewhat baffling, as the cases where this would be useful seem limited since the toaster oven or hot plate would still need a mains supply. But the sounder that plays Star Wars tunes when a cycle is over? That’s just for fun.
Hats off to [Timothy] for a first-rate build and excellent documentation, which delves into PID theory as well as giving detailed instructions for every step of the build. Want to try lower-end reflow? Pull out a halogen work light, or perhaps fire up that propane torch.


 If you look at most stockists of electronic kits these days, you are likely to find an oscilloscope kit in their range. These are volume produced in China, and the same design trends appear across different models. You can buy surface mount or through-hole, and most of them feature a bare board with maybe a piece of laser-cut Perspex standing in for a case. There are one or two models appearing that come with a case though, and it was one of these that we ordered.