Romanian Cobra clone

Romania’s 1980s Illicit DIY Computer Movement

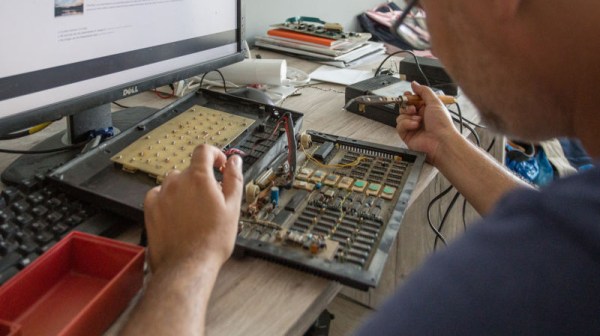
In Western countries in the early 1980s, there was plenty of choice if you wanted an affordable computer: Apple, Atari, TRS-80, Commodore and Sinclair to name a few. But in communist-ruled Romania, mainly you’d find clones of the British Sinclair ZX Spectrum, an 8-bit computer built around the Zilog Z80A, using a CRT TV as display and a BASIC interpreter as UI. The Cobra was one such Romanian Sinclair clone. However, most people couldn’t afford even that, which lead to hackers building their own versions of the Cobra.

Making these clones was highly illegal. But that didn’t stop students at the Politehnica University of Bucharest. They made them for themselves, family and friends, and even sold them at well under market price. To keep people from building radio transmitters, the Communist government kept electronics prices high. So instead, parts smuggled from factories could be paid for with a pack of cigarettes.

Look inside an old Apple II and you’ll see a sea of chips accomplishing what can be done with only a few today. The Cobra clones looked much the same, but with even more chips. Using whatever they could get their hands on, the students would make 30 chips do the job of an elusive $10 chip. No two computers were necessarily alike. Even the keyboards were hacked together, sometimes using keys designed for mainframe computers but with faults from the molding process. These were cleaned up and new letters put on. The results are awesome hacks which fit right in here on Hackaday.

Sadly though, it often takes harsh necessity to make a culture where these inspiring hacks thrive in the mainstream. Another such country which we’ve reported on this happening in is Cuba, which found the necessity first when the U.S. left Cuba in the 60s and again when the Soviet Union collapsed in the 90s, reducing the availability of many factory produced items needed for daily life, and creating a DIY society.

Bionic Eye Trial Approved

Pixium Vision, a French company, has received the approval to begin in-human trials of a miniature wireless sub-retinal implant. Named PRIMA, the device may help those with advanced dry age-related macular degeneration get improvements in their eyesight. The company is in talks to also conduct trials in the United States.

The PRIMA implant is a photovoltaic chip about 2mm square and only 30 microns thick. That’s tiny, but the device has 378 electrodes. The patient uses a device that looks like a conventional pair of glasses but contains an integrated camera that sends data wirelessly to a small pocket-sized image processing computer. This computer then commands the glasses to send data to the implant via invisible infrared light. The chip converts the light to electrical impulses and conducts them to the optic nerve. You can see a video about how the system works below.

Continue reading “Bionic Eye Trial Approved”

Heat-Set Insert Jig Grants Threads To 3D Prints

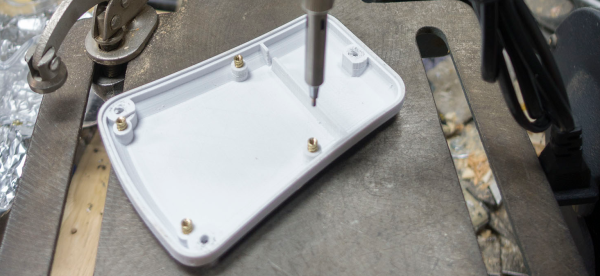
FDM 3D prints might be coming home this holiday as seasonal ornaments, but with a few tweaks, they may even stand up to the tests of the real world as functional prototypes. Heat-Set inserts are one such tweak that we can drop into a print, and [Kurt] spares no expense at laying down a guide to get us comfortable with these parts. Here, he’s created a drill press adapter and modified his soldering iron to form an insert jig to start melting these parts into his next project.

Heat-set inserts grant us proper screw threads in any thermoplastic. Simply heat them up, stake them into your part, let cool, and: voila–a screw thread that’s firmly embedded into our part. We can load these inserts with clumsy hand tools, but why fumble and bumble with a hot soldering iron when we can adapt our drill press to do most of the tricky fixturing for us? That’s exactly what [Kurt] did here. With a 3D-printed adaptor, he’s letting his drill press (turned off!) hold the soldering iron so that he can use the lever to slowly stake the part into the 3D print. Finally, for no additional charge, [Kurt] turned down his soldering tip to mate cleanly into the insert for a cleaner removal.

We’ve seen adapters like this one before, but it’s never too often to get a reminder of the structural bonus that these parts can add to our 3D prints.

Remote Controlled Jeep Destroyed For Your Amusement

Something you learn when you spend a good portion of your day trolling the Internet for creative and unique projects is that “Why?” is one question you should always be careful about asking. Just try to accept that, for this particular person, at this particular time, the project they poured heart and soul into just made sense. Trust us, it’s a lot easier that way.

This mantra is perhaps best exemplified (at least for today), by the incredible amount of work [Stephen Robinson] did to convert a real Jeep Cherokee into a remote control toy. But the crazy part it isn’t so much that he managed to convert a real Jeep to RC, it’s that the first thing he did with it was take it into a field and destroy it.

The stunt is part of a series of videos [Stephen] has on his YouTube channel called “How to learn anything”. His goal in this series is to learn two different skills from industry professionals and combine them in interesting and unconventional ways. The production quality on these videos is really top-notch, and definitely blew us away considering how few subscribers he currently has. If we had to guess, we’d say [Stephen] is about to get real big, real fast.

As it turns out, the process for turning a full size vehicle into a remote-controlled one isn’t actually that complex, relatively speaking. [Stephen] starts by removing the seat and replacing it with a metal frame that holds a motor salvaged from an electric wheelchair to turn the wheel, and a linear actuator to push the brake pedal. He lucked out a bit with the throttle, as this particular Jeep was old enough that there was still an easily accessible throttle cable they could yank with a standard hobby servo; rather than some electronic system they would have had to reverse engineer.

The rest of the hardware is pretty much your standard RC hobby gear, including a Spektrum DX6 transmitter and FPV equipment. Though due to continual problems with his FPV setup, [Stephen] eventually had to drive the Jeep up the ramp by line of sight, which took a few tries.

While this is still probably safer than riding around in a life-size quadcopter, we can’t say it’s the most sophisticated way a hacker has taken over a Jeep remotely.

Continue reading “Remote Controlled Jeep Destroyed For Your Amusement”

Hackaday Prize Entry: Reflowduino, The Open Source Reflow Oven Controller

Face it — you want a reflow oven. Even the steadiest hands and best eyes only yield “meh” results with a manual iron on SMD boards, and forget about being able to scale up to production. But what controller should you use when you build your oven, and what features should it support? Don’t worry — you can have all the features with this open source reflow oven controller.

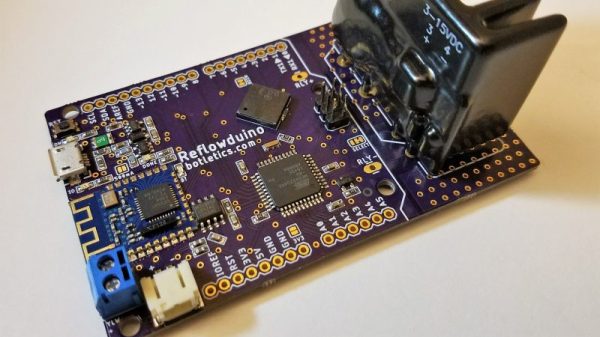
Dubbed the Reflowduino for obvious reasons, [Timothy Woo]’s Hackaday Prize entry has everything you need in a reflow oven controller, and a few things you never knew you needed. Based on an ATMega32, the Reflowduino takes care of the usual tasks of a reflow controller, namely running the PID loop needed to accurately control the oven’s temperature and control the heating profile. We thought the inclusion of a Bluetooth module was a bit strange at first, but [Timothy] explains that it’s a whole lot easier to implement the controller’s UI in software than in hardware, and it saves a bunch of IO on the microcontroller. The support for a LiPo battery is somewhat baffling, as the cases where this would be useful seem limited since the toaster oven or hot plate would still need a mains supply. But the sounder that plays Star Wars tunes when a cycle is over? That’s just for fun.

Hats off to [Timothy] for a first-rate build and excellent documentation, which delves into PID theory as well as giving detailed instructions for every step of the build. Want to try lower-end reflow? Pull out a halogen work light, or perhaps fire up that propane torch.

Peggy Whitson, Space Scientist

When astronaut Dr. Peggy Whitson returned from space earlier this year, it was a triumphant conclusion to a lifelong career as a scientist, explorer, and leader. Whitson is a biochemist who became one of the most experienced and distinguished astronauts ever to serve. She’s got more time logged in space than any other American. There’s a reason that she’s been called the Space Ninja.

Education and Early Life

Some people find their vocation late in life, but Peggy Whitson figured it out in her senior year of high school. It was 1979 and NASA had just accepted its first class of female astronauts, including Christa McAuliffe and Judith Resnik who ultimately died aboard the Challenger.

Born on a family farm in Iowa in 1960, Whitson began working on her plan, with the stereotypical Midwestern work ethic seeming to prime her for the hard slog ahead. She earned a BS in Biology/Chemistry, Summa, from Iowa Wesleyan, before earning a Ph.D. in biochemistry from Rice in 1985. A person can write about Whitson blazing through to a doctorate in a single sentence, but the truth is that it’s just a lot of hard work, and that’s one of the aspects of her career that stands out: she worked tirelessly.

Scientist Career

After getting her doctorate, Whitson worked as a research associate at Johnson Space Center as part of a post-doctoral fellowship. She put in a couple of years as a research biochemist, working on biochemical payloads
like the Bone Cell Research Experiment in STS-47, which was run in space by fellow badass Dr. Mae Jamison. Whitson hadn’t given up on her dream of becoming an astronaut herself, and the whole time she worked at Johnson she was applying to NASA. It took ten years and five applications before she made it in.

In the meantime, however, Whitson was given a lot of very cool projects and also began to establish her credentials as a leader, serving as Project Scientist of the Shuttle-Mir Program from 1992 till 1995. For three years she helped lead Medical Sciences Division at Johnson. The two years after that she co-chaired the NASA committee on US-Russian relations. And because she still had more time to crush it, she also worked as an adjunct professor at the University of Texas Medical Branch as well as at Rice.

Then, in April of 1996, she learned that her hard work had paid off and that she had been accepted into astronaut school. Peggy Whitson was going to space.

Ad Astra

It would be eight more years before she made it to space, however. Two years of intense training was followed by ground-based technical duties, including two years spent in Russia in support of NASA crews there. However, in 2002 she got her chance, flying in a Soyuz up to the International Space Station as part of Expedition 5. There she conducted science experiments and helped install new components in the space station, logging 164 days in space.

Back on earth, Whitson continued to kick ass as a scientist, astronaut, and leader. In 2003 she commanded a 10-day underwater mission that helps trains astronauts for extended stays in space, preparing her for her signature accomplishments: two tours where she commanded the ISS.

In 2008 she led Expedition 16, in which three additional modules were added to the ISS. Because of the new construction, and despite her science focus, Whitson became one of NASA’s most prolific spacewalkers, making 10 EVAs in her career — second only to cosmonaut Anatoly Solovyev’s 16 and her cumulative EVA time of 60 hours is third best in the world.

The three years that followed she served as Chief Astronaut, before she returned to space in November 2016 as commander of Expedition 50. Compared to 16 it was much more mellow, albeit with hundreds of biochemistry experiments conducted. In April of 2017, Whitson surpassed the U.S. space endurance record, earning her a call from the President. She ended up with 665 days in space, returning September 2 as a hero.

Dr. Peggy Whitson’s brilliance and tireless drive have earned her innumerable awards and commendations. Her elementary school has a science lab named after her. This year Glamour named her one of their women of the year. She serves as an inspiration to anyone who aspires to a career in science, math, or space exploration: it won’t be easy, and it will take a really long time, but it’s the kind of work that makes the world a distinctly better place.

Photo Credit: NASA

Open Source Motor Controller Makes Smooth Moves With Anti-Cogging

Almost two years ago, a research team showed that it was possible to get fine motor control from cheap, brushless DC motors. Normally this is not feasible because the motors are built-in such a way that the torque applied is not uniform for every position of the motor, a phenomenon known as “cogging”. This is fine for something that doesn’t need low-speed control like a fan motor, but for robotics it’s a little more important. Since that team published their results, though, we are starting to see others implement their own low-speed brushless motor controllers.

The new method of implementing anti-cogging maps out the holding torque required for any position of the motor’s shaft so this information can be used later on. Of course this requires a fair amount of calibration; [madcowswe] reports that this method requires around 5-10 minutes of calibration. [madcowswe] also did analysis of his motors to show how much harmonic content is contained in these waveforms, which helps to understand how this phenomenon arises and how to help eliminate it.

While [madcowswe] plans to add more features to this motor control algorithm such as reverse-mapping, scaling based on speed, and better memory usage, it’s a good implementation that has visible improvements over the stock motors. The original research is also worth investigating if a cheaper, better motor is something you need.