A DIY Vacuum Pickup Tool For $75

If you’re assembling prototypes of SMD boards on your own, placing the parts accurately can be a pain. Of course, it’d be nice to have a full pick and place machine, but those are rather expensive and time consuming to set up, especially for a small run of boards. Instead, a vacuum pickup tool can help you place the parts quickly and accurately by hand.

The folks over at Ohmnilabs have put together their own DIY pickup tool for about $75, and it’s become part of their in-house prototyping process. They grew tired of placing components with tweezers, which require you to remove parts from the tape before lifting them, and have a tendency to flip parts over at the worst time.

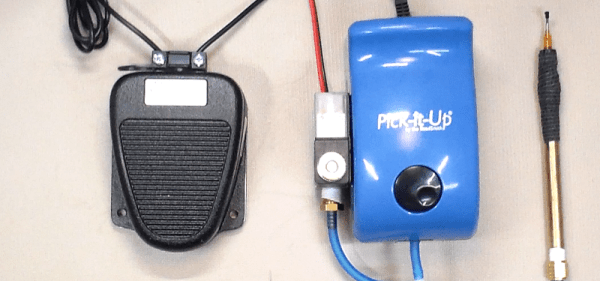
The build consists of a couple parts that can be bought from Amazon. An electric vacuum pump does the sucking, and the vacuum level is regulated with an adjustable buck converter. A solid foot switch keeps your hands free, and syringe tips are used to pick the parts up.

This looks like a simple afternoon build, but if you’re prototyping, it could save you tons of time. To see it in action, check out the video after the break.

Continue reading “A DIY Vacuum Pickup Tool For $75”

Smartphone Bench Instrument Apps: Disappointment Or Delight?

If you are interested in electronics or engineering, you’ll have noticed a host of useful-sounding apps to help you in your design and build work. There are calculators, design aids, and somewhat intriguingly, apps that claim to offer an entire instrument on your phone. A few of them are produced to support external third-party USB instrument peripherals, but most of them claim to offer the functionality using just the hardware within the phone. Why buy an expensive oscilloscope, spectrum analyzer, or signal generator, when you can simply download one for free?

Those who celebrate Christmas somewhere with a British tradition are familiar with Christmas crackers and the oft-disappointing novelties they contain. Non-Brits are no doubt lost at this point… the crackers in question are a cardboard tube wrapped in shiny paper drawn tight over each end of it. The idea is that two people pull on the ends of the paper, and when it comes apart out drops a toy or novelty. It’s something like the prize in a Cracker Jack Box.

Engineering-oriented apps follow this cycle of hope and disappointment. But there are occasional exceptions. Let’s tour some of the good and the bad together, shall we?

Continue reading “Smartphone Bench Instrument Apps: Disappointment Or Delight?”

Characterizing A Cheap 500MHz Counter Module

An exciting development over the last few years has been the arrival of extremely cheap instrumentation modules easily bought online and usually shipped from China. Some of them have extremely impressive paper specifications for their price, and it was one of these that caught the eye of [Carol Milazzo, KP4MD]. A frequency counter for under $14 on your favourite online retailer, and with a claimed range of 500 MHz. That could be a useful instrument in its own right, and with a range that significantly exceeds the capabilities of much more expensive bench test equipment from not so long ago.

Just how good is it though, does it live up to the promise? [Carol] presents the measurements she took from the device, so you can see for yourselves. She took look at sensitivity, VSWR, and input impedance over a wide range, after first checking its calibration against a GPS-disciplined standard and making a fine adjustment with its on-board trimmer.

In sensitivity terms it’s a bit deaf, requiring 0.11 Vrms for a lock at 10 MHz. Meanwhile its input impedance decreases from 600 ohms at the bottom of its range to 80 ohms at 200 MHz, with a corresponding shift in VSWR. So it’s never going to match a high-end bench instrument from which you’d expect much more sensitivity and a more stable impedance, but for the price we’re sure that’s something you can all work around. Meanwhile it’s worth noting from the pictures she’s posted that the board has unpopulated space for an SPI interface header, which leaves the potential for it to be used as a logging instrument.

We think it’s worth having as much information as possible about components like this one, both in terms of knowing about new entrants to the market and in knowing their true performance. So if you were curious about those cheap frequency counter modules, now thanks to [Carol] you have some idea of what they can do.

While it’s convenient to buy a counter module like this one, of course there is nothing to stop you building your own. We’ve featured many over the years, this 100MHz one using a 74-series prescaler or this ATtiny offering for example, or how about this very accomplished one with an Android UI?

How To Control Your Instruments From A Computer: It’s Easier Than You Think

There was a time when instruments sporting a GPIB connector (General Purpose Interface Bus) for computer control on their back panels were expensive and exotic devices, unlikely to be found on the bench of a hardware hacker. Your employer or university would have had them, but you’d have been more likely to own an all-analogue bench that would have been familiar to your parents’ generation.

A GPIB/IEEE488 plug. Alkamid [CC BY-SA 3.], via Wikimedia Commons
A GPIB/IEEE488 plug. Alkamid [CC BY-SA 3.], via Wikimedia Commons.
The affordable instruments in front of you today may not have a physical GPIB port, but the chances are they will have a USB port or even Ethernet over which you can exert the same control. The manufacturer will provide some software to allow you to use it, but if it doesn’t cost anything you’ll be lucky if it is either any good, or available for a platform other than Microsoft Windows.

So there you are, with an instrument that speaks a fully documented protocol through a physical interface you have plenty of spare sockets for, but if you’re a Linux user and especially if you don’t have an x86 processor, you’re a bit out of luck on the software front. Surely there must be a way to make your computer talk to it!

Let’s give it a try — I’ll be using a Linux machine and a popular brand of oscilloscope but the technique is widely applicable.

Continue reading “How To Control Your Instruments From A Computer: It’s Easier Than You Think”

Ikea Desk Lamp That Will Defend Your Lungs

While some people may enjoy the occasional whiff of noxious smells — gasoline, axe body spray, etc — prolonged exposure to fumes is not good for your health. This goes for soldering too, isn’t it about time you added some abatement to your bench tools?

Inspired by some of the fume hoods we’ve featured before — take note, ye who art lacking projects — [Georg Sluyterman] put together his own Ikea lamp fume extractor.

The most striking feature is that it’s mounted on an Ikea desk lamp making for convenient positioning and minimal clutter. A NeoPixels strip lights up your soldering space while the PIR sensor activates the fan when it detects movement. A WeMos D1 Mini is included for WiFi connectivity but that feature still down the road a little bit. The functionality that is in place is still quite impressive; more on that after the break.

Continue reading “Ikea Desk Lamp That Will Defend Your Lungs”

Documentation? Wave Me!

A lot of hardware and software hackers aren’t all that keen on documentation. The problem is, if you don’t document, it is harder for people to replicate or build on your work. If you aren’t happy writing, keep the old adage in mind: a picture is worth a thousand words.

With a digital design, a timing diagram is often a key piece of documentation. WaveMe is a free Windows program that makes it easy to create good-looking timing diagrams. You can run the software on other platforms via Wine.

Continue reading “Documentation? Wave Me!”

Getting A Handle On ESR With A Couple Of DIY Meters

Got a bunch of questionable electrolytic caps sitting in your junk bin? Looking to recap a vintage radio chassis? Then you might need to measure the equivalent series resistance of the capacitors, in which case this simple five-transistor ESR meter might come in handy.

Even if you have no need for an ESR meter, [W2AEW]’s video below is a solid introduction to how ESR is determined. The circuit itself comes from EEVBlog forum user [Jay-Diddy_B] and is about as simple as such a circuit can get. Two transistors form an oscillator that generates a square wave that drives a resistor bridge network. The two legs of the bridge feed matched common-emitter amps, one leg through the device under test. The difference in voltage between the two legs is read on a meter, and you have a quick and simple way to sort through the caps in your junk bin. [Jay-Diddy_B]’s circuit is only presented in breadboard form; no attempt was made to field a practical instrument. Indeed, [W2AEW] already built a home-brew ESR meter using hex inverters and op amps to which he compares the five-transistor circuit’s results. His intention here seems to be to clarify the technique of ESR measurement and evaluate an even simpler circuit than his. We think he’s done a good job on both counts.

We’ve featured plenty of [WA2AEW]’s work before, like this Michigan Mity-Mite transmitter or his primer on oscilloscopes. We really like his laid back style and the way he makes complex topics easy to understand. Check them out.

Continue reading “Getting A Handle On ESR With A Couple Of DIY Meters”