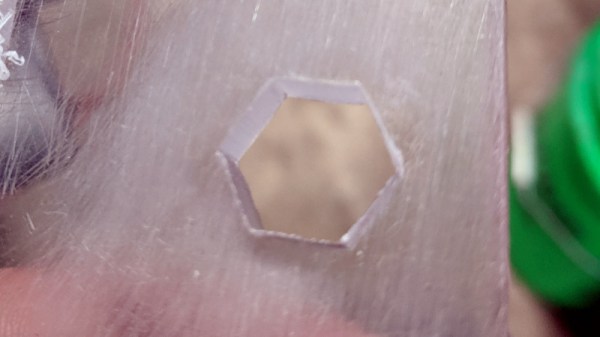
Laser Welding With A Tattoo Removal Gun

Dating as far back as the early 1960’s, researchers were zapping tattoo inks with laser light was an effective way to remove the markings from human skin. At the time it was prohibitively expensive. But the desire to have an undo-button for badge choices is strong, and thus the tattoo removal gun was born.

These days you can pick up one of these zappy, burn-y wonders for far less than a flagship cellphone put their high-power-output to alternative use. [Andrew] recently discovered that these devices can be readily repurposed into a laser welding tool with just a bit of work under the hood.

He first came across the technology via videos from [styropyro], whose work we’ve featured before. The tattoo removal gun features a YAG laser, which is pulsed to create a high power density. In initial testing, the pulses were too short and of too high intensity to effectively weld with; instead, the pulses simply cratered the metal.

After delving in further, [Andrew] discovered that by removing the Q-switch optical component, the pulses from the laser could be lengthened. This reduces the power density, and allows the tool to weld various materials even on its lower power settings. Success was found welding steel, titanium, and other materials, though attempts to weld copper and silver faced little success. Test pieces included razor blades and small screws, which could easily be welded with the tool. Results of the razor blade welding is spectacular, with a high-quality welding bead achieved by taping the laser to a CNC mill for precise movement.

It could prove to be a useful tool for those experimenting with complex projects involving bonding metals at very fine scales. If you’re pursuing something exotic yourself, we want to hear about it!

Motorizing A Plasma Cutter On The Cheap

A hand-held plasma cutter is an excellent tool to have if you are working with sheet metal, but it’s not particularly well suited to making long or repetitive cuts. Which is why [workshop from scratch] worked his usual scrapheap magic and built his own motorized track for making perfectly straight cuts.

Most of the frame, and even the small truck that rides on it, is made out of square stock in various sizes. A couple of bearings are enough to make sure the movement is smooth and doesn’t have too much slop. Motion is provided by a long threaded rod and two nuts, which are welded to the side of the truck.

If you had the patience (and forearm strength) you could just put a crank on the rod and be done with it, but in this case [workshop from scratch] used the motor, gearbox, and chuck from an old electric drill to grab onto the threaded rod and do the spinning for him. He rigged up an enclosure for the side of the rack that holds the motor, DC power supply, and motor controller, along with a couple of switches and a knob to control the speed.

A modification allows him to enable the plasma cutter with one of the switches on the panel, which gives the setup a much more complete feel than just putting a zip tie on the trigger. With this design, the plasma cutter itself can still be removed from the mount and used normally. You can even remove the motorized component with a few bolts if you just wanted to do manual cuts on the bed.

In the video after the break, the keen-eyed viewer may notice a few familiar pieces of gear in the background, such as the hydraulic bench vise we covered earlier in the year. As the name of the channel implies, [workshop from scratch] is all about building the workshop tools that many take for granted, and they’ve all been phenomenally fascinating projects. While we admire the gumption it takes to try and build a lathe out of scrap granite slabs, there’s something to be said for DIY tools that end up looking nearly as good as commercial offerings.

Continue reading “Motorizing A Plasma Cutter On The Cheap”

DIY Electric Roller Bender Can Handle The Thick(er) Stuff

Every serious metal worker will end up getting themself a roller bender at some point, but if you’re as dedicated as [Meanwhile in the Garage], you might just start building the things yourself. His heavy-duty electric roller bender, demonstrated in the video after the break, is perfect for the thicker steel and bigger radii his smaller manual machine can’t handle.

The basic concept is the same in both machines, with two fixed rollers and a third adjustable opposing one between them. Most of the components are pieces of scrap metal, and each shaft runs on bearings mounted in homemade pillow blocks. The two fixed shafts are connected together by a chain drive, and a scrap industrial motor provides the rotating power through a worm gearbox.  There are two adjustable bushings on each shaft to keep the work piece aligned. The lead screw from an old car jack is used to adjust the position of the moving roller.

We picked up a few interesting tips from the video, like how to properly align a cylindrical workpiece in a drill press for drilling radial holes.  He also used toggle switches as limit switches in a pretty ingenious way, and F-clamps on the work piece to activate them when it reaches the end.

Building your own tools at home is a time-honoured hacking tradition, which we have never seen a shortage of here on Hackaday. Check out this DIY drill press and vertical CNC mill.

Is That Cheap Multimeter As Good As A Fluke? Let’s Find Out

When [learnelectronics] talks about cheap meters, he always says, “If you are doing this for a living, get yourself a Fluke.” But he realized he’s never shown the inside of a Fluke meter, so he rectified that in his most recent post. For comparison, he opens up a Fluke 26-III and an Aneng AN870 (retailing at about $500 and $30, respectively).

The initial opening shows that the Fluke has hefty brand name fuses, but the Aneng has little generic fuses. In addition, the Fluke has an internal case that helps keep you away from live voltage. The Fluke also has a proper rotary switch, while the cheap meter has a switch that is etched on the PC board; a cost-cutting trick that’s often a point of failure on these cheap meters.

The Fluke also has a significantly larger number of protection devices and heftier components, you presume can take more punishment. Of course, if you don’t have a few hundred volts running through your meter, it probably doesn’t matter. The cheap meters are certainly good enough, even though you do get what you pay for, as you might expect.

As long as you have a meter open, you might as well hack it to have WiFi. Or, if you prefer, a serial port.

Continue reading “Is That Cheap Multimeter As Good As A Fluke? Let’s Find Out”

DIY Lawnmower Doesn’t Cut Grass Short

[nodemcu12ecanada] is serious about saving water, which is why they built this strange lawnmower that can cut grass taller.

Short lawns are one of those clever marketing victories, like convincing people to eat a lot of sugar, that’s been doing more harm than good ever since the victory was won. Short grass is weak grass, with shallow roots, weakness to weeds, and a lot of water requirement. On top of that the grass is always in a state of panic so it grows extra fast to get to a more “natural” height. It’s great if you want to sell fertilizer, seeds, and lawnmowers. Maybe not so great for the environment.

Most lawnmowers can’t even be set high enough for healthy grass so [nodemcu12ecanada] took three electric weed whackers and bolted them to an angle iron frame. It has a lot of advantages. It’s light. You don’t need to sharpen a blade. It’s quiet. It’s electric. It’s strange appearance will scare your neighbors off from borrowing any of your tools. We love it!

Degassing Epoxy Resin On The (Very) Cheap

Anyone who’s tried to encapsulate something in epoxy resin knows how much of a hassle air bubbles can be. If you’re trying to get a perfectly clear finish, the last thing you want is a bunch of microscopic bubbles frozen in time. The best way to prevent this is to put the parts in a vacuum chamber so all the air works its way out before the epoxy cures, but that’s a considerable investment for a one-off project.

But assuming your parts are small enough, [Jasper Sikken] has a great tip that allows you to construct a simple vacuum chamber for just a few dollars. He shows his homemade chamber off in the video after the break, and we think you’ll agree that the change between before and after is pretty dramatic. The best part is that if you want to build your own version, you only need two parts.

The first one is a airtight container large enough to hold the piece you’re working on. Remember that the larger the chamber is the more time it will take to pump down to a suitable vacuum, so avoid the temptation to use something larger than necessary. [Jasper] used a glass jar with a locking lid, which is not only cheap and readily available, but has a decently large internal volume.

Obviously, the second component is the vacuum pump itself. This might normally be a tall order, but [Jasper] recently found that you can buy small battery-powered gadgets designed for sucking the air out of food containers for as little as $5 USD from the usual import sites. All you need to do is pop a hole in the lid of your container, hold the device over the hole, and watch the magic.

This method is great for anything smaller than a paperweight, but if you’ve got something bigger than that, you’ll need to step up your chamber game. Luckily even larger vacuum chambers can be built cheaply at a pinch.

Continue reading “Degassing Epoxy Resin On The (Very) Cheap”

How To Design A Low Cost Probe-Oscilloscope

[Mark Omo] sends in his write up on the design of what should hopefully be a sub-$100 oscilloscope in a probe. 

Many problems in engineering can be solved simply by throwing money at the them. It’s really when you start to apply constraints that the real innovation happens. The Probe-Scope Team’s vision is of a USB oscilloscope with 60MHz bandwidth and 25Msps. The cool twist is that by adding another probe to a free USB port on your computer you’re essentially adding a channel. By the time you get to four you’re at the same price as a normal oscilloscope but with an arguably more flexible set-up.

The project is also open source. When compared to popular oscilloscopes such as a Rigol it has pretty comparable performance considering how many components each channel on a discount scope usually share due to clever switching circuitry.

The probe is based around an Analog Devices ADC whose data is handled by a tag team of a Lattice FPGA and a 32bit PIC micro controller. You can see all the code and design files on their github. Their write-up contains a very thorough explanation of the circuitry. We hope they keep the project momentum going!