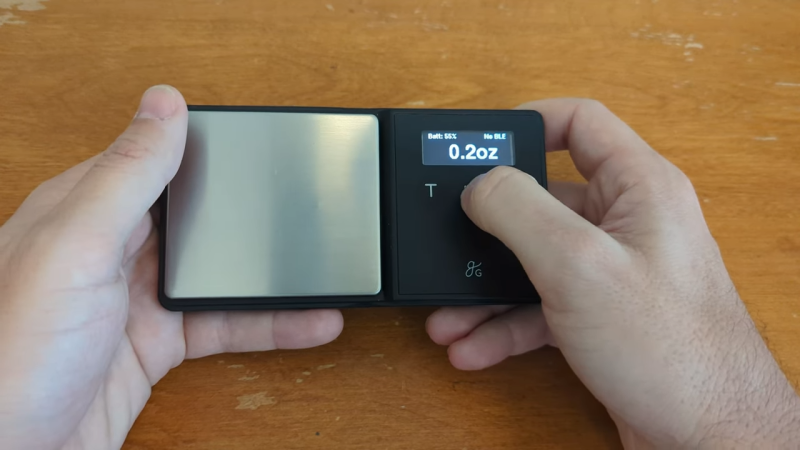
Coin Cell Eliminator Does More Than Save Batteries

Coin cells are useful things that allow us to run small electronic devices off a tiny power source. However, they don’t have a lot of capacity, and they can run out pretty quickly if you’re hitting them hard when developing a project. Thankfully, [bobricius] has just the tool to help.

The device is simple – it’s a PCB sized just so to fit into a slot for a CR2016 or CR2032 coin cell. The standard board fits a CR2016 slot thanks to the thickness of the PCB, and a shim PCB can be used to allow the device to be used in a CR2032-sized slot instead.

It’s powered via a Micro USB connector, and has a small regulator on board to step down the 5 V supply to the requisite 3 V expected from a typical coin cell. [bobricius] also gave the device a neat additional feature – a pair of pads for easy attachment of multimeter current probes. Simply open the jumper on the board, hook up a pair of leads, and it’s easy to measure the current being drawn from the ersatz coin cell.

If you’re regularly developing low-power devices that use coin cells, this tool is one that could save a lot of mucking about in the lab. [bobricius] has them available on Tindie for those eager to get their hands on one. We’ve seen similar designs before too, albeit pursued in a different way!

Open Source LXI Tools Free Us From Vendor Bloat

LXI, or LAN eXtensions for Instrumentation is a modern control standard for connecting electronics instrumentation which supports ethernet. It replaces the older GPIB standard, giving much better performance and lower cost of implementation. This is a good thing.  [Martin Lund] has created the open source lxi-tools project which enables us to detach ourselves from the often bloated vendor tools usually required for talking LXI to your bench equipment. This is a partial rewrite of an earlier version of the tool, and now sports some rather nice features such as mDNS for instrument discovery, support for screen grabbing, and a LUA-based scripting backend. (API Link)

SCPI or Standard Commands for Programmable Instruments is the text-based language spoken by many instruments, allowing control and querying of an instrument. Just to be clear, SCPI is not at all a new thing, and older instruments that have GPIB or RS232 connectors, still could talk SCPI. lxi-tools is not for those. Some instruments can also be very picky about the formatting of commands, especially if they’re buggy, so the ability to interactively debug commands is very desirable. It is quite possible to make poor use of SCPI commands in your test script and end up with tests that just take far longer to execute that they need to. lxi-tools has a benchmarking tool too, which helps you to dig in and find out where all the time is going and make suitable adjustments.

We’ve not seen much about LXI on Hackaday, but we did cover using PyVISA for dealing with SCPI-over-GPIB in python.  If you have an older instrument  with GPIB and you don’t want to sell a internal organ to pay for a USB adaptor, here’s one you can make yourself.

AR Display Shows CNC Lathe Operations In Real Time

[Kent VanderVelden] has come up with an interesting AR system to assist operators who are monitoring CNC lathes. (video, embedded, below) The idea is to first produce a ‘frozen’ video stream of the workpiece. This was achieved by placing a high-speed camera above the lathe, and triggering an image capture, synchronized to the rotational position of the workpiece. A high-speed rotary encoder, attached to the tailstock via a belt drive, feeds the current position into an Altera Terasic DE-Nano FPGA eval board. This is then compared to the position from another encoder, doing duty as an angular set point control. The resulting signal is used as the camera trigger to generate a video stream of just the frames where the angle is as selected by the operator, thus giving the impression of a frozen position. The video stream is sent over to a client device based on a Raspberry Pi 4 with a UPS hat, allowing it to be portable.

High speed rotary encoder driven via a belt

This video stream is overlaid with details of the current machine position, as well as the LinuxCNC G-code being executed and a graphical representation of the operation being performed by the machine. This combined video is then fed to a Vufine VUF-110 wearable, which is minimally invasive, allowing the operator to clearly see the machine of interest. As [Kent] suggests, there are many possible usage scenarios for such a setup, including remote monitoring of multiple operating machines by a single operator.

We’ve seen a few neat machine hacks over the years, here’s a nice project adding a programmable power feed to an old lathe, and since wood lathes are often missing out some DRO love, here’s a nice way to tell them that you care.

Continue reading “AR Display Shows CNC Lathe Operations In Real Time”

Spin Some Spudgers From Secondhand Silverware

Even though it’s not the right tool for the job, we’ve all used a flat head screwdriver for other purposes. Admit it — you’ve pried open a thing or two with that one in the toolbox that’s all dirty and dinged up anyway. But oftentimes, screwdrivers just aren’t thin enough. What you need is a spudger, which for some reason, seem to only come in plastic. Blame our disposable times.

In a relevant break from building electronics, [lonesoulsurfer] took the time to craft a set of spudgers and such from secondhand silverware. These are all made from spoons and butter knives sourced from a thrift store. For the spoons, [lonesoulsurfer] removed the heads with an angle grinder, shaped them on a belt sander, and thinned them out until they were spudger-slim. After doing the same with the handle end, [lonesoulsurfer] polished up the new tools on the wheel with some compound.

Not all of these are spudgers — some are destined to scrape, and others for lifting badges and decals. But they all live in harmony in a handy carrying case. Check out the build video after the break.

On the other hand, sometimes a disposable tool is all you really need.

Continue reading “Spin Some Spudgers From Secondhand Silverware”

Industrial Sewing Machine: Acquired

Well, it’s done. After weeks of trawling Craigslist, an hour-long phone call with an intelligent stranger about a different machine that wasn’t going suit my needs, and a two-week delay while the seller and I waited out their unintentional COVID exposure, I am the proud new owner of a vintage Consew 206RB-3 industrial sewing machine.

So far, it is exactly what I wanted — at least a few decades old, in decent shape, built by a reputable maker, and it has a clutch motor that I can upgrade to a servo motor if I wish. I even like the color of the head, the table, and the little drawer hiding on the left side. Connie Consew is perfect!

Decidedly Not Portable

The internet was right — these things are heavy. According to the manual, the machine head alone weighs 25.5 kg (56 lbs). The motor probably weighs another 50-60 lbs. There’s a small wooden peg sticking up from the table that has the job of holding the head whenever it is tilted back for maintenance or bobbin changes. I’ll admit I didn’t trust the little peg at first, but it does a fine job of supporting all that weight on a single point of contact about an inch in diameter.

Continue reading “Industrial Sewing Machine: Acquired”

Crimping Tools And The Cost Of Being Cheap

Crimp connectors provide an easy and convenient way to connect electronics while still allowing for them to be removed and swapped without having to reach for a soldering iron and desoldering wick. While browsing one’s favorite cheap shopping site, you may get the impression that all one has to do to join the world of crimp-awesome is order a $20 crimp tool and some assorted ‘JST’ and ‘DuPont’ (a Mini-PV clone) connectors to go with it. After all, it’s just a bit of metal that’s squeezed around some stripped wire. How complicated could this be?

The harsh truth is that, as ridiculous as the price tag on official JST and Mini-PV crimping tools may seem at hundreds of dollars each, they offer precise, repeatable crimps and reliable long-term stability. The same is true for genuine JST, Mini-PV and Molex connectors. The price tag for ‘saving a buck’ may end up being a lot higher than the money originally saved.

Continue reading “Crimping Tools And The Cost Of Being Cheap”

Is Your Flashlight A Lumen Liar? Build A DIY Integrating Sphere

A lamp used to be simple thing: just stick a filament in a glass bulb, pass a current through it and behold! Let there be light. A bigger lamp meant a larger filament, taking more power and a larger envelope. Now we’ve moved on a bit, and it’s all about LEDs. There really isn’t such a thing as ‘just an LED,’ these are semiconductor devices, made from relatively exotic materials (OK, not just plain old silicon anyway) and there is quite a lot of variety to choose from, and a bit of complexity in selecting them.

For [Torque Test Channel] the efficiency of conversion from electrical power to radiant power (or flux) is the headline figure of interest, which prompted them to buy a bunch of lamps to compare. To do the job justice that requires what’s known in the business as an integrating sphere (aka an Ulbricht sphere), but being a specialist device, it’s a bit pricey for the home gamer. So naturally, they decided to build the thing themselves.

Coating the inside of the foam sphere took several attempts.

Firstly they did the sensible thing, and shipped off their test units to a metrology lab with the ‘proper’ equipment, to get a baseline to calibrate against. Next they set about using some fairly common materials to construct their sphere. The basic idea is quite simple; it has a uniform diffuse internal surface, which ensures that all photons emitted by a source can be measured at the appropriate measurement port, regardless of the angle they are emitted from the source. This way, the total radiated power can be determined, or at least estimated, since there will be a degree of absorption.

Anyway, after a couple of false starts with coating the internal surface, they came to the conclusion that mixing barium sulphate into the paint, and then a bit of a rub-down with sandpaper, gave the required pure white, diffuse surface.

The results from their testing, using a lux meter inserted into one of the other ports, showed a pretty good correspondence between their measured lux figure and the lab-determined lumens figure. Since one lux is defined as one lumen per square meter, they seemed to get lucky and found a consistent ten-to-one ratio between their observed value and the lab. This factor will be simply due to the physical setup of their contraption, but an encouraging result so far anyway. And what about the bottom line? Did those test units deliver their promised lumen output? It would seem that they pretty much did.

When it rains, it pours. Just a few hours ago we saw another DIY approach to building an integrating sphere, this time using a small cannonball mold of all things. Before that we hadn’t actually seen too many light measurement projects, save this old one that used the chipKIT. Continue reading “Is Your Flashlight A Lumen Liar? Build A DIY Integrating Sphere”