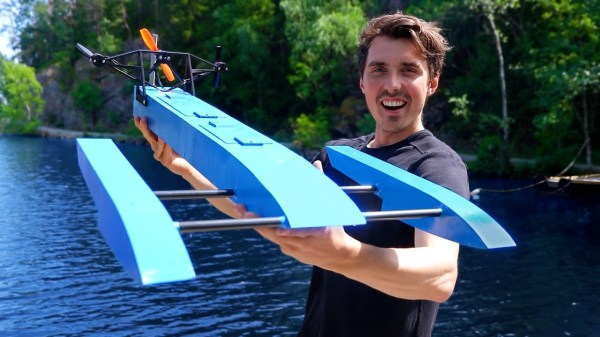
One Man’s Quest To Build A Baby Book With Brains

Regular readers will know that Hackaday generally steers clear of active crowdfunding campaigns. But occasionally we do run across a project that’s unique enough that we feel compelled to dust off our stamp of approval. Especially if the campaign has already blasted past its funding goal, and we don’t have to feel bad about getting you fine folks excited over vaporware.

It’s with these caveats in mind that we present to you Computer Engineering for Babies, by [Chase Roberts]. The product of five years of research and development, this board book utilizes an internal microcontroller to help illustrate the functions of boolean logic operations like AND, OR, and XOR in an engaging way. Intended for toddlers but suitable for curious minds of all ages, the book has already surpassed 500% of its funding goal on Kickstarter at the time of this writing with no signs of slowing down.

The electronics as seen from the rear of the book.

Technical details are light on the Kickstarter page to keep things simple, but [Chase] was happy to talk specifics when we reached out to him. He explained that the original plan was to use discreet components, with early prototypes simply routing the button through the gates specified on the given page. This worked, but wasn’t quite as robust a solution as he’d like. So eventually the decision was made to move the book over to the low-power ATmega328PB microcontroller and leverage the MiniCore project so the books could be programmed with the Arduino IDE.

Obviously battery life was a major concern with the project, as a book that would go dead after sitting on the shelf for a couple weeks simply wouldn’t do. To that end, [Chase] says his code makes extensive use of the Arduino LowPower library. Essentially the firmware wakes up the ATmega every 15 ms to see if a button has been pressed or the page turned, and updates the LED state accordingly. If no changes have been observed after roughly two minutes, the chip will go into a deep sleep and won’t wake up again until an interrupt has been fired by the yellow button being pressed. He says there are some edge cases where this setup might misbehave, but in general, the book should be able to run for about a year on a coin cell.

[Chase] tells us the biggest problem was finding a reliable way to determine which page the book was currently turned to. In fact, he expects to keep tinkering with this aspect of the design until the books actually ship. The current solution uses five phototransistors attached to the the MCU’s ADC pins, which receive progressively more light as fewer pages are laying on top of them. The first sensor is exposed when the second page of the book is opened, so for example, if three of the sensors are seeing elevated light levels the code would assume the user is on page four.

Opening to the last page exposes all five light sensors.

The books and PCBs are being manufactured separately, since as you might expect, finding a single company that had experience with both proved difficult. [Chase] plans on doing the final assembly and programming of each copy in-house with the help of family members; given how many have already been sold this early in the campaign, we hope he’s got a lot of cousins.

So what do you do with an Arduino-compatible book when Junior gets tired of it? That’s what we’re particularly interested in finding out. [Chase] says he’s open to releasing the firmware as an open source project after the dust settles from the Kickstarter campaign, which would give owners a base to build from should they want to roll their own custom firmware. Obviously the peripheral hardware of the book is fairly limited, but nothing is stopping you from hanging some sensors on the I2C bus or hijacking the unused GPIO pins.

If you end up teaching your copy of Computer Engineering for Babies some new tricks, we’ve love to hear about it.

Continue reading “One Man’s Quest To Build A Baby Book With Brains”

Small Scale Mad Max: Danny Huynh’s Dystopian Animatronics

The hacker spirit is always alive and well in post-apocalyptic fiction, as characters throw together contraptions from whatever junk they can find. While these might not always be practical or possible in reality, their primary purpose is usually to look the part. This is definitely the case for [Danny Huynh]’s post-apocalyptic animatronic creations, which look like they can slot straight into Mad Max or Fallout.

[Danny] is an avid RC enthusiast, so many of the models are highly customized off-the-shelf RC cars. However, it’s the lifelike moving characters in these models that really catch the eye. Their hands and feet move with the steering and throttle, and in the motorcycle builds they will often lean with the turns. Other notable builds include a hexapedal taxi and a couple of animatronic bands.

All the vehicle builds are electric, but it looks like [Danny] often includes an audio module to simulate a roaring engine. He makes extensive use of servos and linkages for character movement, with wiring and electronics carefully hidden by paint or bodywork.

With all the CGI technology available today, great animatronic builds like an eerily lifelike heart, or a talking Nikola Tesla are all the more impressive to see.

Continue reading “Small Scale Mad Max: Danny Huynh’s Dystopian Animatronics”

Three-Stage Thrust Vectoring Model Rocket With Tiny Flight Computers

Flying a thrust-vectoring rocket can be a challenge, and even more so if you stack multiple stages and a minimalist flight computer on top of it all. But [Joe Barnard] is not one to shy away from such a challenge, so he built a three stage actively guided rocket named Shreeek.

[Joe] is well known for his thrust-vectoring rockets, some of which have came within a hair’s breadth of making a perfect powered landing. Previous rockets have used larger, more complex flight computers, but for this round, he wanted to go as small and minimalist as possible. Each stage of the rocket has its own tiny 16 x 17 mm flight computer and battery. The main components are a SAM21 microcontroller running Arduino firmware, an IMU for altitude and orientation sensing, and a FET to trigger the rocket motor igniter. It also has servo outputs for thrust vector control (TVC), and motor control output for the reaction wheel on the third stage for roll control. To keep it simple he omitted a way to log flight data, a decision he later regretted. Shreeek did not have a dedicated recovery system on any of the stages, instead relying on its light weight and high drag to land intact

None of the four launch attempts went as planned, with only the first two stages functioning correctly in the test with the best results. Thanks to the lack of recorded flight data, [Joe] had to rely on video footage alone to diagnose the problems after each launch. Even so, his experience diagnosing problems certainly proved its worth, with definitive improvements. However, we suspect that all his future flight computers will have data logging features included.

Continue reading “Three-Stage Thrust Vectoring Model Rocket With Tiny Flight Computers”

Building An Aluminum RC Truck From Scratch

These days you can get just about any kind of radio controlled vehicle as a ready-to-run model. Cars, trucks, excavators, you name it. Open the box, charge the batteries, and you’re ready to roll. Even with all these modern conveniences, there is still a special breed of modelers who create their own models using only a few off-the-shelf parts.

[Rini Anita] is exactly that rare breed, creating this aluminum RC truck from scratch. The truck itself is a cab-over — short for Cab Over Engine (COE), a style seen making local deliveries worldwide. He starts with the ladder frame chassis, which is constructed using an extruded aluminum channel. This is the same material you’d normally use for the door tracks in retail store display cases. The electronics and standard RC fare: a receiver, electronic speed control, and a servo for steering. Batteries are recycled lithium cells. The main gearbox and drive axle look to be sourced from another RC vehicle, while leaf springs and suspension components are all custom built.

The truck’s body is a great example hand forming metal. First, a wooden form was created. Sections for the windows and door panels were carved out. Sheet aluminum was then bent over the wood form. Carefully placed hammer blows bend the metal into the carved sections – leaving the imprints of doors, windows, and other panel lines.

Throughout this build, we’re amazed by [Rini]’s skills, and the fact that the entire job was done with basic tools. A grinder, an old drill press, and a rivet gun are the go-to tools; no welder or 3D printer to be found. This puts a project like this well within the means of just about any hacker — though it may take some time to hone your skills! For his next truck, maybe [Rini] can add a self driving option!

Continue reading “Building An Aluminum RC Truck From Scratch”

Fan Lets RC Car Drive On The Ceiling

Downforce is a major part of modern motorsport, keeping cars glued to the track at high speeds. However, for small radio control cars, adding a fan for a little suction can achieve even greater feats, as demonstrated by this build by [DD ElectroTech].

The build began as a simple two-motor, skid-steer RC car build with a fan for suction. Controlled by a smartphone app, a cheap Arduino board with an HC-05 Bluetooth module ran the show. However, when this was all assembled, the car was too heavy to climb walls or stick to the ceiling.

Thus, a weight-saving plan was in order. Wheels were swapped out for lighter 3D printed parts. The electronics saw significant re-engineering, too, with the multiple separate modules all condensed down into one single custom PCB. After a few other tweaks, the new lighter car was able to easily drive on the ceiling and even climb walls, albeit with some difficulty.

It’s a fun little build and a good demonstration of how easy it is to whip up cool projects with modern electronics and 3D printed parts. We’ve seen other printed fan car builds before, too, but did you know the concept was first trialed in real-world motorsport competition? Video after the break.

Continue reading “Fan Lets RC Car Drive On The Ceiling”

Never Lose A Piece With 3D Printed Sliding Puzzles

Have you ever been about to finish a puzzle, when suddenly you realize there are more holes left than you have pieces? With [Nikolaos’s] 3D printed sliding puzzles, this will be a problem of the past!

An image showing the sliding dovetails of the puzzle
The dovetails, integrated into each piece, keep the puzzle together but still allows pieces to move.

The secret of the puzzle is in the tongue and groove system that captures the pieces while allowing them to slide past each other and along the puzzle’s bezel. The tongues are along the top and right sides of the pieces shown here, with the grooves along the left and bottom. There is only one empty spot on the board, so the player must be methodical in how they move pieces to their final destinations. See this in action in the video after the break.

[Nikolaos] designed the puzzle in Fusion 360, and used this as an opportunity to practice with parameters. He designed the model in such a way that any size puzzle could be generated by changing just 2 variables. Once the puzzle is the proper size, the image is added by importing and extruding an SVG.

Another cool aspect of these puzzles is that they are print-in-place, meaning that when the part is removed from the 3D printer, it is ready to use and fully assembled. No need to remove support material or bolt and glue together multiple components. Print-in-place is useful for more than just puzzles, you could also use this technique to 3D print wire connectors!

Continue reading “Never Lose A Piece With 3D Printed Sliding Puzzles”

80's vintage Tomy Omnibot and Futaba RC Transmitter

80’s Omnibot Goes RC And Gets A Modern Refresh

Thrift stores, antique shops, knick-knack stores- Whatever you might call them in your locale, they’re usually full of “another man’s treasure”. More often than not, we leave empty-handed, hoping another shop has something we just can’t live without. But on rare occasions, when the bits all flip in our favor, we find real gems that although we have no idea what we’re going to do with them, just have to come home with us.

[Charles] ran into this exact situation recently when he walked into yet another shop among many dotting the highways and byways of Georgia and spotted it: A Tomy Omnibot beckoning to him from the 1980s. [Charles] didn’t know what he’d do with the Omnibot, but he had to have it. Not being one to have things just sit around, he set out to make it useful by combining it with an era-appropriate Futaba 4 channel AM radio, and updating all of the electronics with modern hardware.  The Mission? Drive it around at car shows and meetups where he already takes his 1980’s era vans.

We’re not going to spoil the goodies, but be sure to read [Charles]’ blog post to see how he hacked a modern 2.4 GHz 7 channel radio into the vintage Futaba 4 channel AM radio case. We appreciated his analytical approach to meshing the older gimbals and potentiometers with the new radio guts. Not to mention what it took to get the Omnibot back into service using parts from his battle bots bin. You’ll love the attention to detail on the new battery, too!

We’ve featured [Charles] work in the past, and his Power Wheels racer fed by a recovered Ford Fusion battery is simply unforgettable. You might also appreciate another Omnibot revival we featured recently. And as always, if you have a hack to share, submit it via the Tip Line!