What do you get when you combine an old optical drive, some empty soda bottles, and a microcontroller? Well…nothing, really. That’s still just a pile of rubbish. But if you add in a battery, an RC receiver, and some motors, you’re getting dangerously close to a fun little toy to kick around the pond as [Antonio Rizzo] recently demonstrated.
A couple of plastic bottles lashed together make up the hull of the boat, and [Antonio] has used the internal frame of an old optical drive bent at a 90 degree angle to hold the two small DC motors. In a particularly nice touch, the drive’s rubber anti-vibration bushings are reused as motor mounts, though he does admit it was just dumb luck that the motors were a perfect fit.
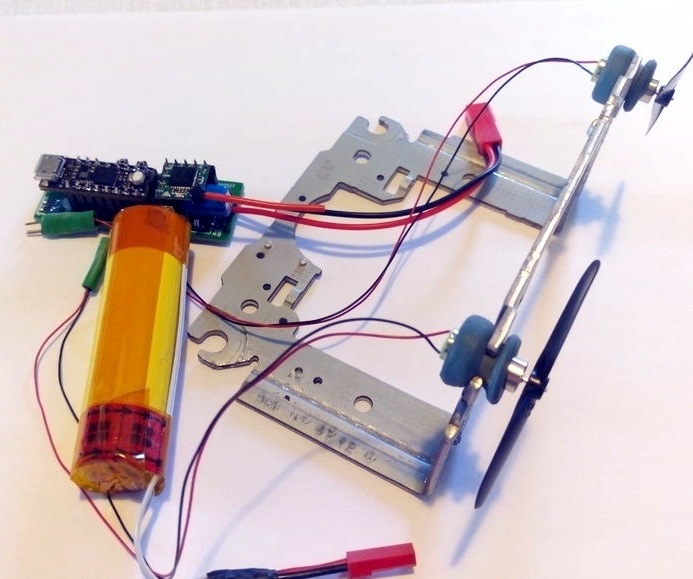
For the electronics, [Antonio] has paired a custom motor controller up with the uChip, a diminutive Arduino-compatible microcontroller in a narrow DIP-16 package. Wireless communication is provided by an off-the-shelf cPPM receiver such as you might see used in a small plane or quadcopter.
The whole build is powered by a common 18650 lithium-ion battery, which could also be easy enough to recover from the trash given how common they are in laptop batteries; though if you threw a new cell into this build we wouldn’t hold it against you. Everything is put into a high-tech plastic sandwich bag to provide minimum of waterproofing with the minimum of effort.
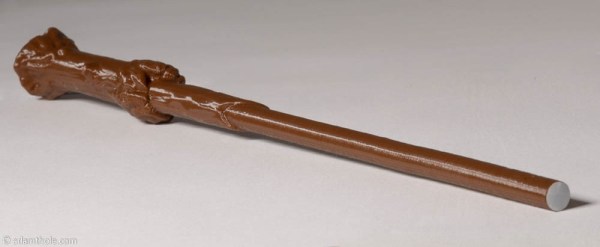
Visitors to the Wizarding World of Harry Potter at Universal Studios are able to cast “spells” by waving special interactive wands in the air. Hackers like us understand that there must be some unknown machinations happening behind the scenes to detect how the wands are moving, but for the kids wielding them, it might as well be real magic. So when his son asked to have a Harry Potter themed birthday party, [Adam Thole] decided to try recreating the system used at Universal Studios in his own home.
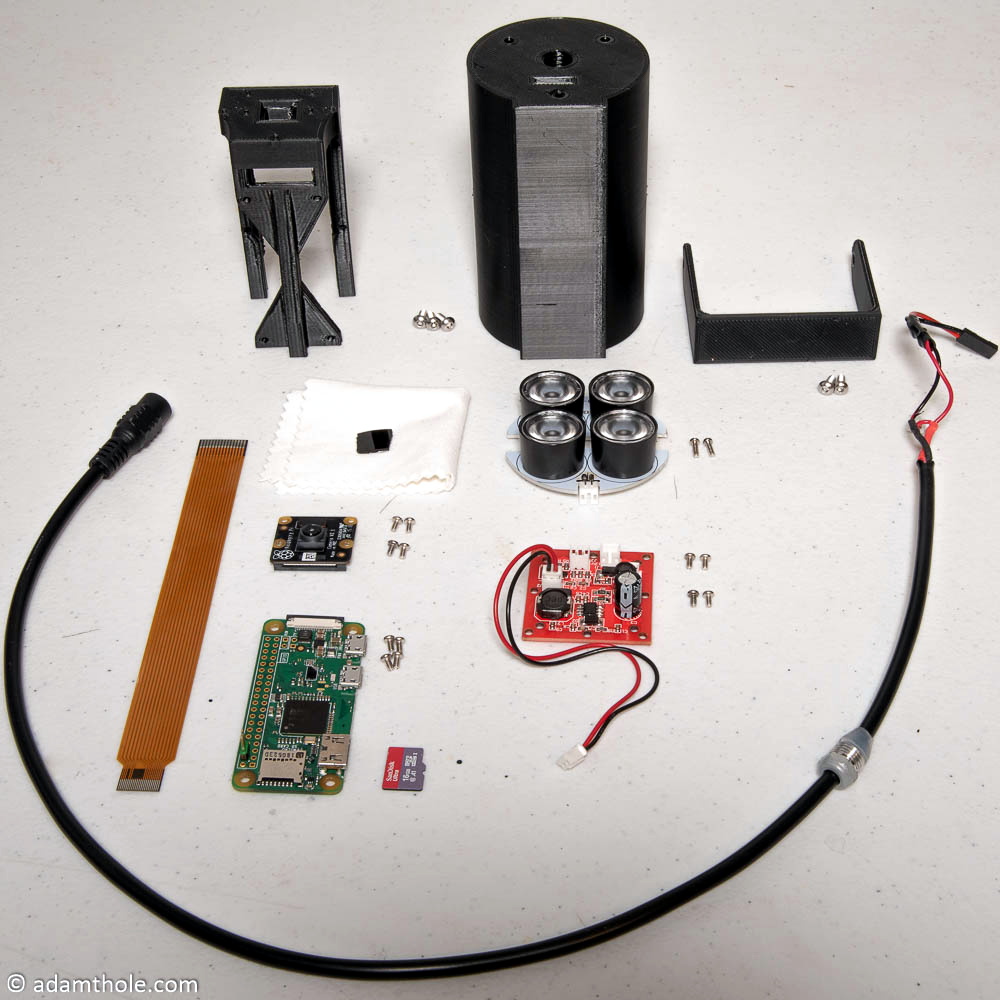
Components used in the IR streaming camera
The basic idea is that each wand has a reflector in the tip, which coupled with strong IR illumination makes them glow on camera. This allows for easy gesture recognition using computer vision techniques, all without any active components in the wand itself.
[Adam] notes that you can actually buy the official interactive wands from the Universal Studios online store, and they’d even work with his system, but at $50 USD each they were too expensive to distribute to the guests at the birthday party. His solution was to simply 3D print the wands and put a bit of white prismatic reflective tape on the ends.
With the wands out of the way, he turned his attention to the IR imaging side of the system. His final design is a very impressive 3D printed unit which includes four IR illuminators, a Raspberry Pi Zero with the NoIR camera module. [Adam] notes that his software setup specifically locks the camera at 41 FPS, as that triggers it to use a reduced field of view by essentially “zooming in” on the image. If you don’t request a FPS higher than 40, the camera will deliver a wider image which didn’t have any advantage in this particular project.
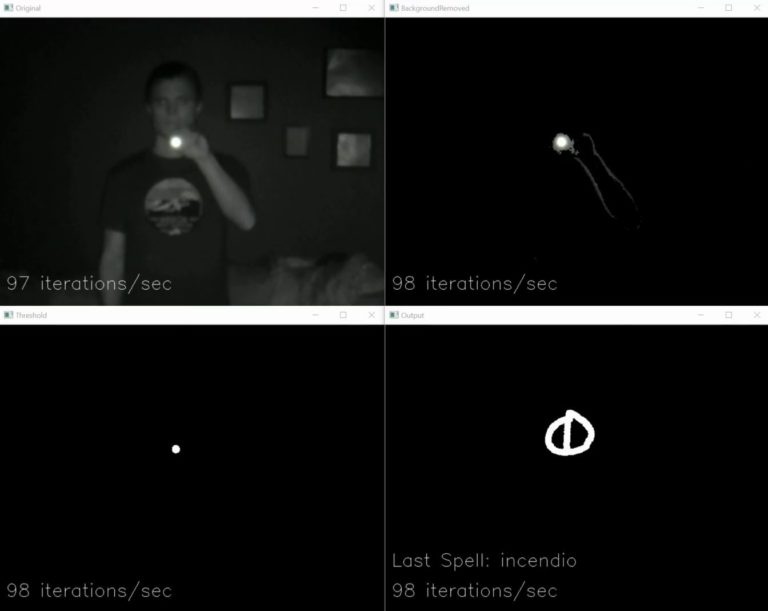
The last part of the project was taking the video stream from his IR camera and processing it to detect the bright glow of a wand’s tip. For each frame of the video the background is first removed and then any remaining pixel that doesn’t exceed a set brightness level if ignored. The end result is an isolated point of light representing the tip of the wand, which can be fed into Open CV’s optical flow function to show [Adam] what shape the user was trying to make. From there, his software just needs to match the shape with one of the stock “spells”, and execute the appropriate function (such as changing the color of the lights in the room) with Home Assistant.
Overall, it’s an exceptionally well designed system considering the goal was simply to entertain a group of children for a few hours. We almost feel bad for the other parents in the neighborhood; it’s going to take more than a piñata to impress these kids after [Adam] had them conjuring the Dark Arts at his son’s party.
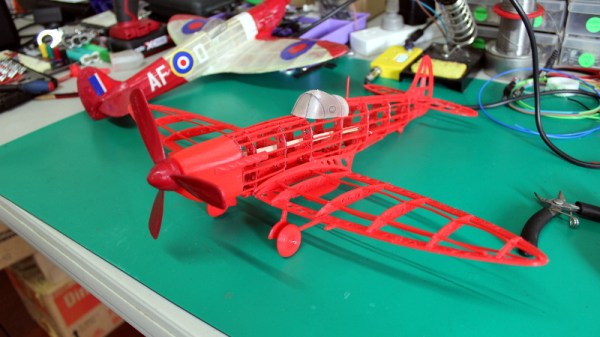
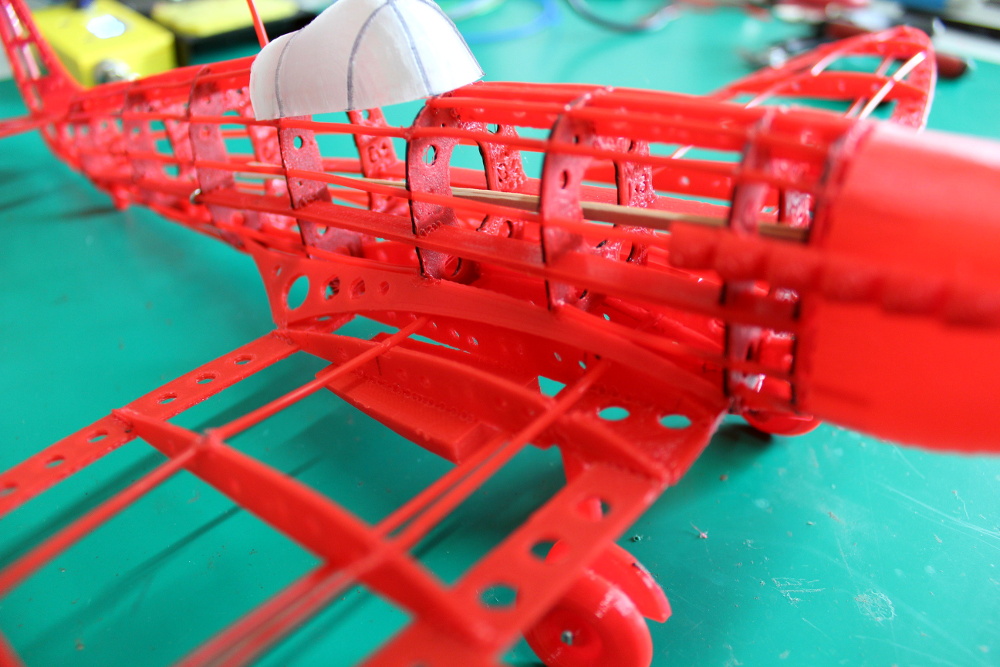
It used to be that if you wanted to make a nice scale model of an airplane, you’d be building the frame out of thin balsa ribs and covering it all up with tissue paper. Which incidentally was more or less how they built most real airplanes prior to the 1930s, so it wasn’t completely unreasonable to do the same on a smaller scale. But once injection molded plastics caught on, wood and tissue model kits largely went the way of the dodo.
[Marius Taciuc] wanted to share that classic model building experience with his son, but rather than trying to hunt down balsa kits in 2019, he decided to recreate the concept with modern techniques. His model of the Supermarine Spitfire, the vanguard of the British RAF during the Second World War, recreates the look of those early model kits but substitutes 3D printed or laser cut components for the fragile balsa strips of yore. The materials might be high-tech, but as evidenced by the video after the break, building the thing is still just as time consuming as ever.
Using a laser cutter to produce the parts would be the fastest method to get your own kit put together (you could even cut the parts out of balsa in that case), but you’ll still need a 3D printer for some components such as the propeller and cowling. On the other hand, if you 3D print all the parts like [Marius] did, you can use a soldering iron to quickly and securely “weld” everything together. For anyone who might be wondering, despite the size of the final plane, all of the individual components have been sized so everything is printable on a fairly standard 200 x 200 mm print bed.
While there’s no question the finished product looks beautiful, some might be wondering if it’s really worth the considerable effort and time necessary to produce and assemble the dizzying number of components required. To that end, [Marius] says it’s more of a learning experience than anything. Sure he could have bought a simplified plastic Spitfire model and assembled it with his son in an afternoon, but would they have really learned anything about its real-world counterpart? By assembling the plane piece by piece, it gives them a chance to really examine the nuances of this legendary aircraft.
Did you have anything planned for the next hour or so? No? That’s good because if you’re anything like us, watching even one of the restorations performed on [Marty’s Matchbox Makeovers] is likely to send you down a deep dark rabbit hole that you never knew existed. Even if you can’t tell the difference between Hot Wheels and Matchbox (seriously, that’s a big deal in the community), there’s something absolutely fascinating about seeing all the little tips and tricks used to bring these decades-old toy cars back into like new condition.
Sketching a replacement part to be 3D printed.
You might think that all it takes to restore a Matchbox car is striping the paint off, buffing up the windows, and respraying the thing; and indeed you wouldn’t be too far off the mark in some cases. But you’ve got to remember that these little cars have often been through decades of some of the worst operating conditions imaginable. That is, being the plaything of a human child. While some of the cars that [Marty] rebuilds are in fairly good condition to begin with, many of them look like they’ve just come back from a miniature demolition derby.
The ones which have had the hardest lives are invariably the most interesting. Some of the fixes, like heating up the interior and manually bending the steering wheel back into shape, are fairly simple. But what do you do when a big chunk of the vehicle is simply gone? In those cases, [Marty] will combine cyanoacrylate “super glue” with baking powder to fill in voids; and after filing, sanding, and painting, you’d never know it was ever damaged.
When a car needs more than just paint to finish it off, [Marty] will research the original toy and make new water slide decals to match what it would have looked like originally. If it’s missing accessories, such as the case with trucks which were meant to carry scale cargo, he’ll take careful measurements so he can design and print new parts. With some sanding and a touch of paint, you’d never know they weren’t original.
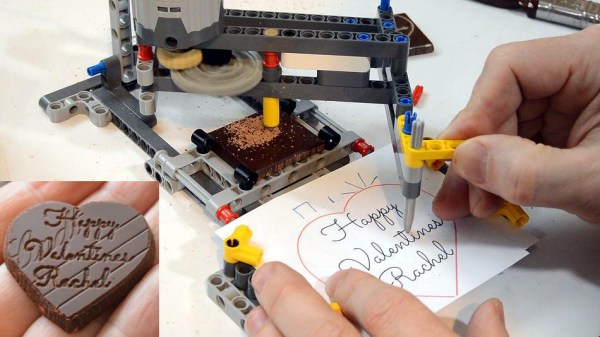
[Matthias Wandel] is best known for his deeply interesting woodworking projects, so you might be forgiven for not expecting this lovely chocolate-engraving pantograph made from LEGO. With it, he carves a delightful valentine’s message into a square of chocolate, but doesn’t stop there. He goes the extra mile to cut the chocolate carefully into a heart, and a quick hit with a heat gun takes the rough edges off for a crisp and polished end result.
The cutting end is a small blade stuck inside a LEGO piece, but that’s the only non-LEGO part in the whole assembly. A key to getting a good carve was to cool the chocolate before engraving, and you can see the whole process in the video embedded below.
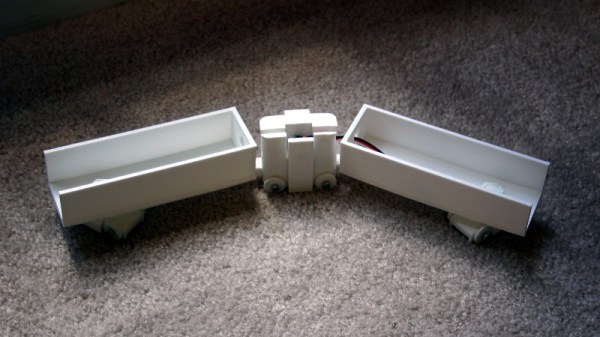
If you had to guess the age of a person hailing from a country in which Lego is commonly available, you might very well do it by asking them about the Lego trains available in their youth. Blue rails or grey rails, 4.5, 9, or 12 volt power, and even somewhat unexpectedly, one rail or two. If that last question surprises you we have to admit that we were also taken aback to discover that for a few years in the 1980s everybody’s favourite Danish plastic construction toy company produced a monorail system.
[Mike Rigsby] had a rather ambitious Christmas display to produce, and as part of it included a pair of reindeer, Rudolph and Bluedolph, atop freight cars on a loop of Lego monorail. He didn’t just use classic Lego parts off-the-shelf, instead he recreated the system in its entirety on his 3D printer; locomotive, rolling stock, and all. In a simlar way tot he original his locomotive sits between the two freight cars, each container housing a pair of AA batteries which together power the unit.
The Lego system isn’t perhaps a classic monorail, in that it involves a four-wheeled vehicle that is guided by a central rail rather than sitting upon it. Drive comes from teeth on the side of the rail which mesh with a gear on the power car. There have been 3D-printable sections of it available as add-ons for owners of classic sets for a while, but this may be the first printable locomotive and train. The Christmas novelty aspect of it all may be a little past its sell-by date here in February, but it’s still worth a look as a potential source of parts for any project that might require a linear rail system.
Perhaps surprisingly we’ve never featured a monorail before, though we have brought you a MagLev.
We probably all used to make our Lego fly by throwing it across the room, but Flite Test have come up with a slightly more elegant solution: they converted a Lego quadcopter to fly. They did it by adding a miniature flight controller, battery and motors/rotors to replace the Lego ones in the Lego City Arctic Air Transport kit. This combination flies surprisingly well, thanks to a thoughtful design that balances the heavier components inside the case.
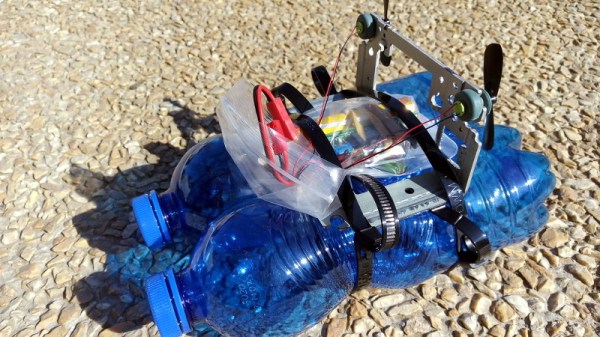
 A couple of plastic bottles lashed together make up the hull of the boat, and [Antonio] has used the internal frame of an old optical drive bent at a 90 degree angle to hold the two small DC motors. In a particularly nice touch, the drive’s rubber anti-vibration bushings are reused as motor mounts, though he does admit it was just dumb luck that the motors were a perfect fit.