Clock Plays A Game Of Pong With Itself To Pass The Time

Would you play a game of Pong where each set lasts exactly one minute and the right player is guaranteed to win 60 times more than the left player? Of course not, but if you were designing a clock that displays the time using a Pong motif, then perhaps it would make sense.

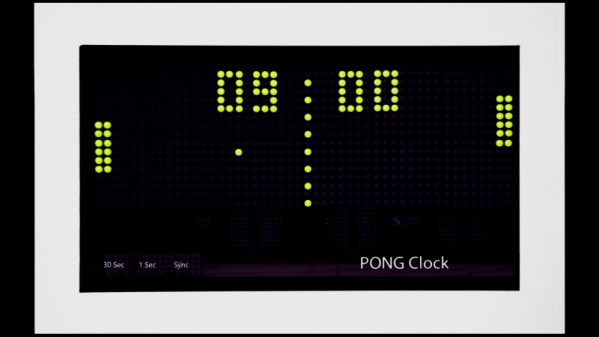
There are some neat design tips in [oliverb]’s Pong Clock that are worth taking a look at. Foremost is the case, which is a retasked jewelry box with a glass lid, procured on the cheap from eBay. It’s a good size for a clock meant to be seen from across the room, and already finished to fit into modern decor. The case holds all the goodies, from the 24×16 green LED matrix display to the Uno that runs the show, as well as an RTC module, a sound chip, a temperature sensor, and a PIR module to turn the display off when the room is unoccupied. To prevent disrupting the sleek lines of the case, all the controls are mounted in a remote panel, itself a clean and modern-looking device thanks to the chrome-plated duplex outlet cover used to house it. The clock has several display modes, from normal time and temperature to a word clock, as well as the Pong mode, where the machine plays itself and the score shows the time. It’s fascinating to watch, and we like everything about it, although we think the tick-tock would drive us nuts pretty quickly.

We recently covered the life and times of [Ted Dabney], one of Pong’s fathers and co-founder of Atari. We tend to think he’d like the design of this clock, both as a nod to his game and for its simple but functional design.

Continue reading “Clock Plays A Game Of Pong With Itself To Pass The Time”

Circuit Bent Keyboard Is Pretty In Pink

If you’re anything like us, more than a few of your projects were borne out of the fact that you had some crusty bit of gear that was badly in need of a second lease on life. Whether it was a hand-me-down or pulled out of the garbage, we’ve all at one time or another had some piece of hardware in our hands that might not be worth anything in its current form, but would make an awesome excuse for warming up the soldering iron.

That’s what happened when [joekutz] got his hands on this exceptionally juvenile keyboard toy. In its original state, it was so janky it couldn’t even reliably detect two keys being pressed at the same time; sort of a problem for a keyboard. So he decided to pull it apart and use it as a circuit bending playground. Thanks in part to how much free space was inside of the case, he was able to pack in a number of interesting modifications which he’s kindly detailed on Hackaday.io.

[joekutz] started by adding a headphone jack to the device, as well as a switch to disable the keyboard’s speaker. That allows not only listening to digital jams in private, but makes it possible to capture high-quality audio when connected to the computer. He then started poking around the PCB with a resistor and listening for changes. When the pitch of the keyboard changed, he soldered a potentiometer into its place and now had a way to adjust it on the fly.

Of particular note is the clever physical reverb he came up with. A microphone and speaker are connected to each other with a spring made out of an old guitar string. Audio from the keyboard’s PCB is played on the speaker and a TDA2022 low-voltage amplifier boosts the signal from the microphone. The end result is a very cool ethereal metallic effect.

If you’re looking for a slightly larger DIY reverb, we’ve covered a few builds in the past which should give you some inspiration. You might want to check the dumpster behind the abandoned local Toys R’ Us for some donor keyboards while you’re at it.

Continue reading “Circuit Bent Keyboard Is Pretty In Pink”

Hackaday Links Column Banner

Hackaday Links: June 24, 2018

What do you do if you’re laying out a PCB, and you need to jump over a trace, but don’t want to use a via? The usual trick is using a zero Ohm resistor to make a bridge over a PCB trace. Zero Ohm resistors — otherwise known as ‘wire’ — are a handy tool for PCB designers who have backed themselves into a corner and don’t mind putting another reel on the pick and place machine. Here’s a new product from Keystone that is basically wire on a tape and reel. It’s designed to jump traces on a PCB where SMD zero ohm resistors and through-hole jumpers aren’t possible. I suppose you could also use it as a test point. They’re designed for high current applications, but before we get to that, let’s consider how much power is dissipated into a zero ohm resistor.

By the way, as of this writing, Mouser is showing 1,595 for Keystone’s 5100TR PCB jumpers in stock. They come on a reel of 1,000, and a full reel will cost you $280. This is significantly more expensive than any SMD zero ohm resistor, and it means someone bought four hundred of them. The electronic components industry is weird and you will never understand it.

There’s a new product from ODROID, and you want it. The ODROID-GO is a Game Boy and Sega Master System emulator running on an ESP-32, has a fantastic injection molded case, and looks phenomenal.  You can buy it now for $32. Does this sound familiar? Yes, a few months ago, the PocketSprite was released. The PocketSprite is the tiniest Game Boy ever, and a project [Sprite_TM] introduced to the world at the 2016 Hackaday Superconference.

This week, the speaker schedules for two awesome cons were announced. The first is HOPE, at the Hotel Penn on July 20th. Highlights of this year? [Mitch Altman] is talking about DSP, [Chelsea Manning] will be on stage, someone is talking about HAARP (have fun with the conspiracy theorists), and someone is presenting an argument that [Snowden] is an ideological turd. The speaker schedule for DEF CON was also announced. The main takeaway: god bless the CFP board for reigning in all the blockchain talks, the Nintendo Switch was broken wide open this year, but there’s only a talk on the 3DS, and there’s more than enough talks on election hacking, even though that was a success of propaganda instead of balaclava-wearing hackers.

The C.H.I.P. is no more, or at least that’s the rumor we’re running with until we get some official confirmation. When it was introduced, the C.H.I.P. was a Linux system on a chip with complete register documentation. It appears the end of C.H.I.P. is upon us, but have no fear: there’s a community building the PocketC.H.I.P., or the C.H.I.PBeagle. It’s a single board computer based around the OSD3358 from Octavo, the same system found in the PocketBeagle. Source in KiCAD, and people are working on it. Thanks [smerrett79] for the tip.

LoRa With The ESP32

If you are interested in deploying LoRa — the low power long-range wireless technology — you might enjoy [Rui Santos’] project and video about using the ESP32 with the Arduino IDE to implement LoRa. You can see the video below. He uses the RFM95 transceivers with a breakout board, so even if you want to use a different processor, you’ll still find a lot of good information.

In fact, the video is just background on LoRa that doesn’t change regardless of the host computer you are using. Once you have all the parts, getting it to work is fairly simple. There’s a LoRa library by [Sandeep Mistry] that knows how to do most of the work.

Although the project uses an RFM95, it can also work with similar modules such as the RFM96W or RFM98W. There are also ESP32 modules that have compatible transceivers onboard.

This is one of those projects that probably isn’t useful all by itself, but it can really help you get over that hump you always experience when you start using something new. Once you have the demo set up, it should be easy to mutate it into what you really need.

We’ve been talking about LoRa a lot lately. We’ve even seen it commanding drones.

Continue reading “LoRa With The ESP32”

An Artsy And Functional LED Filament Lamp

Some projects end up being more objet d’art than objet d’utile, and we’re fine with that — hacks can be beautiful too. Some hacks manage both, though, like this study in silicon and gallium under glass that serves as a bright and beautiful desk lamp.

There’s no accounting for taste, of course, but we really like the way [commanderkull]’s LED filament lamp turned out, and it’s obvious that a fair amount of work went into it. Five COB filament strips were suspended from a lacy frame made of wire, which also supports the custom boost converter needed to raise the 12-volt input to the 60 volts needed by the filaments. The boost converter is based on the venerable 555 timer chip, which sits in the middle of the frame suspended by its splayed-out legs and support components. The wooden base sports a few big electrolytics and some hand-wound toroidal inductors, as well as the pot for adjusting the lamp’s brightness. The whole thing sits under a glass bell jar, which catches the light from the filaments and plays with it in a most appealing way.

There’s just something about that dead bug building technique that we love. We’ve seen it before — this potentially dangerous single-tube Nixie clock comes to mind — but we’d love to see it done more.

[via r/electronics]

Modular Robotics That Can Make Themselves Into Anything

The greatest challenge of robotics is autonomy. Usually, this means cars that can drive themselves, a robotic vacuum that won’t drive down the stairs, or a rover on Mars that can drive on Mars. This project is nothing like that. Instead of building a robot with a single shape, this robot is made out of several modules that can self-assemble into different structures. It’s an organized fleet of robots, all helping each other, like an ant colony, or our future as Gray Goo.

If the idea of self-assembling modular robots sounds familiar, you’re right. The Dtto won the Grand Prize in the 2016 Hackaday Prize, and it’s a beast of a project. It’s an ouroboros of a robot that can assemble itself into a snake, a wheel, or an arm. It’s weird, but if you want a robot that can do anything, this is the kind of modularity that you need. One step closer to Gray Goo, at least.

Like Dtto, the noMad can transform itself into bridges, arms, snakes, and wheels by assembling each individual piece into one component of a massive structure. It’s something we rarely see, and it’s a difficult computational and engineering problem. Still, the progress the team behind noMad has been making is remarkable, and we can’t wait to see the finished project.

Walking Through MRIs With A Vive

If you were to make a list of the most important technological achievements of the last 100 years, advanced medical imaging would probably have to rank right up near the top. The ability to see inside the body in exquisite detail is nearly miraculous, and in some cases life-saving.

Navigating through the virtual bodies generated by the torrents of data streaming out of something like a magnetic resonance imager (MRI) can be a challenge, though. This intuitive MRI slicer aims to change that and makes 3D walkthroughs of the human body trivially easy. [Shachar “Vice” Weis] doesn’t provide a great deal of detail about the system, but from what we can glean, the controller is based on a tablet and Vive tracker. The Vive is attached to the back of the tablet and detects its position in space. The plane of the tablet is then interpreted as the slicing plane for the 3D reconstruction of the structure undergoing study. The video below shows it exploring a human head scan; the update speed is incredible, with no visible lag. [Vice] says this is version 0.1, so we expect more to come from this. Obvious features would be the ability to zoom in and out with tablet gestures, and a way to spin the 3D model in space to look at the model from other angles.

Interested in how the machine that made those images works? We’ve covered the basics of MRI scanners before. And if you want to go further, you could always build your own.

Continue reading “Walking Through MRIs With A Vive”