The Cable Modem To SDR Transformation

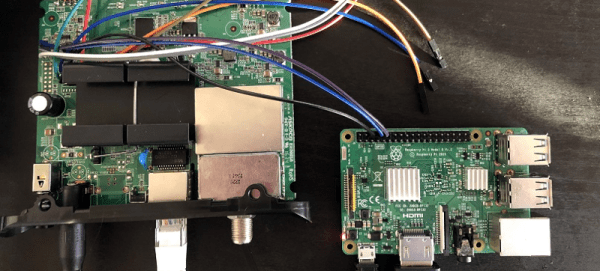
What do you do with an old cable modem in a closet? If you are [stdw] you reverse engineer it and turn it into a software-defined radio. The modem in question was a Motorola MB7220. After looking at a similar project using a different modem, it seemed like it should be doable.

Cracking open the case revealed two likely UART ports, one of which was active. The output from that UART provided a lot of info. The chip was a Broadcom BCM3383 which is a MIPS processor. It had eCos as an operating system. However, the bootloader eventually disables the UART, so there wasn’t much more investigation possible via the serial terminal.

The next step was to dump the flash memory. That required a little solder surgery to prevent the board from starting while the flash chip had power. It appeared that some key credentials and configuration data were present, but they were really backups. After doing a factory reset to remove the backups, the right data was apparent.

After some lengthy exploration, the diagnostic that builds a spectrum display gave up its data. At first, the data was just a small sample of what was really required, but it did show a local FM station as a spectrum. Eventually, the data loss rate was down to about 12% when streaming which is not great, but good enough. You can hear an audio clip of the reception. Not exactly crystal-clear quality, but not bad.

Of course, no one will use this for an FM radio. But it is a fascinating view into how far you can hack into a device like this if you have some skills and patience. There must be something about quarantine that is making people hack old gear, as we just recently saw a similar Netgear hack. Even cheap games aren’t safe.

DIY Braille Embosser Is Really Impressive

We weren’t surprised to learn that Braille tools are quite expensive. But it’s interesting to hear that there’s another class of tools altogether, and they are very cheap and imprecise. In devising the Braille Embossing Experience, aka BEE, [alatorre] sought to find an open-source middle ground. We think they succeeded marvelously.

Another surprising thing — while handheld embossers do exist, there is no system for filling out an A4 sheet of paper, say, to write a letter.

For Braille to be readable, the characters and lines must be properly spaced, and this requires some kind of moveable type-like device to correctly register the characters onto paper. BEE fills this void as well. The amazing thing is, there’s not much more to it than a marked-up piece of aluminum and some clever 3D printing.

There are two parts to this system — the positioning rail, which includes a landing box for the embosser with six holes in the bottom. The other part is a pair of embossers, one for letters A-M, and another for letters N-Z. To use BEE, just slide the rail to the right and start embossing letters right to left, then flip the paper over when finished.

Need to create something more permanent? Make a Braille PCB.

Heavy Metal Power Bank Uses Tool Batteries

At one time or another, most of us have seen a gadget for sale and thought we could build something similar for cheaper. Of course, we’re almost always wrong. Not about being able to build it, mind you. But when you add up the cost of the materials, the tool or two you almost inevitably end up buying, and the time spent chasing perfection, you’re lucky if you haven’t doubled the original price.

We’re not sure how much money [Taylor Hay] ended up saving by building his own portable power bank. But we do know it’s a gorgeous piece of hardware that’s certainly built far better than the average consumer gadget. The CNC-cut aluminum side panels look like something pulled out of a tank, and while we know some might balk at the 3D printed internal frame, we’re confident you could use this thing as an impromptu step stool without a problem.

Inside there’s 150 watt 240 VAC inverter, complete with a temperature-controlled fan to keep it cool under load. There are also four USB ports providing 2.1 A each, a standard 12 VDC accessory port, and a LED display that shows battery voltage and current being drawn. Rather than come up with his own battery pack, [Taylor] used a 3D printed interface that accepts an 18 V Milwaukee cordless tool battery. Naturally, the design could be adapted to take another brand’s cells if you were so inclined.

Around these parts, we know that a good project doesn’t have to be cheaper or even more practical than what’s already on the market. There’s an inherent value in building something exactly the way you want it that you simply can’t put a monetary price on.

Continue reading “Heavy Metal Power Bank Uses Tool Batteries”

Procedural Barcode Synth Is As Simple As Black And White

We are no stranger to peculiar and wonderful musical instruments here at Hackaday. [James Bruton] has long been fascinated with barcode scanners as an input source for music and now has a procedural barcode-powered synth to add to his growing collection of handmade instruments. We’ve previously covered his barcode guitar, which converts a string of numbers from the PS/2 output to pitches. This meant having a large number of barcodes printed as each pitch required a separate barcode. As you can imagine, this makes for a rather unwieldy and large instrument.

Rather than looking at the textual output of the reader, [James] cracked it open and put it to the oscilloscope. Once inside, he found a good source that outputs a square wave corresponding to the black and white lines that the barcode sees. Since the barcodes [James] is using don’t have the proper start and stop codes, the barcode reader continuously scans.  Normally it would stop the laser to send the text over the USB or PS/2 connection. A simple 5v to 3.3v level shifter feeds that square wave into a Teensy board, which outputs the audio.

A video showcasing a similar technique inspired [James] with this project. The creators of that video have a huge wall of different patterns of black and white lines. [James’s] next stroke of brilliance was to have a small HDMI display to generate the barcodes on the fly. A Raspberry Pi 4 reads in various buttons via GPIO and displays the resulting barcode on the screen. A quick 3d printed shell rounds out the build nicely, keeping things small and compact. All the code and CAD files are up on GitHub.

Continue reading “Procedural Barcode Synth Is As Simple As Black And White”

Starshine Is A MIDI Controller For The Musically Shy

What keeps people from playing music? For one thing, it’s hard. But why is it hard? In theory, it’s because theory is confusing. In practice, it’s largely because of accidentals, or notes that sound sour compared to the others because they aren’t from the same key or a complementary key.

What if there were no accidentals? Instruments like this exist, like the harmonica and the autoharp. But none of them look as fun to play as [Bardable]’s Starshine, the instrument intended to be playable by everyone. The note buttons on the outside are laid out and programmed such that [Bardable] will never play off-key.

We love the game controller form factor, which was also a functional choice. On the side that faces the player, there’s a PSP joystick and two potentiometers for adding expression with your thumbs. The twelve buttons on this side serve several functions like choosing the key and the scale type depending on the rocker switch position. A second rocker lets [Bardable] go up or down an octave on the fly. There’s also an OLED to show everything from the note being played to the positions of the potentiometers. If you want to know more, [Bardable] made a subreddit for this and other future instruments, and has a full tour video after the break.

If this beginner-friendly MIDI controller isn’t big enough for you, check out Harmonicade’s field of arcade buttons.

Continue reading “Starshine Is A MIDI Controller For The Musically Shy”

Hardware Vs Software: Fight!

It’s one of the great cliches in the hacker world: the hardware type and the software type. You can tell which of these two you are quite easily. When a project is actually 20% done, but you think it’s 90% done, and you say to yourself “And the rest is a simple matter of software”, you’re a hardware type. Ask anyone who has read my code, and they’ll tell you, I’m a hardware type.

Along with my blindness to the difficulties of getting the code right, I’ve also admittedly got an underappreciation of what powers lie in the dark typing arts. But I am not too proud to tip my hat when I see an awesome application of the soft stuff. Case in point: this Go board sequencer that we ran last week. An overhead webcam parses players’ moves as they put black and white stones down while playing the game of Go, and turns this into music.

The pure software type will be saying “but there’s a webcam and a Go board”. And indeed, that’s true. There are physical elements to this project that anchor it in the shared reality of the two people playing. But a hardware project this isn’t; it’s OpenCV and Max/MSP that make it work.

For comparison, look at the complexity of this similar physical sequencer. It’s got a 16 x 16 array of LEDs and switches and a CNC milled, primed, and painted surface that’s the size of a twin bed. Sawdust and hand-soldering: that’s a hardware project.

What I love about the Go sequencer is that it uses software just right. The piece is still physical. It could have just as easily been a VR world, where the two people would interact with each other only inside their goggles. But somehow that’s not quite as human as putting stones on a wooden board, sitting across from, and maybe even looking at, your opponent. The players aren’t forced to think about the software. They don’t feel like they’re playing a video game.

But at the same time, the software side of things makes all of the horrible hardware problems go away. Nobody is soldering a rat’s nest of 169 switches. There’s a webcam plugged into the USB port of a laptop. There’s a deep simplicity there.

Should you always trade out arcade buttons for OpenCV? Absolutely not! But is it worth considering the soft side when doing it in hardware is just too, well, hard? I’m open.

Homemade Gear Cutting Indexer Blends Art With Engineering

Ordinarily, when we need gears, we pop open a McMaster catalog or head to the KHK website. Some of the more adventurous may even laser cut or 3D print them. But what about machining them yourself?

[Uri Tuchman] set out to do just that. Of course, cutting your own gears isn’t any fun if you didn’t also build the machine that does the cutting, right? And let’s be honest, what’s the point of making the machine in the first place if it doesn’t double as a work of art?

[Uri’s] machine, made from brass and wood, is simple in its premise. It is placed adjacent to a gear cutter, a spinning tool that cuts the correct involute profile that constitutes a gear tooth. The gear-to-be is mounted in the center, atop a hole-filled plate called the dividing plate. The dividing plate can be rotated about its center and translated along linear stages, and a pin drops into each hole on the plate as it moves to index the location of each gear tooth and lock the machine for cutting.

The most impressive part [Uri’s] machine is that it was made almost entirely with hand tools. The most advanced piece of equipment he used in the build is a lathe, and even for those operations he hand-held the cutting tool. The result is an elegant mechanism as beautiful as it is functional — one that would look at home on a workbench in the late 19th century.

[Thanks BaldPower]

Continue reading “Homemade Gear Cutting Indexer Blends Art With Engineering”