Hackaday Prize Entry: Messing Around With New Vacuum Tubes

Vacuum tubes have been around for ages, and for better or worse, they have their advocates for use in amplifiers and preamps. However, tubes are simply inconvenient devices. Even a 12AX7 preamp tube is huge relative to a handful of transistors, tubes require weird voltages, and each and every one of them is a through-hole device that doesn’t lend itself to machine assembly.

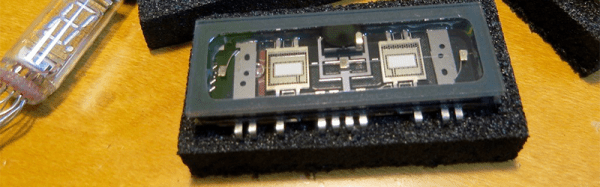
This changed recently with the introduction a strange new tube from Japan. Noritake and Korg recently introduced a triode that uses the same packaging as VFD displays. The Korg Nutube is a vacuum tube that operates at lower voltages, is smaller than the usual preamp tubes, and still has the vacuum tube sound.

For his Hackaday Prize entry, [Kodera] is building a headphone amp with this new tube. Is a tube-based headphone amp particularly novel? No. But this is the first we’ve seen anyone playing around with this new, interesting piece of technology.

The requirements for this Nutube are simple enough, and the minimum anode voltage of this tube is just 8 V. [Kodera]’s circuit is running the tube at 12 V, and the only other circuitry in this preamp are a few coupling caps and an op-amp just before the power stage.

[Kodera] has crammed this circuit into a proper amplifier using a 2 x 15 W class-D chip from TI. It’s really a phenomenally simple circuit that’s also remarkably tiny. These kits are actually available on Tindie. Time will tell if the Nutube is picked up by some big-time manufacturers, but we’re happy to see someone is playing around with the latest advances in tube amp technology.

Hackaday Prize Entry: Modular Circuits With SnapBloks

[Ekawahyu Susilo]’s twist on the modular circuit kit, SnapBloks helps you create circuits by stacking components on top of each other with the help of three magnetic contacts that not only keep the modules stuck together but also deliver power, ground, and data to each part.

[Ekawahyu] envisioned it as a prototyping kit, used to whip together an idea without a lot of hassle. It could also be an educational aid, used to teach Arduino coding while skipping the confusing tangle of wiring. You can stack a sound module on top of a power module to make a buzzer, or attach power to a wheel Blok to make a robot.

With version 2 of the project [Ekawahyu] updated the look with color-coded shells, with pink signifying input Bloks, green for output, orange for communication, and blue for power. Each Blok has a Arduino chip inside — an STM32, which Hackaday reviewed back in March. For version three, he hopes to leverage the ESP8266 to make a WiFi-enabled Blok. [Ekawahyu]’s idea of having a cheap SMD Arduino in every module seems like a smart way to simplify module creation—no “controller block” needed!

Hackaday Prize Entry: A 3D Printer Management System

Since the first desktop 3D printers, people have been trying to figure out a way to manage desktop 3D printers and turn them into tiny little automated factories. One of the first efforts was a conveyor belt build plate that was successfully used by MakerBot until it wasn’t anymore. Octoprint has been a boon for anyone who wants to manage a few printers, but that’s only half the solution.

For his Hackaday Prize entry, [Mike] has come up with a solution that turns a desktop 3D printer into a completely automated factory. Not only does this project take care of removing the part from the bed when the print is done, it also manages a web-based print queue. It is the simplest way to manage a printer we’ve ever seen, and it’s a great entry for the Hackaday Prize.

First up, the software stack. [Mike] has developed a web-based queue and slicing software that ingests 3D models and spits out Gcode to a printer. This, really, is nothing new. Octoprint does it, Astroprint does it, and even a few 3D printers have this capability. This is only one part of the project though, although it is geared more as a maker space management software than simply a dedicated 3D printer controller.

You can’t have an automated mini factory without an automated build plate, though, and here [Mike] has come up with something really great. His solution for dispensing prints after they’re completed is brilliant in its simplicity. All you need to do is drop the floor out from underneath the print. [Mike]’s solution is a trap door print bed. At the beginning of the print, an inkjet printer spits out a piece of paper, with a few lines of text, onto the print bed. When the print is finished, a stepper motor unwinds a cable, and a trap door opens up underneath the print. The part drops into a bin, the door closes, and the next print is loaded up in the queue. It’s brilliantly simple.

You can check out [Mike]’s demo of this system after the break. It’s awesome and so sublimely simple we’re shocked no one has thought of this before.

Continue reading “Hackaday Prize Entry: A 3D Printer Management System”

Autonomous Transatlantic Seafaring

[Andy Osusky]’s project submission for the Hackaday Prize is to build an autonomous sailboat to cross the Atlantic Ocean. [Andy]’s boat will conform to the Microtransat Challenge – a transatlantic race for autonomous boats. In order to stick to the rules of the challenge, [Andy]’s boat can only have a maximum length of 2.5 meters, and it has to hit the target point across the ocean within 25 kilometers.

The main framework of the boat is built from aluminum on top of a surfboard, with a heavy keel to keep it balanced. Because of the lightweight construction, the boat can’t sink and the heavy keel will return it upright if it flips over. The sail is made from ripstop nylon reinforced by nylon webbing and thick carbon fiber tubes, in order to resist the high ocean winds.

The electronics are separated into three parts. A securely sealed Pelican case contains the LiFePo4 batteries, the solar charge controller, and the Arduino-based navigation controller. The communications hardware is kept in polycarbonate cases for better reception. One case contains an Iridium satellite tracker, compass, and GPS, the other contains two Globalstar trackers. The Iridium module allows the boat to transmit data via the Iridium Short Burst Data service. This way, data such as GPS position, wind speed, and compass direction can be transmitted.

[Andy]’s boat was launched in September from Newfoundland headed towards Ireland. However, things quickly seemed to go awry. Storms and crashes caused errors and the solar chargers seemed not to be charging the batteries. The test ended up lasting about 24 days, during which the boat went almost 1000km.

[Andy] is redesigning the boat, changing to a rigid sail and enclosing the hardware inside the boat. In the meantime, the project is open source, so the hardware is described and software is available on GitHub. Be sure to check out the OpenTransat website, where you can see the data from the first sailing. Also, check out this article on autonomous kayaks, and this one about a swarm of autonomous boats.

Continue reading “Autonomous Transatlantic Seafaring”

Hackaday Prize Entry: Elephant AI

[Neil K. Sheridan]’s Automated Elephant Detection System was a semi-finalist in last year’s Hackaday Prize. Encouraged by his close finish, [Neil] is back at it with a refreshed and updated Elephant AI project.

The purpose of Elephant AI is to help humans and elephants coexist by eliminating contact between the two species. What this amounts to is an AI that can herd elephants. For this year’s project, [Neil] did away with the RF communications and village base stations in favor of 4G/3G-equipped, autonomous sentries equipped with Raspberry Pi computers with Go Pro cameras.

The main initiative of the project involves developing a system able to classify wild elephants visually, by automatically capturing images and then attempting to determine the elephant’s gender and age. Of particular importance is the challenge of detecting and controlling bull elephants during musth, a state of heightened aggressiveness that causes bulls to charge anyone who comes near. Musth can be detected visually, thanks to secretions called temporin that appear on the sides of the head. If cameras could identify bull elephants in musth and somehow guide them away from humans, everyone benefits.

This brings up another challenge: [Neil] is researching ways to actually get elephants to move away if they’re approaching humans. He’s looking into nonlethal techniques like audio files of bees or lions, as well as ping-pong balls containing chili pepper.

Got some ideas? Follow the Elephant AI project on Hackaday.io.

Hackaday Prize Entry: A Go-Kart For A Special Child

ScottCar is a go-kart for a special Kid and is [Alain]’s entry in this years Hackaday Prize. Will it race to victory?

The concept behind ScottCar is simple: There isn’t much out there for disabled kids when it comes to go-karts. [Alain Mauer] has an autistic son who isn’t quite capable of driving a Go-Kart as he would have trouble using pedals and brakes. He didn’t let that stand in his way, so he built a go-kart for his 11-year-old son. It incorporates an automatic braking system. In situations where the kart speeds up going down, brakes are automatically applied, slowing it down to a normal pace. It also features a remote emergency brake which would avoid crashes while supervising playtime. The braking system uses bike disc brakes controlled by an Arduino Nano. A Siemens Motor with a screw drive is what propels the vehicle, powered by a 12V Battery with a healthy 7.5Ah capacity.

The project is being released under GNU General Public License version 3, Will we be seeing ScottCar racing towards the Hackaday prize?

Hackaday Prize Entry: 3D Printed Linear Actuator Does 2kg+

The rabbit hole of features and clever hacks in [chiprobot]’s NEMA17 3D Printed Linear Actuator is pretty deep. Not only can it lift 2kg+ of mass easily, it is mostly 3D printed, and uses commonplace hardware like a NEMA 17 stepper motor and a RAMPS board for motion control.

The main 3D printed leadscrew uses a plug-and-socket design so that the assembly can be extended easily to any length desired without needing to print the leadscrew as a single piece. The tip of the actuator even integrates a force sensor made from conductive foam, which changes resistance as it is compressed, allowing the actuator some degree of feedback. The force sensor is made from a 3M foam earplug which has been saturated with a conductive ink. [chiprobot] doesn’t go into many details about his specific method, but using conductive foam as a force sensor is a fairly well-known and effective hack. To top it all off, [chiprobot] added a web GUI served over WiFi with an ESP32. Watch the whole thing in action in the video embedded below.

Continue reading “Hackaday Prize Entry: 3D Printed Linear Actuator Does 2kg+”