Hackaday Prize 2023: AutoDuct Smart Air Duct

Modern building techniques are relying more and more on passive elements to improve heating and cooling efficiencies, from placing windows in ways to either absorb sunlight or shade it out to using high R-value insulation to completely sealing the living space to prevent airflow in or out of the structure. One downside of sealing the space in this fashion, though, is the new problem of venting the space to provide fresh air to the occupants. This 3D printed vent system looks to improve things.
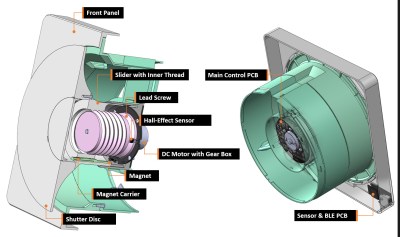
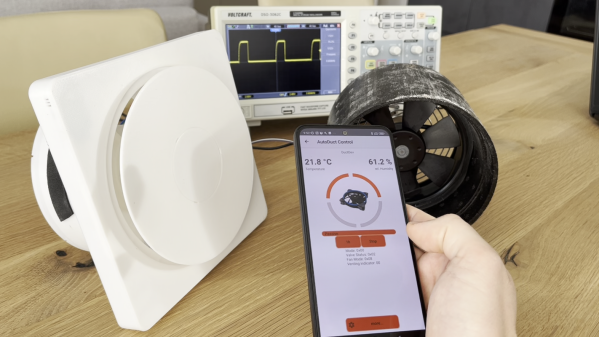
Known as the AutoDuct, the shutter and fan combination is designed to help vent apartments with decentralized systems. It can automatically control airflow and also reduces external noise passing through the system using a printed shutter mechanism which is also designed to keep out cold air on windy days.

A control system enables features like scheduling and automatic humidity control. A mobile app is available for more direct control if needed. The system itself can also integrate into various home automation systems like Apple’s HomeKit.

A 100% passive house that’s also as energy-efficient as possible might be an unobtainable ideal, but the closer we can get, the better. Some other projects we’ve seen lately to help climate control systems include this heat pump control system and this automatic HVAC duct booster fan system.

Hackaday Prize 2023: The Gearing Up Challenge Finalists

If there’s more to life than just a workshop full of tools, it’s probably a workshop full of tools that you’ve built yourself. At least that was the thinking behind the recently concluded “Gearing Up” challenge of the 2023 Hackaday Prize, which unsurprisingly generated quite a list of entries for our judges to review and whittle down to their top ten favorite tools, jigs, fixtures, and general labor-savers.

Having piqued the interest of our crack team of judges, these ten projects have not only earned a spot in the 2023 Hackaday Prize Finals, but they’ll also get a $500 cash prize to boot. But the heat is really on now; like all the finalists from the previous rounds, they’ve only got until October to get their projects as far along as they can before the final round. The grand prize is grand indeed — $50,000 in cash and a residency at the Supplyframe Design Lab in Pasadena!

We’re really getting down to the wire here, but it’s worth taking a little time out to look at some of the Gearing Up challenge winners, and what they came up with to make life in the shop a little easier. And don’t forget — the one who dies with the most tools wins!

Continue reading “Hackaday Prize 2023: The Gearing Up Challenge Finalists”

Hackaday Prize 2023: 10 KW Electronic Load

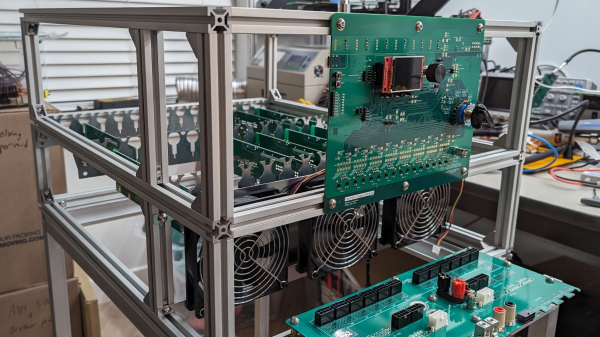
[tinfever] needed a high-power benchtop electronic load for an upcoming project, and by their own admission decided foolishly to build their own. And we’re glad they did. The thing is, whilst this isn’t exactly a super-cheap project to build, buying a commercial offering with a capability of 10 kW and up to 30 kW pulsed, is going to cost an absolute fortune.

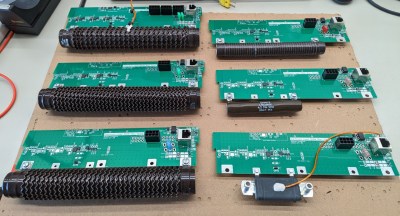
A selection of small resistors

Built inside a cubic frame using what appears to be standard 2020 aluminum rails and fixturing, the modular construction is nice and clean, with plenty of space around the load boards to allow the cooling air to circulate.

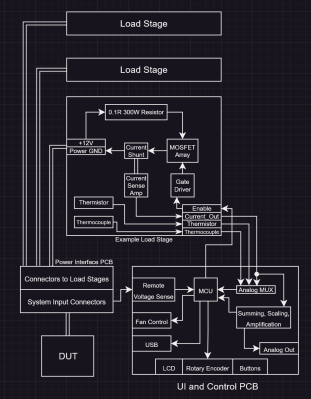
The operating principle is very simple; custom PCBs act in parallel to provide any load needed, by switching in the on-board load resistor. Each load board handles all the details of switching and dumping the power due to the inductance in the system wiring and the wire-wound resistors themselves.

Whilst we know that wire-wound resistors are reverse-wound to minimize inductance, there will still be some, and each load board will contribute a little more when the whole system is scaled up. Also, each load PCB handles its own temperature sensing, and current measurement passing these data off to the control PCB. A front-end connector PCB provides a variety of connection options to interface to the DUT (Device Under Test.) The system controller is based around an STM32 processor which deals with quite a lot more than you might think is needed on a first look.

The sense currents from each load need to be sensed, scaled, and summed to keep the overall load accuracy within the 1% spec. Also, it is on duty for PWM control of the cooling fans, handling the user interface, and any other remote connectivity. There are a lot of details on the project page, as we’re only skimming the surface here. If you’re interested in building an active load, this is a project you really should be digging into.

We shall watch with interest for when [tinfever] scales up this eight-slot prototype to the full specification of 52 stages! When working with power applications, there comes a point when you really need an electronic load, and to that end, here’s one with a very specific use case to get you started.

There is also the option of buying something cheap from the usual sources and hacking on some custom firmware to adapt it a little to your needs.


Hackaday Prize 2023: Jumperless, The Jumperless Jumperboard

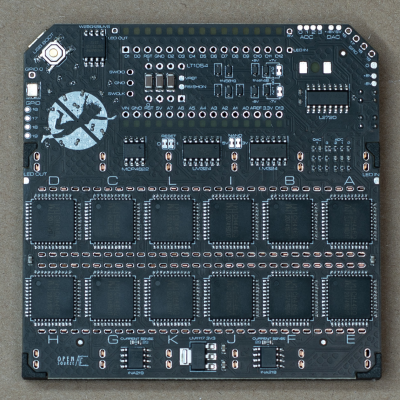
Jumperless is a jumperless breadboard with multicolored LED visualization of signals in real-time. Sounds like magic? This beautifully executed entry to the 2023 Hackaday Prize by [Kevin Santo Cappuccio] uses a boatload of CH446Q analog switch ICs to perform the interconnect between the Raspberry Pi Pico header and the jumper board (or breadboard if you prefer.)

This will add some significant resistance, but for low currents and digital logic levels, this should not be a major concern. Additionally, there are two DAC channels and four ADC channels to help break out of the digital world, which could make for some very interesting non-trivial applications.
The visualization of the Pico header signals is solved neatly with a tiny wishbone-shaped PCB that is reverse-mounted to the back of the main board to illuminate upwards. The masking of the labels is done by using copper to mask off the individual signals and solder mask to draw in the legends. This PCB-level hacking is simply wonderful to see. The PCBs are designed with KiCAD, the design files for which you can find here. It appears however that [Kevin] needed to have the spring clips for the jumper board custom-made, so you’d need to contact them if you needed to get some for a build.

On the software side of things, [Kevin] currently recommends using Wokwi, to run the Arduino stack applications and to perform the signal routing to the virtual jumper board. You can follow how it works internally here. A Python-based bridge application runs on the host computer, which takes care of programming the interconnects as they are constructed, which looking at the demo in the embedded video, appears to ‘just work.’

One word of caution though — the bridge app uses Python requests and Beautiful Soup to scrape the Wowki project page, which could potentially make it vulnerable to getting out-of-sync with updates, so hopefully [Kevin] will keep track of this and keep them in sync.

Need some breadboarding tips? We got you covered. Talking of bread, here’s an 8-bit TTL breadboard-based CPU in a breadbin.

Continue reading “Hackaday Prize 2023: Jumperless, The Jumperless Jumperboard”

Hackaday Prize 2023: Universal Tensile Testing Machine

Material testing is important in big industry, where manufacturers must be able to trust the properties of the raw materials they’re using. The rest of us generally take a supplier’s word for it that they’re giving us what we’ve paid for. However, you could always take on material testing yourself with the Universal Tensile Testing Machine from [Xieshi Zhang].

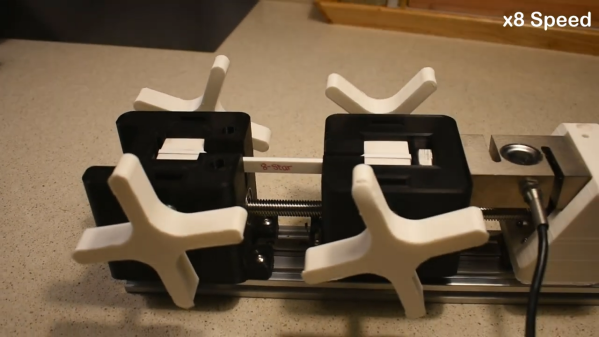
Unlike a six-figure industrial machine, this build is much more affordable, costing on the order of $300 to build. It uses an Arduino to read a tensile strain gauge, and is capable of applying up to a kilonewton of force. To achieve this, it uses a NEMA 17 stepper motor driving a lead screw to apply tensile strain or compression to the specimen under test.  The test fixture is assembled from 3D-printed components, and built on top of a piece of aluminium extrusion.

Fundamentally, it’s a smaller version of a machine most engineering undergraduates will see in a materials lab experiment. It could be highly useful for anyone wanting to experiment with 3D printed structures; it would be more than capable of testing various filaments and infill types for their tensile and compression performance. Video after the break.

Continue reading “Hackaday Prize 2023: Universal Tensile Testing Machine”

Hackaday Prize 2023: Circuit Scout Lends A Hand (Or Two) For Troubleshooting

Troubleshooting a circuit is easy, right? All you need is a couple of hands to hold the probes, another hand to twiddle the knobs, a pair of eyes to look at the schematic, another pair to look at the circuit board, and, for fancy work, X-ray vision to see through the board so you know what pads to probe. It’s child’s play!

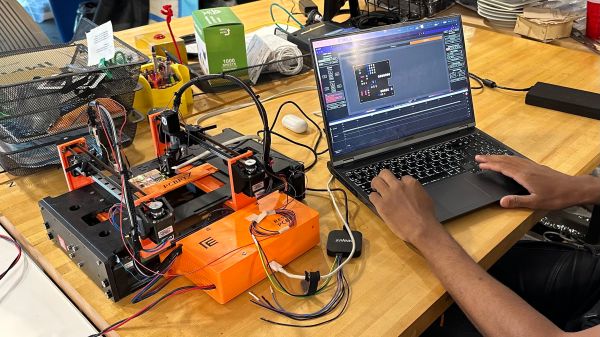
In the real world, most of us don’t have all the extra parts needed to do the job right, which is where something like CircuitScout would come in mighty handy. [Fangzheng Liu] and [Thomas Juldo]’s design is a little like a small pick-and-place machine, except that instead of placing components, the dual gantries place probes on whatever test points you need to look at. The stepper-controlled gantries move independently over a fixture to hold the PCB in a known position so that the servo-controlled Z-axes can drive the probes down to the right place on the board.

As cool as the hardware is, the real treat is the software. A web-based GUI parses the PCB’s KiCAD files, allowing you to pick a test point on the schematic and have the machine move a probe to the right spot on the board. The video below shows CircuitScout moving probes from a Saleae logic analyzer around, which lets you both control the test setup and see the results without ever looking away from the screen.

CircuitScout seems like a brilliant idea that has a lot of potential both for ad hoc troubleshooting and for more formal production testing. It’s just exactly what we’re looking for in an entry for the Gearing Up round of the 2023 Hackaday Prize.

Continue reading “Hackaday Prize 2023: Circuit Scout Lends A Hand (Or Two) For Troubleshooting”

2023 Hackaday Prize: A Reinvented Solar Tracker

It probably goes without saying that solar panels need to be pointed at the sun for optimal performance. The tricky bit is that the sun has a funny habit of moving on you. For those with a solar panel on their balcony or garden, mysoltrk tracks the sun to get the most out of a small solar panel.

[Fulvio] built the tracker to be solid, low cost, and sturdy enough to survive outdoors, which is quite a tall order. Low cost meant WiFi and GPS were out. The first challenge was low-cost linear actuators that were 3D printed with a mechanism to lock the shaft. An N20 6 volt 30 RPM geared motor formed the heart of the actuator. Four photo-resistors inside a printed viewfinder detect where the sun is, allowing the system to steer the array to get equal values on all the sensors. An Arduino Nano was chosen as it was low power, low cost, and easy to modify. A L298N h-bridge drives the motors, and a shunt is used instead of limit switches to reduce costs further.

There are a few other clever tricks. A voltage divider reads the power coming off the panel so the circuit doesn’t brown out trying to move the actuators. The load can also be switched off via an IRL540n. As of the time of writing, only the earlier versions of the code are up on GitHub, as [Fulvio] is still working on refining the tracking algorithm. But the actuators work wonderfully. We love the ingenuity and focus on low cost, which probably explains why mysoltrk was selected as a finalist in the 2023 Hackaday Prize Green Hacks challenge.

Continue reading “2023 Hackaday Prize: A Reinvented Solar Tracker”