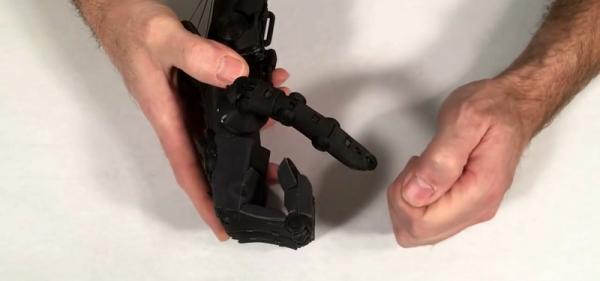
A Modern Take On The Crystal Radio

We’ll admit that [3DSage] has a pretty standard design for a crystal radio. What we liked, though, was the 3D printed chassis with solderless connections. Of course, the working pieces aren’t 3D printed — you need an earphone, a diode, and some wire too. You can see the build and the finished product in the video below.

Winding the coil is going to take awhile, and the tuning is done with the coil and capacitance built into the tuning arrangement so you won’t have to find a variable capacitor for this build. There is a picture of the radio using a razor blade point contact with a pencil lead, so if you want to really scrimp on the diode, that works too, and you can see how at the end of the video.

We did like the use of cord ends from a sewing and craft supply store to serve as solderless springs. This would be a great item to print off a few dozen copies and use it for a school or youth group activity. You might want to pair it with an AM transmitter, though so the kids won’t be dismayed at what is playing on AM in most markets. [3DSage] uses a sink for ground — literally a kitchen sink. However, if you try this, make sure all the pipes are metal or you won’t get a good ground and you probably won’t pick up any stations.

We’d like to get some of those springs and make some other kind of starter projects with them like the kits many of us had as kids. This reminded us of the old foxhole radios, found during World War II.

Continue reading “A Modern Take On The Crystal Radio”

3D Printed Propellers Take To The Skies

In the world of drones, propeller choice is key to performance. Selecting the right props can have a major effect on things like flight time, vibration, and a whole host of other factors. Thinking it might be fun to experiment, [RCLifeOn] decided to 3D print some props and head out for a flight.

The props are a fairly simple 3-bladed design, which were printed in both PETG and PLA. No major difference is noted between the two materials, and the quadcopter under test is able to fly with either. It was noted that the props perform particularly poorly in a crash, with all props failing even in the softest of crashes. We would recommend some eye (and body) protection when spinning these props up for the first time.

If you’re keen to try them out yourself, the STL file can be had here. The video notes that when printing 4 props, 2 must be reversed in the Y-axis to print a counter-rotating set of 4. The instructions used for creating propellers in Fusion3D are available here.

It’s a worthy experiment, and something we’d like to see more of. With a 3D printer, it’s possible to experiment with all manner of propeller designs, and we’d love to see the best and worst designs that are still capable of flight. We’ve also seen 3D printed props before, like this effort from [Anton].

Teaching Alexa To 3D Print

Sometimes a gadget like Alexa or Google Home is a solution looking for a problem. Then the problem you’ve been looking for hits you square in the face. I’ve confessed before that I have an oscilloscope problem. I also have a microcontroller development board habit. It appears now I have too many 3D printers. I recently finished building my latest one, an Anet A8 I picked up on Black Friday. While calibrating it, I found myself juggling a screwdriver, a pair of pliers, and trying to operate the thing all at one time. I realized I had to come up with a better way.

I don’t know if it qualifies as an addiction yet, but I also have an Alexa in every room (although I call it “Computer” because I’m a Star Trek fan) and a Google Home device almost everywhere. Why can’t I get one of these assistants to operate my printer for me? What are assistants for, after all, other than telling Dad jokes?

You’d think adding voice control to a 3D printer would a bit difficult. With the right tools, it is actually pretty easy. Luckily those tools aren’t anything special… if you want a set up like mine, where Alexa controls your 3D printer, read on.

Continue reading “Teaching Alexa To 3D Print”

Copyright Exception May Overrule Ability To Jailbreak 3D Printers

At the end of October, the US Patent and Trademark Office renewed a rule allowing anyone to ‘jailbreak’ a 3D printer to use unapproved filament. For those of you following along from countries that haven’t sent a man to the moon, a printer that requires proprietary filament is DRM, and exceptions to the legal enforceability DRM exist, provided these exceptions do not violate US copyright law. This rule allowing for the jailbreaking of 3D printers contains an exception so broad it may overturn the rule.

A few months ago, the US Copyright Office renewed a rule stating that using unapproved filament in a 3D printer does not violate US Copyright law. The language of this rule includes the wording:

‘The exemption shall not extend to any computer program on a 3D printer that produces goods or materials for use in commerce the physical production of which is subject to legal or regulatory oversight…” 

This exception is extraordinarily broad; any 3D printers can produce aircraft parts (subject to FAA approval) and medical devices (subject to FDA approval). In effect, if a 3D printer has the ability to produce objects subject to regulatory oversight, the exception allowing the use of filament not approved by the manufacturer does not apply. Additionally, it should be noted that any object produced on a 3D printer that is subject to regulatory oversight is already regulated — there’s no reason to drag the Copyright Office into the world of 3D printed ventilation masks or turbine blades.

[Michael Weinberg], ‘legal guy’ for Shapeways and President of the Open Source Hardware Association has filed a petition with the US Copyright Office, asking the Office to eliminate this exception to the existing rule surrounding DRM and 3D printers. You are encouraged to submit a comment in support of this petition by March 14th.

DIY Cable Chain Looks Great, Stays Cheap

If you’ve built a 3D printer, CNC, laser cutter, or basically any piece of electrical equipment that moves around, then you’ve run into the problem of securing the bundle of wires that such machines always require. The easy way out is to zip tie them all up into a tight harness or put them in commercially available wraps or sleeves, but these don’t really impart any mechanical strength on the wires. With repetitive motion it’s not unheard of to break a conductor or two, causing intermittent failures and generally leading to a painful diagnostic session trying to isolate the broken wire.

An alternative are what are generally referred to as “cable chains”. These are rigid enclosures for your wiring that not only keep things tidy, but give the wires the mechanical support necessary to prevent fatigue. Unfortunately, they are often many times more expensive than a simple wire wrap or pack of zip ties. But [Brad Parcels] has written into our tip line to share with us a sort of hybrid approach to wire management that has many of the same advantages as a traditional cable chain, but at a greatly reduced cost.

The key to the design is using the metallic tape from a cheap tape measure to give the bundle of wires some mechanical strength. As anyone who’s ever played around with a tape measure knows, if you bend the tape over into a U shape it will hold the bend even if you extend and retract it. Thanks to this principle, [Brad] realized that all he need to do was add some wire sleeves and he would have a cheap and effective way to keep his wiring neat and sag-free.

[Brad] punches holes in the tape to secure it to his 3D printed mounting arms, but really any method of securing the tape to the frame of your machine will work just as well. He then slides a cable sleeve over the tape itself to protect from any possibility of the edge of the tape nicking a wire, and then finally a larger wire sleeve over the entire assembly.

After running the wires between the two sleeves, heatshrink can be used on the ends to neatly close everything up. Just make sure you remember all your wires before you seal it, [Brad] learned that one the hard way. But overall, he reports this DIY cable chain arrangement has been working wonderfully in his machine, providing smooth and silent movement for only a few bucks.

Cable management for projects that move is one of those things that doesn’t always get the attention it deserves. Not only can it keep your project looking professional, but it just might save you some time down the road by preventing failures.

Brute Forcing Passwords With A 3D Printer

Many of us use a 4 digit pin code to lock our phones. [David Randolph] over at Hak5 has come up a simple way to use a 3D printer to brute force these passwords. Just about every 3D printer out there speaks the same language, G-code. The same language used in CAD and CNC machines for decades.

[David] placed a numeric keypad on the bed of his printer. He then mapped out the height and positions of each key. Once he knew the absolute positions of the keys, it was easy to tell the printer to move to a key, then press and release. He even created a G-code file which would press every one of the 10,000 4 key pin combinations.

A file this large was a bit unwieldy though, so [David] also created a python script which will do the same thing — outputting the G-code and coordinates to brute force any 4 pin keypad. While a printer is quite a bit slower than Hak5’s own USB Rubber Ducky device (which acts as an automated keyboard), it will successfully brute force a password. Although most phones these days do limit the number of password attempts a user gets.

[David] admits this is probably useless in a clandestine/hacking application, but the video is still a great introduction to G-code and using 3D printers for non-printing functions.

Continue reading “Brute Forcing Passwords With A 3D Printer”

How Cheap Can A 3D Printer Get? The Anet A8

The short answer: something like $200, if your time is worth $0/hour. How is this possible? Cheap kit printers, with laser-cut acrylic frames, but otherwise reasonably solid components. In particular, for this review, an Anet A8. If you’re willing to add a little sweat equity and fix up some of the bugs, an A8 can be turned into a good 3D printer on a shoestring budget.

That said, the A8 is a printer kit, not a printer. You’re going to be responsible for assembly of every last M3 screw, and there are many. Building the thing took me eight or ten hours over three evenings. It’s not rocket surgery, though. There are very accessible videos available online, and a community of people dedicated to turning this box of parts into a great machine. You can do it if you want to.

This article is half how-to guide and half review, and while the fun of a how-to is in the details, the review part is easy enough to sum up: if you want the experience of building a 3D printer, and don’t mind tweaking to get things just right, you should absolutely look into the A8. If you want a backup printer that can print well enough right after assembly, the A8 is a good deal as well; most of the work I’ve put into mine is in chasing perfection. But there are a couple reasons that I’d hesitate to recommend it to a rank beginner, and one of them is fire.

Still, I’ve put 1,615 m (1.0035 miles) of filament through my A8 over 330 hours of run-time spread across the last three months — it’s been actively running for 15% of its lifetime! Some parts have broken, and some have “needed” improving, but basically, it’s been a very functional machine with only three or four hours of unintentional downtime. My expectations going in were naturally fairly low, but the A8 has turned out to be not just a workhorse but also a decent performer, with a little TLC. In short, it’s a hacker’s printer, and I love it.

Continue reading “How Cheap Can A 3D Printer Get? The Anet A8”