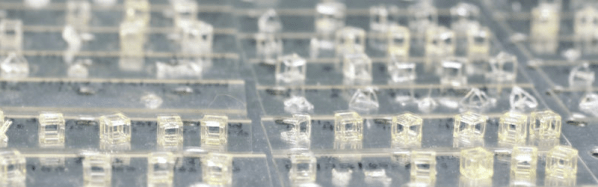
When most of us think about 3D printing, we usually think about a machine that melts plastic filament and extrudes it through a nozzle. But we all know that there are other technologies out there that range from cutting and laminating paper, to printing with molten metal or glass. Many of those are out of range for the common hacker. Probably the second most common method uses photo resin and some light source to build the layers in the resin. Researchers at Lawrence Livermore National Laboratory (LLNL) and several universities are experimenting with a new technique that exposes photo resin using three lasers, printing an entire object at one time. You can see a cube formed using the technique in the video below.
In all fairness, the process really isn’t holography but LLNL refers to it as “hologram-like.” In fact, it appears the lasers project more like an oblique projection (you know, like in drafting) which is considerably simpler. Simple enough, that we can’t help but wonder if the hacker community couldn’t develop machines based on this principle. The key would be arranging for the resin to only cure where laser light overlaps.
I always find it interesting that 3D printers — at least the kind most of us have — are mostly open-loop devices. You tell the head to move four millimeters in the X direction and you assume that the stepper motors will make it so. Because of the mechanics, you can calculate that four millimeters is so many steps and direct the motor to take them. If something prevents that amount of travel you get a failed print. But there is one part of the printer that is part of a closed loop. It is very tiny, very important, but you don’t hear a whole lot about it. The thermistor.
The hot end and the heated bed will both have a temperature sensor that the firmware uses to keep temperatures at least in the ballpark. Depending on the controller it might just do on-and-off “bang-bang” control or it might do something as sophisticated as PID control. But either way, you set the desired temperature and the controller uses feedback from the thermistor to try to keep it there.
If you print with high-temperature materials you might have a thermocouple in your hot end, but most machines use a thermistor. These are usually good to about 300 °C. What got me thinking about this was the installation of an E3D V6 clone hot end into my oldest printer which had a five-year-old hot end in it. I had accumulated a variety of clone parts and had no idea what kind of thermistor was in the heat block I was using.
Traditional desktop 3D printing technology has effectively hit a wall. The line between a $200 and a $1000 printer is blurrier now than ever before, and there’s a fairly prevalent argument in the community that you’d be better off upgrading two cheap printers and pocketing the change than buying a single high-end printer if the final results are going to be so similar.
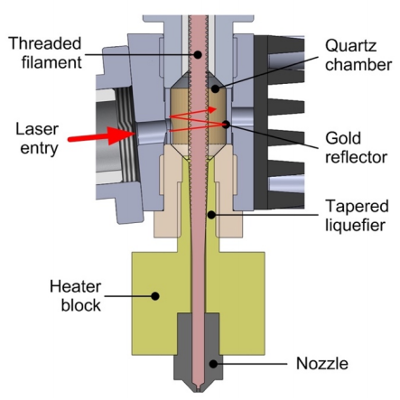
As anyone who’s pushed their 3D printer a bit too hard can tell you, the first thing that usually happens is the extruder begins to slip and grind the filament down. As the filament is ground down it starts depositing plastic on the hobbed gear, further reducing grip in the extruder and ultimately leading to under-extrusion or a complete print failure. To address this issue, MIT’s printer completely does away with the “pinch wheel” extruder design and replaces it with a screw mechanism that pulls special threaded filament down into the hot end. The vastly increased surface area between the filament and the extruder allows for much higher extrusion pressure.
An improved extruder doesn’t do any good if you can’t melt the incoming plastic fast enough to keep up with it, and to that end MIT has pulled out the really big guns. Between the extruder and traditional heater block, the filament passes through a gold-lined optical cavity where it is blasted with a pulse modulated 50 W laser. By closely matching the laser wavelength to the optical properties of the plastic, the beam is able to penetrate the filament and evenly bring it up to nearly the melting point. All without physically touching the filament and incurring frictional losses.
There are still technical challenges to face, but this research may well represent the shape of things to come for high-end printers. In other words, don’t expect a drop-in laser hot end replacement for your $200 printer anytime soon; the line is about to get blurry again.
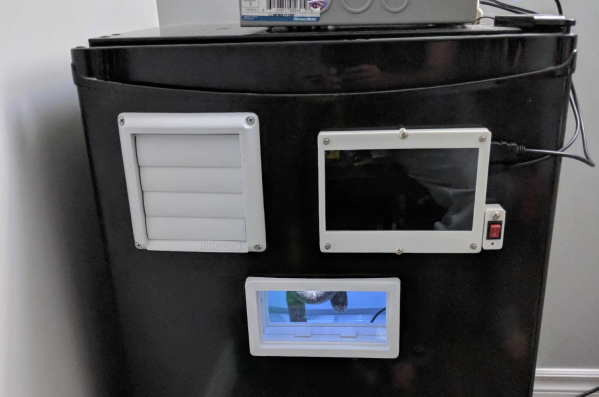
Charcuterie is delicious — but is it hackable? When talking about the salty preserved meats, one might be more inclined to indulge in the concept of bacon before pondering a way to integrate an electrical monitoring system into the process. However, [Danzetto] decided to do both when he did not have anywhere to cure his meats. He made his own fully automatic meat curing chamber lovingly called the curebOS with the aid of a raspberry pi. It is basically a beefed up mini fridge with all of the bells and whistles.
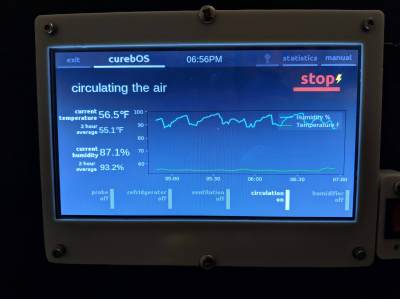
This baby has everything. Sitting on top is a control system containing the Pi. There are 5 relays used for the lights, circulating fan, ventilating fans, refrigerator, and humidifier all powered by a 5 amp supply — minus the fridge. Down below that is the 3D printed cover with a damper for one of the many ventilation fans that regulate the internal temperature. To the right is a touchscreen for viewing and potentially controlling the system if necessary. The control program was written in Python for viewing the different trends. And below that, of course, is a viewing window. On the inside are temperature and humidity probes that can be monitored from the front screen. These readings help determine when to activate the compressor, any of the fans, or the humidifier for optimal settings. For a final touch, there are also some LEDs placed above the hanging meat to cast a glowing effect upon the prized possessions.
LEGO has always been an excellent toy for both play and learning, and the Technic sets are a great starting point for any budding engineer. Not content to rest on their plastic, blocky laurels, LEGO introduced more advanced parts over the years, such as motors and battery packs to allow builders to propel their creations. Combine this mechanical philosophy with [Matt]’s Giant Lego Go-Kart and you have one heck of a project.
It all started months ago, when [Matt] built his original Giant Lego Go-Kart, a 5-times scaled up model of the original kit #1972-1. Achieved through the wonder of 3D printing, he had sized it up based off the largest parts he could fit on his printer. The Youtube video led to commenters asking – could it be driven?
He decided that radio control was definitely a possibility. Not content to simply bolt on a series of motors to control the drive and steering, he took the effort to build scaled up replica LEGO motors, even taking care to emulate the old-school connectors as well. A particularly nice touch was the LEGO antenna, concealing the Orange RX radio receiver.
There were some hiccups – at this scale & with [Matt]’s parts, the LEGO force just isn’t strong enough to hold everything together. With a handful of zipties and a few squirts of glue, however, the giant ‘kart was drifting around the carpark with ease and hitting up to 26km/h.
In the end, the build is impressive not just for its performance but the attention to detail in faithfully recreating the LEGO aesthetic. As for the next step, we’d like to know what you think – how could this be scaled up to take a human driver? Is it possible? You decide.
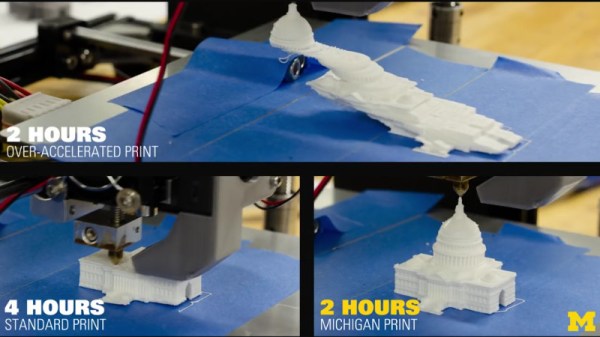
Recently, a YouTube video has been making the rounds online which shows a rather astounding comparison between two printed models of the US Capitol. Starting with the line “3-D PRINTERS CAN NOW PRINT TWICE AS FAST”, the video shows that one print took four hours to complete, and the other finished in just two hours by virtue of vibration reducing algorithms developed at the University of Michigan. The excitement around this video is understandable; one of the biggest limitations of current 3D printer technology is how long it takes to produce a model of acceptable quality, and if improvements to the software that drives these machines could cut total print time in half, the ramifications would be immense.
The only problem is, the video shows nothing of the sort. What’s more, when pushed for details, the creators of the video are now claiming the same thing.
The mechanical and electronic parts of a 3D printer are critical for success, but so is the slicing software. Slic3r and Cura are arguably the most popular, and how they command your printer has a lot to do with the results you can get. There are lots of other slicers out there both free and paid, but it is hard to really dig into each one of them to see if they are really better than whatever you are using today. If you are interested in the performance of IceSL — a free slicer for Windows and Linux — [DIY3DTECH] has a video review that can help you decide if you want to try it. You can see the video below.
IceSL has several modules and can actually do OpenSCAD-like modeling in Lua so you could — in theory — do everything in this one tool. The review, though, focuses only on the slicing aspect. In addition to the desktop client versions, you can use some features online (although on our Linux machine it didn’t work with the latest Chrome beta even with no add ons; Firefox worked great, though).