A Blacksmith Shows Us How To Choose An Anvil

No doubt many readers have at times wished to try their hand at blacksmithing, but it’s fair to say that acquiring an anvil represents quite the hurdle. For anyone not knowing where to turn there’s a video from [Black Bear Forge], in which he takes us through a range of budget options.

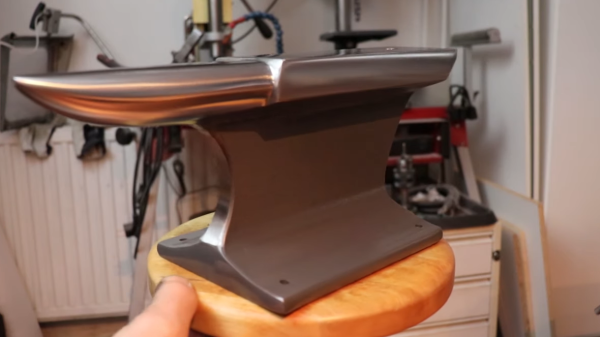
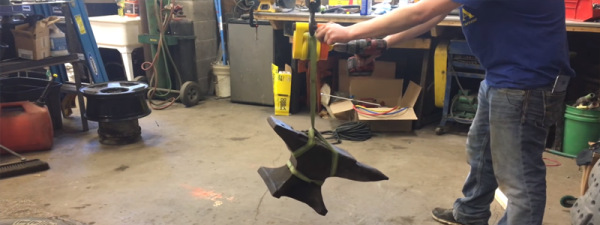
He starts with a sledgehammer, the simplest anvil of all, which we would agree makes a very accessible means to do simple forge work. He shows us a rail anvil and a couple of broken old anvils, before spending some time on a cheap Vevor anvil and going on to some much nicer more professional ones. It’s probably the Vevor which is the most interesting of the ones on show though, not because it is particularly good but because it’s a chance to see up close one of these very cheap anvils.

Are they worth taking the chance? The one he’s got has plenty of rough parts and casting flaws, an oddly-sited pritchel and a hardy hole that’s too small. These anvils are sometimes referred to as “Anvil shaped objects”, and while this one could make a reasonable starter it’s not difficult to see why it might not be the best purchase. It’s a subject we have touched on before in our blacksmithing series, so we’re particularly interested to see his take on it.

Continue reading “A Blacksmith Shows Us How To Choose An Anvil”

Railroad Rail Transformed Into Blacksmith’s Anvil With The Simplest Of Tools

One of the biggest challenges facing the aspiring blacksmith is procuring the tools of the trade. And that means tackling the unenviable task of finding a decent anvil. Sure, one can buy an ASO — anvil-shaped object — at Harbor Freight, but a real anvil is much harder to come by. So perhaps the beginner smith’s first build should be this railroad rail to anvil conversion.

Repurposing sections of rail into anvils is hardly a new game, but [The Other Finnish Guy]’s build shows us just how little is needed in terms of specialized tooling to pull this off. Other than a file, the bulk of the work is done by angle grinders, which are used to cut off the curved crown of the rail section, cut the shape of the heel, and rough out the horn. Removing that much metal will not be a walk in the park, so patience — and a steady supply of cutting wheels and sanding discs — is surely required. But with time and skill, the anvil hidden inside the rail can be revealed and put to use.

We have questions about the final result, like its lack of a hardy hole and the fact that the face isn’t hardened. We wonder if some kind of induction heating could be used to solve the latter problem, or if perhaps a hardened plate could be welded into the top to make a composite anvil. Still, any anvil is better than no anvil. More on the anatomy and physiology of these tools can be had in [Jenny List]’s article on anvils, and her whole excellent series on blacksmithing is highly recommended. [Jenny]’s not the only smith we have on staff, though — [Bil Herd] has been known to smite a bit too.

Continue reading “Railroad Rail Transformed Into Blacksmith’s Anvil With The Simplest Of Tools”

Blacksmithing For The Uninitiated: Curves And Rings

You know the funny looking side of the anvil? That’s where the best curves come from. It’s called the anvil horn and is the blacksmith’s friend when bending steel and shaping it into curves.

The principle of bending a piece of steel stock is very easy to understand. Heat it up to temperature, and hammer it over a curved profile to the intended shape. A gentler touch is required than when you are shaping metal. That’s because the intent is to bend the metal rather than deform. Let’s take a look!

Continue reading “Blacksmithing For The Uninitiated: Curves And Rings”

Wire Bender Aims To Take Circuit Sculptures To The Next Level

It doesn’t seem as though bending wire would be much of a chore, but when you’re making art from your circuits, it can be everything. Just the right angle in just the right place can make the difference between a circuit sculpture that draws gasps and one that’s only “Meh.”

[Jiří Praus] creates circuit sculptures that are about as far away from the “Meh” end of the spectrum as possible. And to help him make them even more spectacular, he has started prototyping a wire-bending machine to add precision to his bends. There’s no build log at the moment, but the video below shows progress to date. All the parts are 3D-printed, with two NEMA 17 steppers taking care of both wire feed and moving the bending head. It appears that the head has multiple slots for tools of different shapes. For now, the wire is rotated around its long axis manually, but another stepper could be added to take care of that job.

[Jiří] tells us that while he loves making circuit sculptures like his amazing mechanical tulip, he hates repeating himself. He hopes this bender will make repeat jobs a little less tedious and a lot more precise, and we hope he goes forward with the build so we get to see both it and more of his wonderful works of circuit art.

Continue reading “Wire Bender Aims To Take Circuit Sculptures To The Next Level”

Blacksmithing For The Uninitiated: Your First Time At The Anvil

For the past few months we’ve been running this series of Blacksmithing For The Uninitiated posts, exploring the art of forge work for a novice. It’s based upon my experience growing up around a working blacksmith’s business and becoming an enthusiastic if somewhat inexpert smith, and so far we’ve spent our time looking at the equipment you might expect to need were you embarking on your own blacksmith work. Having assembled by now a basic forge of our own it’s now time to fire it up and take to the anvil for our first bit of smithing.

Lighting a forge is easy enough. Some people do it with a gas torch, but I break a piece of firewood into sticks using a hammer with the fuller set in the hardy hole on the anvil as an impromptu splitter. Making a small fire by lighting some paper under my pile of sticks placed on the hearth next to the tuyere I start the blower and then pile coke on top of the resulting conflagration. After about ten minutes I will have a satisfying roar and a heap of glowing coals, and as they burn there will be some slag collecting in the bottom of the fire that I will eventually need to rake out. Continue reading “Blacksmithing For The Uninitiated: Your First Time At The Anvil”

Blacksmithing For The Uninitiated: Let’s Talk About Anvils

When you grow up with something as the constant backdrop to your life, it’s easy to forget as an adult that not everyone else shares your instinctive knowledge of the subject. My dad is a blacksmith, he’s now retired, but as I was growing up his very active forge was in a workshop next to our house. This is the second part of a series based upon that experience, exploring blacksmithing for people who have maybe always fancied a go at the anvil but have little idea where to start.

The Most Obvious Blacksmithing Tool: The Anvil

Having considered the hearth in our previous outing, it’s time to turn our attention to what is the signature piece of blacksmithing equipment: the anvil. This has the function of providing a high-mass hardened working surface against which metal can be forged, and it has a distinctive shape with various parts for particular metalworking tasks. There are many minor and major variations of anvil design depending upon where in the world your anvil hails from, but since my experience comes from the English counties, the anvil I will be describing is the pattern you’ll find in the British Isles.

Continue reading “Blacksmithing For The Uninitiated: Let’s Talk About Anvils”

3D Printed Gearbox Lifts An Anvil With Ease

How strong can you make a 3D-printed gearbox. Would you believe strong enough to lift an anvil? [Gear Down For What?] likes testing the limits of 3D printed gearboxes. Honestly, we’re amazed.

3D printing has revolutionized DIY fabrication. But one problem normally associated with 3D printed parts is they can be quite weak unless designed and printed carefully.

Using a whole roll of filament, minus a few grams, [Gear Down For What?] printed out a big planetary gear box with a ratio of 160:1 and added some ball bearings and using a drill as a crank. Setting it up on a hoist, he started testing what it could lift. First it lifted a 70 lb truck tire and then another without any issues. It then went on to lift a 120 lb anvil. So then the truck tires were added back on, lifting a combined weight of 260 lb without the gearbox breaking a sweat.

This is pretty amazing! There have been things like functional 3D-printed car jacks made in the past, however 3D-printed gear teeth are notoriously easily broken unless designed properly. We wonder what it would take to bring this gearbox to the breaking point. If you have a spare roll of filament and some ball bearings, why not give it go yourself? STL files can be found here on Thingiverse.

Continue reading “3D Printed Gearbox Lifts An Anvil With Ease”