Pain Box Project

Making The Dune “Pain Box” A Reality

If you are unfamiliar with Dune, then you may not know what the pain box is. The pain box is a fictional device that produces an excruciating burning sensation without causing any actual damage. [Bryan] has been working on a project to duplicate this effect in the real world. It sounds like he may be on the right path by using the “thermal grill illusion”.

The thermal grill illusion is a sensory trick originally demonstrated back in 1896. The trick is made up of two interlaced grills. One is cool to the touch, and the other is warm. If the user touches a single grill, they won’t experience any pain because neither temperature is very extreme. However if the user places their hand over the interlaced grills simultaneously they will immediately experience a burning heat. This usually causes the person to pull their hand away immediately. It’s a fun trick and you can sometimes see examples of it at science museums.

The thermal grill illusion sounded like the perfect way to make the pain box a reality. [Bryan] has set specific constraints on this build to make it more true to the Dune series. He wants to ensure the entire package fits into a small box, just big enough to place an adult hand inside. He also wants to keep safety in mind, since it has the potential to actually cause harm if it were to overheat.

[Bryan] has so far tried two methods with varying success. The first attempt involved using several thermoelectric coolers (TECs). [Bryan] had seen PCBs etched a certain way allowing them to radiate heat. We’ve seen this before in 3D printer surfaces. He figured if they could become hot, then why couldn’t they become cold too? His idea was very simple. He etched a PCB that had just two large copper pours. Each one branched out into “fingers” making up the grill.

Each side of the grill ultimately lead to a flat surface to which a TEC was mounted. One side was cold and the other was hot. Heat sinks we attached to the open side of the TECs to help with performance. Unfortunately this design didn’t work. The temperature was not conducted down to the fingers at all. The back side of the PCB did get hot and cold directly under the TECs, but that wouldn’t work for this illusion.

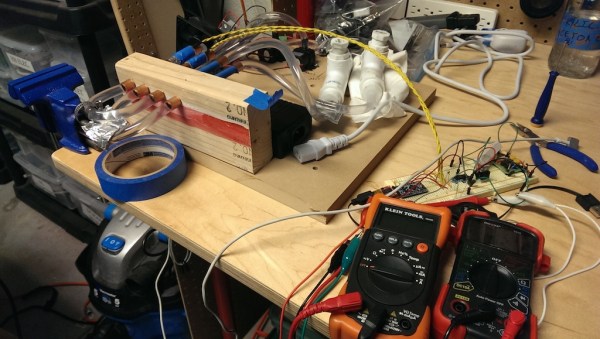
The latest version of the project scraps the PCB idea and uses small diameter copper tubing for the grill. [Bryan] is working with two closed loop water systems. One is for warm water and the other is for cold. He’s using an aquarium pump to circulate the water and the TECs to actually heat or cool the water. The idea is that the water will change the temperature of the copper tubing as it flows through.

While the results so far are better than the previous revision, unfortunately this version is having problems of its own. The hot water eventually gets too hot, and it takes over an hour for it to heat up in the first place. On top of that, the cold water never quite gets cold enough. Despite these problems, [Bryan] is hopefully he can get this concept working. He has several ideas for improvements listed on his blog. Maybe some Hackaday readers can come up with some clever solutions to help this project come to fruition.

Hackaday Links Column Banner

Hackaday Links: December 21, 2014

Most of the incredible flight simulator enthusiasts with 737 cockpits in their garage are from the US. What happens when they’re from Slovenia? They built an A320 cockpit. The majority of the build comes from an old Cyprus Airways aircraft, with most of the work being wiring up the switches, lights, and figuring out how to display the simulated world out of the cockpit.

Google Cardboard is the $4 answer to the Oculus Rift – a cardboard box and smartphone you strap to your head. [Frooxius] missed being able to interact with objects in these 3D virtual worlds, so he came up with this thing. He adapted a symbol tracking library for AR, and is now able to hold an object in his hands while looking at a virtual object in 3D.

Heat your house with candles! Yes, it’s the latest Indiegogo campaign that can be debunked with 7th grade math. This “igloo for candles” will heat a room up by 2 or 3 degrees, or a little bit less than a person with an average metabolism will.

Last week, we saw a post that gave the Samsung NX300 the ability to lock the pictures taken by the camera with public key cryptography. [g3gg0] wrote in to tell us he did the same thing with a Canon EOS camera.

The guys at Flite Test put up a video that should be handy for RC enthusiasts and BattleBot contenders alike. They’re tricking out transmitters, putting push buttons where toggle switches should go, on/off switches where pots should go, and generally making a transmitter more useful. It’s also a useful repair guide.

[Frank Zhao] made a mineral oil aquarium and put a computer in it. i7, GTX 970, 16GB RAM, and a 480GB SSD. It’s a little bigger than most of the other aquarium computers we’ve seen thanks to the microATX mobo, and of course there are NeoPixels and a bubbly treasure chest.

An MSP430-based Automatic Fish Feeder

[Dmitri] wanted to buy an automatic feeding setup for his aquarium, but he found that most off-the-shelf feeders are really inaccurate with portion control. [Dmitri]’s fish is sensitive to overfeeding, so an off-the-shelf feeder wouldn’t get the job done. Since [Dmitri] knows a thing or two about electronics, he set out to build his own microcontroller-based automatic feeding machine.

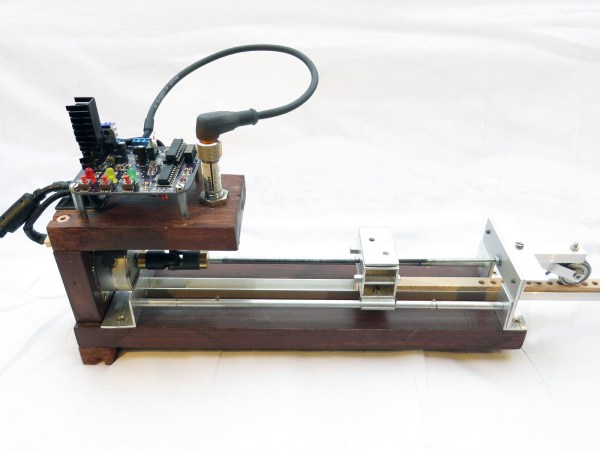
[Dmitri]’s machine is based around a MSP430 that starts feeding at scheduled times and controls how much food is dispensed. The MSP lives on a custom PCB that [Dmitri] designed, which includes a stepper motor driver and input for an endstop sensor. The board is wired to a stepper motor that advances a small wooden board with a series of holes in it. Each hole is filled with a single serving of food. The board slides along a piece of U-channel, and food drops out of each hole into the aquarium when the hole reaches the end of the channel.

The whole build is very well documented, and [Dmitri] explains each block of his schematic in detail. His firmware is also open-source, so you can build your own fish feeder based off of his design. Check out the video after the break to see the feeder in action.

Continue reading “An MSP430-based Automatic Fish Feeder”

A betta fish swims in an MFC.

Microbial Fuel Cell With A Side Of Betta Fish

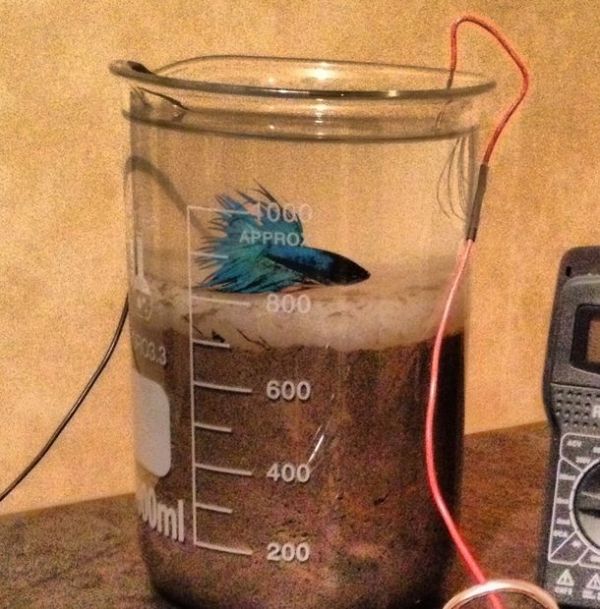
Move over, potato batteries: DIY microbial fuel cells are here to stay! A microbial fuel cell (MFC) is a device that uses bacteria in an anaerobic (oxygen-poor) environment to convert chemical energy into electricity. [drdan152] posted steps on how to make a soil-based MFC  with a neat twist: it’s also a fishbowl for a betta fish.

[drdan152] used soil from the wetlands, referred to as “muck.” This nutrient-rich soil provided a hearty supply of bacteria, especially Geobacter species, known for their uncanny ability to transport electrons outside their cells using bacterial nanowires. The proton exchange membrane (PEM) was made up of salt, water, and agar. After some initial runs, [drdan152] determined that flat char cloth made the best anode, while red copper wire served as the cathode. Assembling the MFC was as simple as surrounding the anode with a thick layer of muck on all sides, adding the PEM on top, followed by water. The cathode was situated halfway out of the water.

After a couple of days, the voltage increased in proportion to the amount of bacteria growing on the anode. The betta fish can happily live in this habitat for a short period of time(it still has to be fed, of course), and the bacteria certainly won’t mind – the fish’s excrement provides an additional food supply. As a bonus, the water is kept clean. However, like any aquarium, the water will need to be changed periodically as carbon dioxide byproduct accumulates from the fish’s respiration and the MFC (high carbon dioxide levels = dead betta fish).

The MFC generates 725 mV. [drdan152] is not satisfied with that number, and is testing out charge pump circuits to generate as much as 3V. We are looking forward to seeing the results. We also wonder if a small aquatic plant could help make it a more self-sustaining environment for the fish. In the meantime, [drdan152] is encouraging others to try larger-scale versions of this MFC. Perhaps MFC-powered carnivorous robots doubling as mobile aquariums are in our near future.

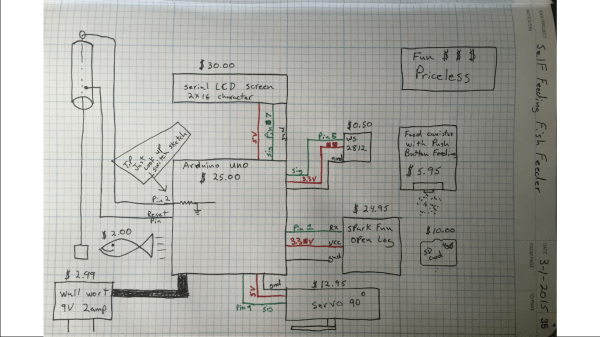
DIY Auto Fish Feeder

DIY Auto Fish Feeder Feeds Fish Automatically

[Brian] has a fairly large 400 liter aquarium and loves the fish that call it home. Unfortunately, sometimes life gets in the way of keeping those fish fed on a regular basis. There are automatic fish feeders out there on the market and [Brian] gave one a try. Although it worked, it dropped one huge clump of food in at a time (rather than sprinkling it in), the food hopper held a very small amount of food and the unit drained a new set of batteries in less than a week. Fifty euros were spent on purchasing that auto feeder and in the end it wasn’t any more convenient than just feeding the fish.

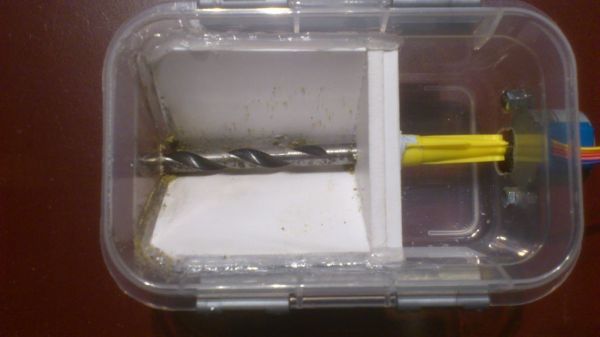
Faced with a tough decision on whether or not to buy another product he may not be happy with, [Brian] decided to make his own automatic fish feeder system out of parts anyone can find lying around the house. The main housing is a small Tupperware bin, inside of which 3 pieces of plastic were glued together to make a v-shaped hopper. The fish food is loaded into the hopper and as it falls to the bottom it meets a reverse-spinning drill bit that acts like an auger, pushing the food out of the container. The drill bit is powered by a small stepper motor connected to the drill bit by an improvised coupling made from a silicone sealant cap!

The control system is an Arduino and a stepper motor driver chip. Through trial and error [Brian] figured out that 100,000 half steps of the motor dumped a good amount of food into the tank. The drill bit delivery method even sprinkles the food nicely for total fish enjoyment. To keep the food flowing at regular intervals, an AC timer unit controls how often the Arduino is powered on and subsequently feeds the fish.

Continue reading “DIY Auto Fish Feeder Feeds Fish Automatically”

The Abovemarine

Over the course of a few weeks, [Adam] trained his betta fish, [Jose], to jump out of the water to snatch food off his finger. An impressive display for a fish, but being able to train his small aquatic friend got [Adam] thinking. What’s stopping [Jose] from interacting his environment even more? The abovemarine was born.

The abovemarine is a robotic platform specifically built for [Jose]’s aquarium. Below, three omni wheels drive the entire aquarium in any direction. A computer running OpenCV, a webcam, and a few motors directs the abovemarine in whatever direction [Jose] wants to go. Yes, it’s a vehicle for a fish, and that’s awesome.

[Adam] put a lot of work into the creation of the abovemarine, and was eventually able to teach [Jose] how to control his new home. In the videos below, you can see [Jose] roaming the studio and rolling towards the prospect of food.

Because [Jose] is a Siamese fighting fish and extremely territorial when he sees other males of his species, this brings up the idea of a version of Battlebots with several abovemarines. They’re in different tanks, so we don’t know what PETA would think of that, but we do expect it to show up in the Hackaday tip line eventually.

Continue reading “The Abovemarine”

Aquarium with variable LEDs

18-Channel PWM Aquarium Lights Provide Habitat-Like Life For Fish

Whether you want to keep your fish happy or just need a good light show, this aquarium light fits the bill. It is the second iteration, but [William] calls it v1. That’s because v0 — which used a few loops of LED strips — never really met his requirements.

This build uses just six LEDs, each a 30 Watt RGB monster! To source about 350 mA for each, and to control brightness with 18-channels of pulse width modulation, he had to plan very carefully. This meant a proper aluminum project box and a beefy, fan-cooled power supply.

The driver board is his own design, and he etched a huge board to hold all of the components. Everything is driven by an Arduino Mega, which has 16 hardware PWM channels; two short of what he needed. Because of this he had to spend a bit of time figuring out how best to bit-bang the signals. But he’s putting them to good use, with fish-pleasing modes like “sunset” or the “passing rainbow” pattern which is shown in the image above.

If you need something a little less traditional why not house your fish in a computer case, complete with LED marquee for displaying data.