LED Heart Beats With The Beholder

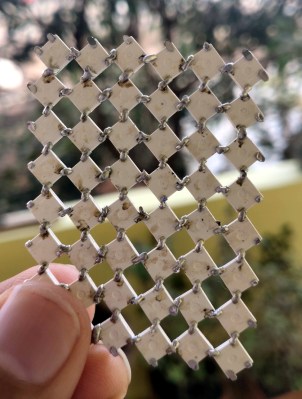
Many a maker likes to use their craft to create gifts for loved ones. [Jiří Praus] was celebrating having been married for 5 years, and crafted this beautiful LED heart sculpture to commemorate the occasion.

The outer shell was created by first starting with a 3D printed heart shape. This was used as a form upon which the brass wire could be soldered together to form an attractive heart-shaped cage. Inside, an Arduino Nano is hooked up to a series of WS2812b LEDs. The LEDs are flashed in time with the heartbeat of the person holding the heart, thanks to a MAX30102 heartbeat sensor. There’s also a TP4056 charge module and a small lithium battery to provide power for the device.

Adding the heartbeat sensor really makes this project shine, forming a connection between the holder and the device itself. The tasteful craftsmanship of the brass design makes this an excellent gift, one we’re sure anyone would like to receive. We’ve seen [Jiří Praus] make the most of this artform before too, with projects like this stunning tulip or dead-bug Arduino. Video after the break.  Continue reading “LED Heart Beats With The Beholder”

Minimalist Magnetic Minute Minder Mesmerizes

Timepieces are cool no matter how simplistic or granular they are. Sometimes its nice not to know exactly what time it is down to the second, and most of the really beautiful clocks are simple as can be. If you didn’t know this was a clock, it would still be fascinating to watch the bearings race around the face.

This clock takes design cues from the Story clock, a visual revolution in counting down time which uses magnetic levitation to move a single bearing around the face exactly once over a duration of any length as set by the user. As a clock, it’s not very useful, so there’s a digital readout that still doesn’t justify the $800 price tag.

[tomatoskins] designed a DIY version that’s far more elegant. It has two ball bearings that move around the surface against hidden magnets — an hour ball and a minute ball. Inside there’s a pair of 3D-printed ring gears that are each driven by a stepper motor and controlled with an Arduino Nano and a real-time clock module. The body is made of plywood reclaimed from a bed frame, and [tomatoskins] added a walnut veneer for timeless class.

In addition to the code, STLs, and CAD files that birthed the STLs, [tomatoskins] has a juicy 3D-printing tip to offer. The gears had to be printed in interlocked pieces, but these seams can be sealed with a solution of acetone and plastic from supports and failed prints.

If you dig minimalism but think this clock is a bit too vague to read, here’s a huge digital clock made from small analog clocks.

Seven-Segment Shelves Do Double Duty

[Lewis] of [DIY Machines] was always on the lookout for that perfect something to hang above the couch. After spending a lot of time fruitlessly searching, he designed and built this awesome shelving unit with recessed lighting that doubles as a huge 7-segment clock.

The clock part works as you probably expect — an Elegoo Nano fetches the time from a real-time clock module and displays it on the WS2812B LED strips arranged in 7-segment formations. There’s a photocell module to detect the ambient light level in the room, so the display is never brighter than it needs to be.

Don’t have a 3D printer yet? Then you may need to pass on this one. Aside from the wood back plane and the electronics, the rest of this build is done with printed plastic, starting with 31 carefully-designed supports for the shelves. There are also the LED strip holders, and the sleeve pieces that hide all the wires and give this project its beautifully finished look.

You may have noticed that the far left digit isn’t a full seven segments. If you’re committed to 24-hour time, you’d have to adjust everything to allow for that, but you’d end up with two more shelves. Given the fantastic build video after the break, it probably wouldn’t take too long to figure all that out.

We like big clocks and we cannot lie. If you have room for it, build something like this blinkenlit beauty.

Continue reading “Seven-Segment Shelves Do Double Duty”

Pump Up The (Windows) Volume With Physical Sliders

For as long as we can remember, Windows has provided a mixer that breaks out the volume level of every applicable application into its own slider-controlled lane. But navigating to these controls is non-trivial, especially if you’re in a hurry to silence someone on team speak. You have to stop what you’re doing, click the speaker, go into the mixer, and then go find the appropriate slider. Windows won’t respect resizes between mixer visits, so you’ll almost always have some horizontal scrolling to do.

So why on Earth would you put yourself through all of this when you could be pushing physical sliders on the fly like a DJ? A slider is just a potentiometer in a straight line, after all.

These are wired up to an Arduino Nano, which sends the serial data to a Python script on the PC that changes the volume values accordingly for whatever five programs are in the config file. Thanks to a little bit of Visual Basic, the Python script can run in the background.

[Aithorn]’s got everything you need to replicate this, so slide on over and grab the STL files and code. If you get to point where these sliders are too small, just build some bigger ones.

Stop ‘n Go DUPLO

[beshur]’s 2-year-old is obsessed with transportation, so he lifted a few DUPLO blocks from the bin and made this toy traffic light as a birthday present. Hey, might as well get him used to the realities of traffic, right? It also makes for a good early hacker lesson: why buy something when you can make it yourself?

The traffic pattern is determined by an Arduino Nano V3 situated inside the carved-out rear block. There’s a push button on the side in case there’s a spill and the lights need to go blinking red until the issue is dealt with. Instead of trying to solder everything in situ and risk melting the plastic, [beshur] dead-bugged the LEDs and resistors to the Nano with a helping hands and then worked everything into the case. The 5mm LEDs fit perfectly into the drilled-out posts of a second block and produce a nice, soft glow. Proceed with caution and check it out after the break.

Of course, plastic building blocks can do real work, too. This LEGO chocolate pantograph is pretty sweet.

Continue reading “Stop ‘n Go DUPLO”

Laser Tachometer Knows How Fast You Were Spinning Back There

Does your drill go as fast as the manufacturer says it will? Well, you’d need a tachometer to figure that out. They’re not that expensive to buy, but as [Elite Worm] shows, they’re not that expensive to make, either — about $10 total if you get your parts from the right places. Lucky for you, he has links to everything.

Really, the links are just the tip of the iceberg here as far as the gifts that [Elite Worm] bestows upon those who choose to undertake this project. The build video (after the break, as usual; our favor to you) is fantastic, and would be perfect for a beginner because of the entrancing speed at which he builds it. The video is straight up relaxing to watch, whether you want to build one or not.

It’s a fairly simple circuit — just push the momentary switch, and the laser diode and sensor pair count the revolutions over one second. The Arduino Nano multiplies this number by 60 and displays the RPM on the OLED screen. What we absolutely love about this build is the care that taken in designing the case. There’s a designated spot for each component, and the ones without their own special holder are kept in place with printed crossbar pieces. [Elite Worm] says this has a higher refresh rate than his store-bought tacho, and we say it looks way cooler, too.

Still don’t want to make one yourself? Well, okay. Before you buy one, try using your phone to calculate RPM.

Continue reading “Laser Tachometer Knows How Fast You Were Spinning Back There”

How To Hack A Portable Bluetooth Speaker By Skipping The Bluetooth

Portable Bluetooth speakers have joined the club of ubiquitous personal electronics. What was once an expensive luxury is now widely accessible thanks to a prolific landscape of manufacturers mass producing speakers to fit every taste and budget. Some have even become branded promotional giveaway items. As a consequence, nowadays it’s not unusual to have a small collection of them, a fertile field for hacking.

But many surplus speakers are put on a shelf for “do something with it later” only to collect dust. Our main obstacle is a side effect of market diversity: with so many different speakers, a hack posted for one speaker wouldn’t apply to another. Some speakers are amenable to custom firmware, but only a small minority have attracted a software development community. It doesn’t help that most Bluetooth audio modules are opaque, their development toolchains difficult to obtain.

So what if we just take advantage of the best parts of these speakers: great audio fidelity, portability, and the polished look of a consumer good, to serves as the host for our own audio-based hacks. Let’s throw the Bluetooth overboard but embrace all those other things. Now hacking these boxes just requires a change of mindset and a little detective work. I’ll show you how to drop an Arduino into a cheap speaker as the blueprint for your own audio adventures.

Continue reading “How To Hack A Portable Bluetooth Speaker By Skipping The Bluetooth”