Pump Up The (Windows) Volume With Physical Sliders

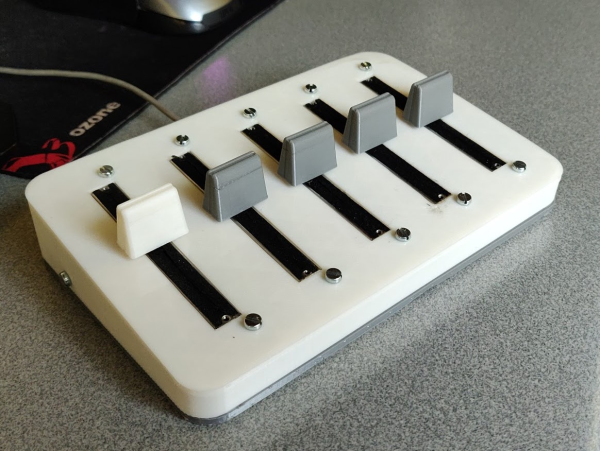
For as long as we can remember, Windows has provided a mixer that breaks out the volume level of every applicable application into its own slider-controlled lane. But navigating to these controls is non-trivial, especially if you’re in a hurry to silence someone on team speak. You have to stop what you’re doing, click the speaker, go into the mixer, and then go find the appropriate slider. Windows won’t respect resizes between mixer visits, so 
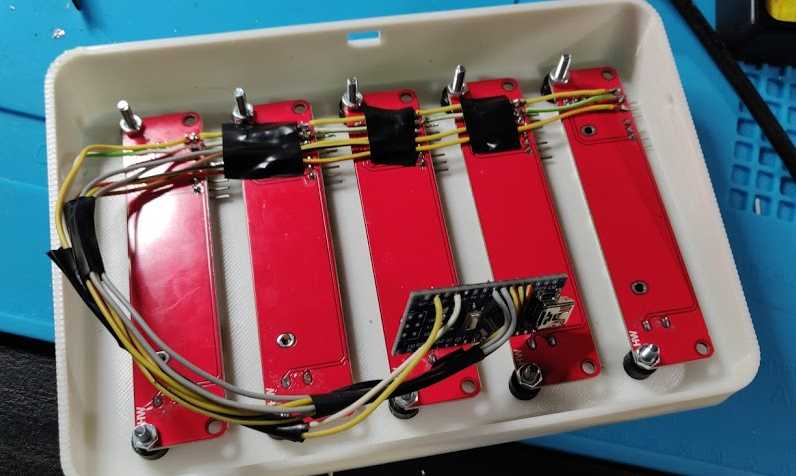
you’ll almost always have some horizontal scrolling to do.

So why on Earth would you put yourself through all of this when you could be pushing physical sliders on the fly like a DJ? A slider is just a potentiometer in a straight line, after all.

These are wired up to an Arduino Nano, which sends the serial data to a Python script on the PC that changes the volume values accordingly for whatever five programs are in the config file. Thanks to a little bit of Visual Basic, the Python script can run in the background.

[Aithorn]’s got everything you need to replicate this, so slide on over and grab the STL files and code. If you get to point where these sliders are too small, just build some bigger ones.

Brute-Forced Copyrighting: Liberating All The Melodies

Bluntly stated, music is in the end just applied physics. Harmony follows — depending on the genre — a more or less fixed set of rules, and there  are a limited amount of variation possible within the space of music itself. So there are technically only so many melodies possible, making it essentially a question of time until a songwriter or composer would come up with a certain sequence of notes without knowing that they’re not the first one to do so until the cease and desist letters start rolling in.

You might well argue that there is more to a song than just the melody — and you are absolutely right. However, current copyright laws and past court rulings may not care much about that. Aiming to point out these flaws in the laws, musician tech guy with a law degree [Damien Riehl] and musician software developer [Noah Rubin] got together to simply create every possible melody as MIDI files, releasing them under the Creative Commons Zero license. While their current list is limited to a few scales of fixed length, with the code available on GitHub, it’s really just a matter of brute-forcing literally every single possible melody.

Admittedly, such a list of melodies might not have too much practical use, but for [Damien] and [Noah] it’s anyway more about the legal and philosophical aspects: musicians shouldn’t worry about getting sued over a few overlapping notes. So while the list serves as a “safe set of melodies” they put in the public domain, their bigger goal is to mathematically point out the finite space of music that shouldn’t be copyrightable in the first place. And they definitely have a point — just imagine where music would be today if you could copyright and sue over chord progressions.
Continue reading “Brute-Forced Copyrighting: Liberating All The Melodies”

Robotic Ball Bouncer Uses Machine Vision To Stay On Target

When we first caught a glimpse of this ball juggling platform, we were instantly hooked by its appearance. With its machined metal linkages and clear polycarbonate platform, its got an irresistibly industrial look. But as fetching as it may appear, it’s even cooler in action.

You may recognize the name [T-Kuhn] as well as sense the roots of the “Octo-Bouncer” from his previous juggling robot. That earlier version was especially impressive because it used microphones to listen to the pings and pongs of the ball bouncing off the platform and determine its location. This version went the optical feedback route, using a camera mounted under the platform to track the ball using OpenCV on a Windows machine. The platform linkages are made from 150 pieces of CNC’d aluminum, with each arm powered by a NEMA 17 stepper with a planetary gearbox. Motion control is via a Teensy, chosen for its blazing-fast clock speed which makes for smoother acceleration and deceleration profiles. Watch it in action from multiple angles in the video below.

Hats off to [T-Kuhn] for an excellent build and a mesmerizing device to watch. Both his jugglers do an excellent job of keeping the ball under control; his robotic ball-flinger is designed to throw the ball to the same spot every time.

Continue reading “Robotic Ball Bouncer Uses Machine Vision To Stay On Target”

144 7-Segment Displays Combine To Form A Mighty Clock

What do you do with 144 7-segment displays? If you’re [Frugha] you put them all together to create an epic clock. Each display has 8 individual LEDs — 7 segments, and a decimal point. Put that all together, and you’ve got 1152 individual LEDs to control. This presented a problem, as [Frugha] wanted to control the clock with a single Arduino Nano. Even charlieplexing won’t get you that many I/O lines.

The solution was a nifty little chip called the MAX7219. The ‘7219 speaks SPI and can control 64 individual LEDs. [Frugha] used 18 of them in the clock, giving him full control over all his LEDs. That’s pretty impressive, considering the last matrix 7-segment display we saw required 48 Arduinos!

Another problem is memory – 1152 “pixels” would quickly overrun the 2KB RAM in the ATmega328. This is a clock though — which means only digits 0-9 and a colon. [Frugha] picked a nice font and hand-coded lookup tables for each digit. The lookup tables are stored in ROM, saving precious RAM on the Arduino.

A clock wouldn’t be any good if it wasn’t accurate. A Tiny RTC supplies battery-backed time data. [Frugha] wrapped everything up with a neat layout on a custom PCB. Sure, you could put it in a case, but we think a clock this crazy deserves to be left open – so you can see it in all its glory.

Debugging Electronics: To Know Why It Didn’t Work, First Find What It Is Actually Doing

Congratulations, you have just finished assembling your electronics project. After checking for obvious problems you apply power and… it didn’t do what you wanted. They almost never work on the first try, and thus we step into the world of electronics debugging with Daniel Samarin as our guide at Hackaday Superconference 2019. The newly published talk video embedded below.

Beginners venturing just beyond blinking LEDs and premade kits would benefit the most from information here, but there are tidbits useful for more experienced veterans as well. The emphasis is on understanding what is actually happening inside the circuit, which explains the title of the talk: Debugging Electronics: You Can’t Handle the Ground Truth! So we can compare observed behavior against designed intent. Without an accurate understanding, any attempted fix is doomed to failure.

To be come really good at this, you need to embrace the tools that are often found on a well stocked electronics bench. Daniel dives into the tricks of the trade that transcend printf and blinking LED to form a plan to approach any debugging task.

Continue reading “Debugging Electronics: To Know Why It Didn’t Work, First Find What It Is Actually Doing”

Art of 3D printer in the middle of printing a Hackaday Jolly Wrencher logo

3D Printering: Getting Started Is (Still) Harder Than It Needs To Be

Stop me if this sounds familiar. You are interested in 3D printing but lacked a clear idea of what was involved. Every time you looked into it, it returned to the back burner because after spending your limited free time researching, it still looked like a part time job just to get up to speed on the basics. If this is you, then you’re exactly the reason I say the following: despite 3D printing being more accessible than ever, getting started remains harder than it needs to be. It’s a shame, because there are smart, but busy, people just waiting for that to change.

A highly technical friend and colleague of mine had, off and on, been interested in 3D printing for some time. He had questions, but also didn’t have a very good understanding of the basics because it’s clumsy and time-consuming to research something when one doesn’t even know the right terms.

I told him to video call me. Using my phone I showed him the everyday process, from downloading a model to watching the first layer get put down by the printer. He had researched getting started before, but our call was honestly the first time he had ever seen a 3D printer’s actual workflow, showing hands-on what was involved from beginning to end. It took less than twenty minutes to give him a context into which he could fit everything else, and from where he felt comfortable seeking more information. I found out later, when I politely inquired whether he had found our talk useful, that he had ordered a Prusa MK3S printer later that same day.

It got me thinking. What from our call was important and useful, but not available elsewhere? And why not?

Continue reading “3D Printering: Getting Started Is (Still) Harder Than It Needs To Be”

Blister Pack With Jet Fighter Toy Is A Business Card

In the world of business cards, it seems that for some people a white rectangle of card just doesn’t cut it any more. A card isn’t simply a means to display your contact details, instead it can be a way to show off your work and demonstrate to the world your capabilities. For [agepbiz] those are the skills of a 3D design specialist, so what better way to proceed than by distributing a 3D-printed example of his work? How to render that into a business card? Put it in a retail-style blister pack, of course. Take a look at the video below the break.

It’s an interesting process to follow, because  there are certainly readers who will have toyed with the idea of selling their work, and this makes an attractive way to display a small assembly while still keeping it safe from damage. The toy – a small 3D-printed jet fighter with working swing wings that’s a masterpiece in itself – is laid on a backing card and a custom blister is glued over it. The manufacture of the printed backing card with a CNC card cutter is shown, followed by that of the blister with a custom SLA-printed mould being used to vacuum-form a sheet of clear plastic. Surprisingly the whole is assembled with just a glue stick, we’d have expected something with a bit more grab. The result is a professional-looking blister packed product of the type you wouldn’t bat an eyelid over if you saw it in a shop, and one of those things that it’s very useful to have some insight into how one might be made..

It’s possible this card might be a little bulky to slip in your wallet, but it’s hardly the only novelty card we’ve brought you over the years. Some of our most recent favourites run Linux or play Tetris.

Continue reading “Blister Pack With Jet Fighter Toy Is A Business Card”