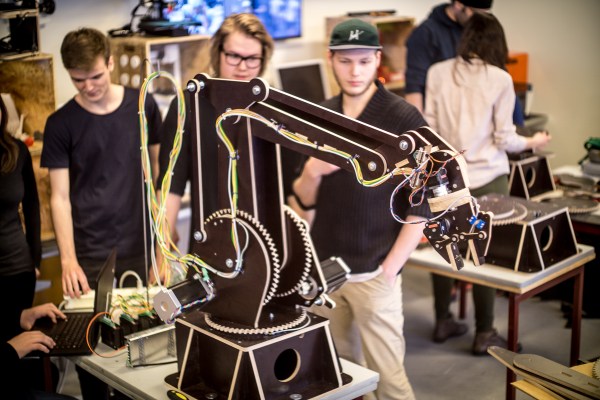
phone controller

Breathe New Life Into Payphones With Asterisk

Payphones used to be found on just about every street corner. They were a convenience, now replaced by the ubiquitous mobile phone. These machines were the stomping grounds for many early computer hackers, and as a result hold a place in hacker history. If you’ve ever wanted to re-live the good ol’ days, [hharte’s] project might be for you.

[hharte] has been working to make these old payphones useful again with some custom hardware and software. The project intends to be an interface between a payphone and an Asterisk PBX system. On the hardware side, the controller board is capable of switching various high voltage signals required for coin-line signaling. The controller uses a Teensy microcontroller to detect the hook status as well as to control the relays. The current firmware features are very basic, but functional.

[hharte] also wrote a custom AGI script for Asterisk. This script allows Asterisk to detect the 1700hz and 2200hz tones transmitted when coins are placed into the machine. The script is also in an early stage, but it will prompt for money and then place the call once 25 cents has been deposited. All of the schematics and code can be found on the project’s github page.

[Thanks mies]

Automated Bed Warmer Control For Chilly Nights

For most of the Northern Hemisphere, winter is in full swing right now. That means long, chilly nights. We assume [LC] is in one of these climes because it seems like his bed warmer wasn’t doing quite a good enough job of getting his bed up to a reasonable temperature before he climbed in. To alleviate some of his discomfort, he hacked into the control unit and added some automation.

The original controller uses a mechanical potentiometer to set the heat level. [LC] added a digital potentiometer which he can switch to in order to allow the automation (using a real-time clock to handle scheduling) to take over control of the bed warmer. This also preserves the original functionality of the controller. There is also an Arduino involved which handles the override from mechanical to digital potentiometer when a capacitive touch sensor is activated. This means that when someone attempts to take manual control of the device, the Arduino can switch the override circuit off.

There is quite a bit of detail on the project site about this hack, including the source code for the controller. [LC] also mentions that this could be interfaced to the web to allow remote control of the bed warmer. This is a great hack, and also fits into the idea of heating the person, not the room.

Arduino Vs. Phidgets – Dev Time Trials

Is developing on an Arduino too slow? Are Phidgets too expensive? When might you use one or the other? Hackaday regular [Ken] breaks down what he learned from three experimental time trials.

The main development differences between Arduino and Phidgets are a mix of flavor preferences and some hard facts. The Arduino is open source, Phidgets are proprietary. Arduino requires a mix of hard- and software where Phidgets only needs (and only allows) a connection to a full computer but enables high level languages – it is expected to get the job done sooner and easier. And finally, Arduinos are cheap, Phidgets are 3-5x the cost.

The three time trials were common tasks: 1. Blink an LED. 2. Use a pot to turn a servo. 3. Build a pedometer. For [Ken], the Phidgets won in each of the three experiments, but not significantly: 37%, 45%, and 25% respectively. The difference is only minutes. Even considering time value, for most hackers it is not worth the cost.

HAD - Phidgets3In context, the advantages of a mildly more rapid development on the simplest projects are wasted away by needing to rebuild a permanent solution. Chained to a PC, Phidgets are only useful for temporary or fixed projects. For many of our readers that puts them dead in the water. Arduinos may technically be dev kits but are cheap enough to be disposed of in the project as the permanent solution – probably the norm for most of us.

[Ken] points out that for the software crowd that abhor electronics, Phidgets plays to their preferences. Phidgets clips together their pricey peripherals and the rest is all done in code using familiar modern languages and libraries. We wonder just how large this group could still be; Phidgets might have been an interesting kit years ago when the gulf between disciplines was broader but the trend these days is towards everyone knowing a little about everything. Hackaday readers probably represent that trend more than most, but let us know if that seems off.

[Ken]’s article has much more and much better detailed explanations of the experiments and the tradeoffs between the platforms.

If you enjoy watching parallel engineering, see the time-lapse video below for a split screen of the time trials.

Continue reading “Arduino Vs. Phidgets – Dev Time Trials”

Digital To Analog To Digital To Analog To Digital Conversion

[Andy] had the idea of turning a mixing desk into a MIDI controller. At first glance, this idea seems extremely practical – mixers are a great way to get a lot of dials and faders in a cheap, compact, and robust enclosure. Exactly how you turn a mixer into a MIDI device is what’s important. This build might not be the most efficient, but it does have the best name ever: digital to analog to digital to analog to digital conversion.

The process starts by generating a sine wave on an Arduino with some direct digital synthesis. A 480 Hz square wave is generated on an ATTiny85. Both of these signals are then fed into a 74LS08 AND gate. According to the schematic [Andy] posted, these signals are going into two different gates, with the other input of the gate pulled high. The output of the gate is then sent through a pair of resistors and combined to the ‘audio out’ signal. [Andy] says this is ‘spine-crawling’ for people who do this professionally. If anyone knows what this part of the circuit actually does, please leave a note in the comments.

The signal from the AND gates is then fed into the mixer and sent out to the analog input of another Arduino. This Arduino converts the audio coming out of the mixer to frequencies using a Fast Hartley Transform. With a binary representation of what’s happening inside the mixer, [Andy] has something that can be converted into MIDI.

[Andy] put up a demo of this circuit working. He’s connected the MIDI out to Abelton and can modify MIDI parameters using an audio mixer. Video of that below if you’re still trying to wrap your head around this one.

Continue reading “Digital To Analog To Digital To Analog To Digital Conversion”

Controlling Nokia Phones With Arduino

While [Ilias Giechaskiel] was waiting for his SIM900 shield to arrive, he decided to see what he could do with an old Nokia 6310i and an Arduino. He was researching how to send automated SMS text messages for a home security project, and found it was possible to send AT commands via the headphone jack of Motorola phones. But unfortunately Nokia did not support this, as they use a protocol known as FBus. With little information to go on, [Ilias] was able to break down the complicated protocol and take control with his Arduino.

With the connections in place, [Ilias] was able to communicate with the Nokia phone using a program called Gnokii — a utility written specifically for controlling the phone with a computer. Using the Arduino as an intermediary, he was eventually able tap into the FBus and send SMS messages.

Be sure to check out his blog as [Ilias] goes into great detail on how Nokia’s FBus protocol works, and provides all source code needed to replicate his hack. There is also a video demonstration at the end showing the hack in action.

Reverse-Engineering A Superior Chinese Product

It makes an Arduino look like a 555.  A 364 Mhz, 32 bit processor. 8 MB RAM. GSM. Bluetooth. LCD controller. PWM. USB and dozens more. Smaller than a Zippo and thinner than corrugated cardboard. And here is the kicker: $3. So why isn’t everyone using it? They can’t.

Adoption would mandate tier after tier of hacks just to figure out what exact hardware is there. Try to buy one and find that suppliers close their doors to foreigners. Try to use one, and only hints of incomplete documentation will be found. Is the problem patents? No, not really.

[Bunnie] has dubbed the phenomenon “Gongkai”, a type of institutionalized, collaborative, infringementesque knowledge-exchange that occupies an IP equivalent of bartering. Not quite open source, not quite proprietary. Legally, this sharing is only grey-market on paper, but widespread and quasi-accepted in practice – even among the rights holders. [Bunnie] figures it is just the way business is done in the East and it is a way that is encouraging innovation by knocking down barriers to entry. Chinese startups can churn out gimmicky trash almost on whim, using hardware most of us could only dream about for a serious project.

Continue reading “Reverse-Engineering A Superior Chinese Product”

Z80, CP/M, And FAT File Formats

[Gary Kildall] and CP/M are the great ‘also ran’ of the computing world; CP/M could run on thousands of different 1980s computers, and [Gary] saw a few million in revenue each year thanks to CP/M’s popularity. Microsoft, DOS, and circumstances have relegated [Kildall] and CP/M to a rather long footnote in the history of microcomputers, but that doesn’t mean CP/M is completely dead yet. [Marcelo] wrote a Z80 emulator running CP/M inside an Arduino Due, and he did it in such a way that it’s actually convenient and useful to use.

Instead of using CP/M disk images, [Marcelo]’s emulator emulates CP/M disk drives on top of a regular FAT file system. Drives are mapped to folders in the FAT file system, so a folder named ‘A’ will show up as the A: disk in CP/M. Drives up to P: are supported, the maximum number of drives available under CP/M. The BIOS resides in the root directory of the SD card, and so far Microsoft Basic, Turbo Pascal, UCD Micromumps, and Wordstar work just fine.

The Arduino project was built upon one of [Marcelo]’s earlier projects that put the CP/M emulator on Windows. The version for the Due works exactly how you think it would, with a serial connection and terminal emulator providing the IO, and the huge amount of processing power and RAM available on the Due doing all the heavy lifting.