Cracking Weather Station Checksum

[BaronVonSchnowzer] is spinning up some home automation and settled on an inexpensive ambient temperature sensor which is sold to augment the data a home weather station collects. He found that the RF protocol had been reverse engineered and will use this information to harvest data from a sensor in each room. In true hacker fashion, he rolled his own advances out to the Internet so that others may benefit. Specifically, he reverse engineered the checksum used by the Ambient F007TH.

He got onto this track after trying out the Arduino sketch written to receive the sensor’s RF communications. One peculiar part of the code turned out to be a filter for corrupt messages as the protocol’s checksum hadn’t yet been worked out. Figuring out how the checksum byte owrks wasn’t an easy process. The adventure led him to dump 13k samples into a spreadsheet to see if sorting similar sets of 5-byte message and 1-byte checksum would shed some light on the situation. The rest of the story is some impressive pattern matching that led to the final algorithm. Now [BaronVonSchnowzer] and anyone else using these modules can filter out corrupt data in the most efficient way possible.

Hacking The Nike+ Fuelband

[Simone] was trying to reverse-engineer the Bluetooth protocol of his Nike+ Fuelband and made some surprising discoveries. [Simone] found that the authentication system of the Fuelband can be easily bypassed and discovered that some low-level functions (such as arbitrarily reading and writing to memory) are completely exposed to the end user or anyone else who hacks past the authentication process.

[Simone] started with the official Nike app for the Fuelband. He converted the APK to a JAR and then used JD-Gui to read the Java source code of the app. After reading through the source, he discovered that the authentication method was completely ineffective. The authenticator requires the connecting device to know both a pin code and a nonce, but in reality the authentication algorithm just checks for a hard-coded token of 0xff 0xff 0xff 0xff 0xff 0xff rendering the whole authentication process ineffective.

After he authenticated with the Fuelband, [Simone] started trying various commands to see what he could control over the Bluetooth interface. He discovered that he could send the device into bootloader mode, configure the RTC, and even read/write the first 65k of memory over the Bluetooth interface–not something you typically want to expose, especially with a broken authentication mechanism. If you want to try the exploit yourself, [Simone] wrote an Android app which he posted up on GitHub.

Finding An Active TX Pin On Cheap GPS

Twenty Euros will score you a small, self-contained GPS keychain. Crack that case open and you can have a lot more. [j3tstream] explored the guts of the thing and found that the NMEA data can be streamed out of the TX pin on the GPS chip.

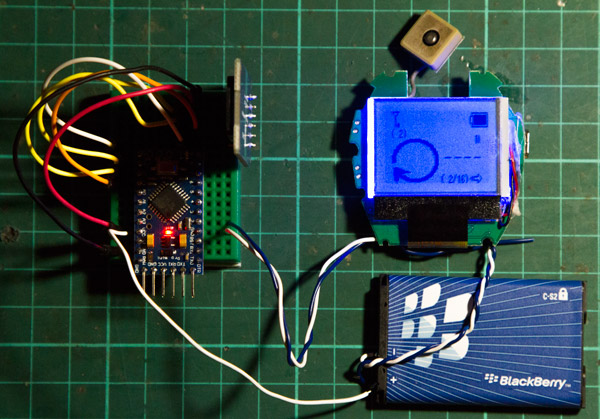
First off, check out that miniscule GPS antenna module, crazy! But we digress. For testing purposes the asynchronous UART of the GPS was probed, proving that the data can be acquired. From there [j3tstream] moved to an Arduino Pro Mini with an SD card for data logging. The uC is powered from the GPS board but this will quickly exhaust the stock battery so [j3tstream] swapped it out for one from an old cellphone.

That little dot-matix LCD that comes with the unit also caught our eye. If you can hack a headless interface for the GPS that could be repurposed for your next project. May we suggest a wearable gaming project for it?

Kill Time Making Flappy Bird, Not Playing It

With all the Flappy Bird clones floating around in the ether after the game’s unexpected success, there are some that are better than others. And by better, we mean, hacked together from misc hardware. If you’ve got an Arduino on hand, then you’re half way to making your own:

The “Minimalist” Version

[aron.bordin] created his own Flappy Bird game with a short list of parts some of us likely have lying around on our bench. An Arduino loaded with the appropriate code is wired to a 16×16 LED matrix, which apparently displays the minimal amount of visual information you’d need to play the game. The only other parts required are a single pushbutton and resistor tethered on a breadboard to control your flapping. With the wire hookup laid out by convenient diagrams and the libraries required for the code all found on the same page, this is easily something one could bang out in an afternoon. If afterwards you still find yourself with more time to kill than you can stand to play Flappy Birds, there is always the option of fashioning a humorously-sized cell phone case to squeeze it all into… which we’d like to see.

The “Fancy” Version

If you want more resolution than solid colored LEDs, or you just have a fondness for the terrifying bird abstraction the game is known for, you can switch out the 16×16 matrix for a Nokia LCD screen. [Huy’s] rendition of this build over on Hackaday.io will deliver a “more detailed” graphic for the game, and is still roughly just as easy to assemble. Similarly, an Ardunio is loaded with the smarts required to generate the game, along with a single pushbutton tacked on for control. The code and the daunting (/sarcasm) two steps needed to wire the Arduino to the screen can be found on his project’s page.

If you must kill boredom playing Flappy Bird, there is no excuse not to do so on something you made yourself.

Continue reading “Kill Time Making Flappy Bird, Not Playing It”

Hacklet 32 – LED Persistence Of Vision Displays

Blinking LEDs are good. Moving, spinning things are good too. Put them both together and you get a Persistence of Vision (POV) display. Hackers have been building these displays for years. This week’s Hacklet focuses on some of the best LED POV displays on Hackaday.io!
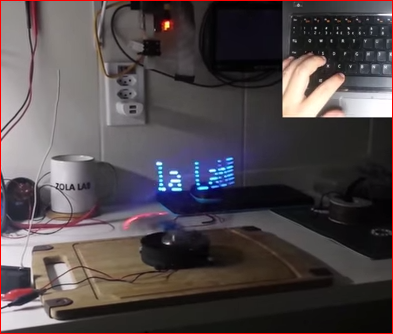
povtypeWe start with [EduardoZola] and POV as you type, write on the air. [Eduardo] used an Arduino Nano, a pair of 433 MHz radios, some blue LEDs and a motor to create a simple spinning display. A hall effect sensor keeps everything in sync. The entire display is powered by a 500 mAh LiPo battery. The awesome thing about this display is the interactive aspect. The transmitter module connects to a laptop via an on-board USB to serial converter. Typing into any serial terminal sends the text directly to the POV display, where the letters appear to hang in the air.
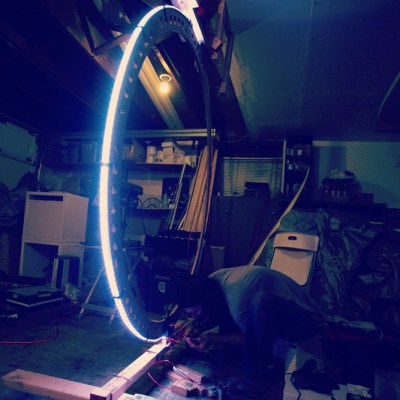
 

deathringNext up is [boolean] with Silent Orchestra POV aka “Death Ring”. [boolean] didn’t want to just create a POV ring, he wanted a huge 5 foot diameter display for his local Burning Man decompression. Death Ring is an aluminum ring spun by a 3HP motor. A hall effect sensor keeps everything synced up, and keeps Death Ring’s 3 horsepower motor in check. Light is provided by a PixelPusher and WS2812 RGB strips. The system is designed to be interactive, controlled with a Leap Motion controller or a Microsoft Kinect. An MPU-6050 keeps acceleration in check while processing maps video to the LED strip. An Arduino Yun allows the entire system to be controlled via WiFi. [boolean] and his team have taken Death Ring through several revisions. Judging by the quality of their aluminum welding though, they’re on the right track to an awesome end result!
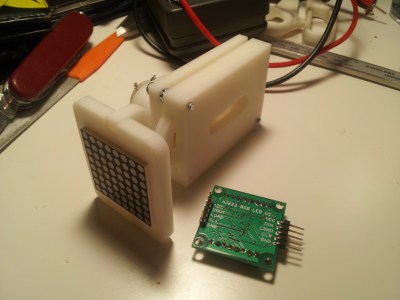
locoHackaday.io power user [Davedarko] has been working on a POV display of a different sort. His Locomatrix is an 8×8 LED matrix which moves in and out on the Z axis. [Dave] originally created Locomatrix as his entry in the 2014 Hackaday Prize. We have to admit this is the first time we’ve seen this sort of display, but the idea is sound. In fact, [Bruce Land] posted in the comments to let [Dave] know that he’d seen a similar technique used with a CRT display back in 1964. We’re betting Dave’s 3D printed gears and LED matrix display will be more robust than a CRT tube slamming two and fro at several hundred pulses per minute!

CPOVFinally, we have Hackaday’s own [Mike Szczys] with CPOV – a Crappy Persistence of Vision display . CPOV is a proof of concept made from upcycled parts which [Mike] threw together in a couple of hours. He grabbed the motor from an old cassette deck, some plywood, perfboard, and of course LEDs to build his display. The processor is an ATtiny2313 running Adafruit’s MiniPOV 3 firmware. The system display doesn’t have a sync input, so [Mike] uses a novel form of Human-in-the-loop PWM control to keep the motor speed in check. CPOV is proof that Hackaday.io isn’t just for polished projects, but for proof of concepts, fails, and just plain research. Even if your project isn’t perfect, documenting it will help you learn from it. It might even inspire someone else to move forward and continue where you left off!

Want more POV goodness? Check out our new POV display list!

Our LEDs are going dim, so that’s about all the time we have for this Hacklet. As always, see you next week. Same hack time, same hack channel, bringing you the best of Hackaday.io!

Interactive Projections Take Miniature Golfers To A Tiny World

Miniature golf is one of those pastimes that can be molded and redefined pretty much indefinitely. Like pinball machines which also come in an endless variety of flavors, each hole of a miniature golf course is a vignette with a theme designed to tie cleverly into its objective. Mini golf has come a long way from windmills and draw-bridges, and with technology thrown in the mix you end up with works of art like [Dan Rosenfeld’s] project, “Sleepwalkers” which go so far as to paint a holographic world for the player to interact with.

“Sleepwalkers” was commissioned by Urban Putt, a chain that accommodates for dense city spaces by building their courses indoors. Designed specially for its location, the hologram acts as a narrative told by tiny characters living within the walls of the historic building the golf course occupies. At a certain point during the game, a player is prompted to purposely place their ball into an opening in one of the old walls where it quickly rolls somewhere out of sight. When the player peeks through a series of holes dotted throughout the surface in order to find where it went, they discover another world sandwiched between wood beams and insulation. This becomes the setting of a short exchange with a character who the player must interact with in order to get their ball out of hock. The spectral glow and dimensionality of the wall’s inhabitants is created using a projection along with the Pepper’s Ghost illusion, a classic trick with angles and mirrors. Once the player’s hand enters into the Sleepwalker’s world through larger holes in the wall, a camera used for depth cues maps the projection to its presence. The tiny figure then uses the hand in a series of dioramas as a tool to climb on in order to reach the area where the player’s ball is trapped. After a joint effort, a linear actuator and sensor help to complete the illusion that the projected character is pushing the golf ball free into the real world where the player can then retrieve it and continue on to the next hole.

The traditional antics created by swinging pendulums and spinning windmills will always charm us, but the use of technology to take us into a new world will leave us with something more. You can see it on the faces of those interacting with [Rosenfeld’s] installation for the first time:

Continue reading “Interactive Projections Take Miniature Golfers To A Tiny World”

Casing Up The Teensy SDR

[Rich, VE3MKC] has made a lot of progress on his Software Defined Radio (SDR) which is based on a Teensy. His latest update shows off the hardware in an enclosure and a few new features.

When we looked at this in April of last year it was pretty much a proof-of-concept with components hanging loose from jumper wires. The new case mounts everything securely in a plastic Hammond enclosure with copper clad for the front and rear panels. The SoftRock SDR unit was yanked from its case and retrofitted with connectors to make it swappable for other units.

A little help goes a long way and [Rich] thanks his friend [Loftur, VE2LJX] for contributing numerous code improvements and feature additions which can be viewed in the repository. Check out the video below where these features are shown off.

In its present state the radio draws 80 mA at 12V in receive mode. It doesn’t transmit yet but we’ll keep our eyes open for another update on that. [Rich] plans to populate the input circuitry and write the transmit code next.

Continue reading “Casing Up The Teensy SDR”