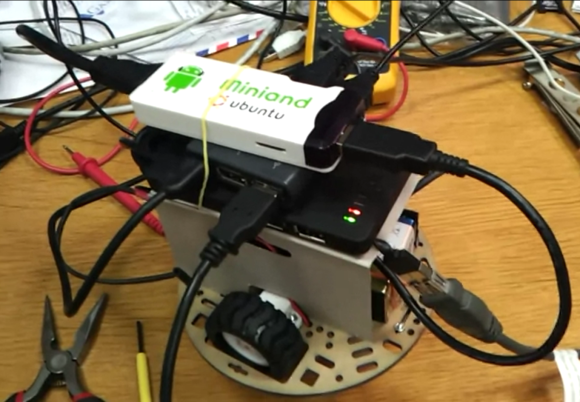
Stacking GPS, GSM, And An SD Card Into An Arduino Shield

A few years ago, [Phang Moh] and his compatriots were asked by a client if they could make a vehicle tracking device for oil tankers all around Indonesia. The request of putting thousands of trackers on tanks of explosives was a little beyond [Phang Moh]’s capability, but he did start tinkering around with GPS and GSM on an Arduino.

Now that tinkering has finally come to fruition with [Phang]’s TraLog shield, a single Arduino shield that combines GPS tracking with a GSM and GPRS transceiver. There’s also an SD card thrown in for good measure, making this one of the best tracking and data logging shields for the Arduino.

The shield can be configured to send GPS and sensor data from devices attached to an I2C bus to remote servers, or a really cool COSM server. [Phang] is selling his TraLog for $150, a fairly good deal if you consider what this thing can do.

Seems like the perfect piece of kit for just about any tracking project, whether you want to know the location of thousands of oil tankers or just a single high altitude balloon.

Tip ‘o the hat to [Brett] for finding this one.

Hacking Beer Cans For Fun And Publicity

beer-keyboard

Although beer is generally a good way to get people to come to your trade show booth, [Robofun.ru] decided to put a new spin on things. Instead of (or possibly in addition to) giving out beer, they decided to turn 40 Staropramen beer cans into a keyboard.

This was done using an Arduino hooked up to four Sparkfun MPR121 Capacitive Touch Sensor Breakout Boards, allowing them to act as keys. These inputs are translated via the Arduino into a standard output (we assume USB) that can be plugged into any computer.  Additionally, a Sparkfun MP3 trigger board was used to control the sound effects.  Rounding out the build, a Raspberry Pi computer was used to run the human machine interface, a large plasma display.

Be sure to check out this keyboard in action after the break. If this isn’t enough alternative input fun, why not check our post about how to make a banana piano and giant NES controller. Continue reading “Hacking Beer Cans For Fun And Publicity”

Nebulophone Microcontroller Synthesizer Project Sounds Great

Judging from the video (found after the break) the Nebulophone is one of the best sounding DIY synthesizers we’ve seen. Especially when you consider the simplicity of the hardware design. It uses an AVR chip and an OpAmp. The rest of the parts are just a few handfuls of inexpensive components.

The device was developed by Bleep Labs, and they sell the synthesizer kit seen on the left. But since it’s an open source project you can follow their design to fabricate your own, which is what [BlinkyBlinky] did with his offering seen to the right.

An ATmega328 drives the device, which is the chip often used in the Arduino Duemilanove. The keyboard is a set of traces hooked to the microcontroller. These are tinned pads on the kit PCB, but the DIY version simply uses some adhesive copper foil with a jumper wire soldered to it. The keys are played with a probe that makes the electrical connection, a common practice on these stylophone type designs. Chances are you have everything on hand to make this happen so keep it in mind for that next cold winter weekend that’s making everyone a bit stir crazy.

Continue reading “Nebulophone Microcontroller Synthesizer Project Sounds Great”

Arduino Parking Lot Attendant

Here’s an automatic parking gate for toy cars. There’s no need to press a button, the electronics detect the presence of a vehicle on either side of the gate, raising it after verifying that the lot is not already full. It’s the same idea as counting how many people enter a room in order to switch the lights but the hardware is just a bit different.

The system is controlled by a pair of sensors in the paper which serves as the parking lot. There are three sheets of heavy stock, the top and bottom both have aluminum foil on them, with the center layer  as a separator. There are holes cut in the separator where the hash marks are seen above. By adding a little pressure to the car when you drive it up to the gate this completes a circuit instructing the Arduino that there’s a vehicle in position.

You can see a demonstration, as well as the guts of the build, in two videos after the break.

Continue reading “Arduino Parking Lot Attendant”

Arduino Voice Changer Turns You Into [Vader]

Halloween is just around the corner, so of course we’re looking forward to a bunch of awesome costumes put together by Hackaday readers. In an effort to match his voice to his costume, [Phil Burgess] over at Adafruit (and former Hackaday alumnus) put together an Arduino-powered voice changer to give his voice the gravitas of [James Earl Jones] or the lightheartedness of a member of the Lollipop Guild.

If you’ve ever played with a turntable, you’ll know playing a 33 RPM record at 45 or 78 RPM turns your treasured copy of Dark Side of the Moon into a lighthearted aural experience with a pitch that is much too high. Likewise, playing a single at 33 or 16 RPM means those once dulcet tones are now recordings of tormented souls in an acoustic hell.

[Phil]’s voice changer operates on the same principle by recording sounds from a microphone into a circular array and playing them back at a different rate; faster if the desired effect is a Munchkin, and slower if this year’s Halloween costume will be a Sith lord.

The completed build incorporates a 10k pot to dynamically change the timbre of the voice changer, as well as an Adafruit Wave Shield to play back a few pre-recorded sounds of lightsabers clashing. In all, a very cool project for your Halloween costume that’s also a very good introduction to DSP and real-time audio modifications with a microcontroller.

Continue reading “Arduino Voice Changer Turns You Into [Vader]”

Malting Kiln Controller For Preparing Beer Brewing Grains

A quick primer is in order: when it comes to hobby brewing there’s two main types, extract brewing and all-grain brewing. The former uses a syrup that has been extracted from the grains at a factory while the latter adds the steps to do this yourself. But in both cases the brewing grains have already been malted. This is a careful process of soaking the grains and then kiln drying them. [Richard Oliver] built his own malt kiln controller to add the preliminary step to his home brewing ritual. Now the only thing he’s not doing himself is growing the grains (and perhaps culturing the yeast).

His original design used a food dehydrator for the drying step, but this didn’t work because the temperature wasn’t at the correct level. The new build uses the ceramic heating element from a 300W hot air gun. A blower directs air through the element and into the wooden box that serves as the kiln. An Arduino monitors the heated air to keep it right in the sweet spot. He’s included a graphing GUI for easy monitoring, which is shown in the video after the break.

Continue reading “Malting Kiln Controller For Preparing Beer Brewing Grains”

Building A Better PID Smoker Controller

[Matt] wanted to have more control over his meat smoker so he built this advanced PID smoker controller. It uses the solid state relay seen in the bottom-right of this image to switch the smoker’s heating element. But all of the other goodies that are included add several features not usually found in these builds.

This is a replacement for the commercial PID unit he used on the original build. That monitored the temperature in the smoker, using predictive algorithms to maintain just the right heat level. But this time around [Matt] is looking for extra feedback with a second sensor to monitor meat temperature. Using an Arduino with an SD shield he is able to data log the smoking sessions, and his custom code allows him to specify temperature profiles for resting the meat after it has hit the target temperature. It kind of reminds us of a reflow oven controller… but for food.