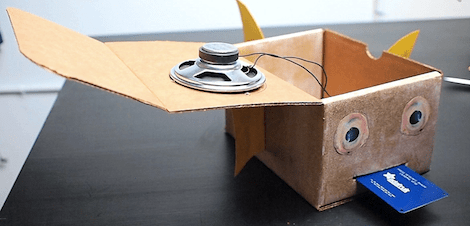
Making Music With Tennis Balls And Lego

We’ve seen a lot of interesting MIDI controllers, but this one uses some unconventional materials. The World’s Coolest Keystroke, built by [Audiobody], is made from a combination of tennis balls, Lego bricks, servos, and switches.

When a tennis ball is lifted up, a Lego arm is actuated. It looks like a servo is used to move the Lego arm so it hits a switch. An Arduino is used to detect this and send a message to their computer.

They use the device to control Ableton Live and play different clips depending on which tennis ball was removed. It’s an interesting way to control sound with a tactile interface, and it looks pretty nifty.

After the break is a short video of the device in action, but [Audiobody] says that they will be releasing more information soon. We’re looking forward to seeing other interesting controllers that they have in the works.

[Via Make]

Continue reading “Making Music With Tennis Balls And Lego”

Not Quite Building A Raspi Arduino Bridge


A few months ago, [Omer] sent in a Raspberry Pi to Arduino bridge he’s been working on called Ponte. Now that he’s gotten a few assembled, he can actually test out his ideas for combining the powerful Raspi with the ubiquitous Arduino.

Ponte revision 0 used a pair of 12-bit analog to digital converters, but during the soldering and debugging phase of development [Omer] discovered a few things were wrong with his original design. The FETs on the fabricated boards had the drain and source pins mixed up, but that problem was easily solved with a bit of board surgery.

The worst problem was the mechanical design of Ponte rev. 0 – the power jack on the Ponte is directly above the Raspi’s USB port, meaning it’s impossible to plug the Ponte into the Pi.

[Omer] is working on these problems and should have  the revised boards completed shortly. A few people have asked where they can get a Ponte, but right now there are no plans to assemble and ship boards. That may change, but for now if might be worth bugging [Omer] to put his new and improved Ponte (with an 8-port I2C port expander!) up on SeeedStudio


Reading Punch Cards With An Arduino And Digital Camera

[digitaltrails] wanted the data on a few old IBM 80-column punch cards he had lying around, but didn’t have decades old computer hardware in his garage. He decided to build his own out of LEGO, an Arduino, a digital camera, and a bit of Python.

The hardware portion of [digitaltrails] build includes a crank-operated feed mechanism made entirely out of LEGO. For each turn of the crank, the feed mechanism sends one card down a chute where a photodetector wired into an Arduino tells a camera to take a picture. After that, a servo is activated, sending the card into the ‘already scanned’ bin.

On the software side of the build, [digitatrails] used the Python Imaging Library to scan one row of pixels where each column is expected to be. The software outputs the code and data contained on the 80-column card as well as a very cool ASCII art version of each card.

Considering you just can’t go down to Fry’s and buy an IBM 80-column punch card reader, we’re loving [digitatrails]’ clever way of getting data off an otherwise unreadable storage medium. Check out the video of the card reader in action after the break.

Continue reading “Reading Punch Cards With An Arduino And Digital Camera”

Drawbot Software Aims To Do It Better Than The Rest

drawbot-software

There are plenty of drawbot projects out there, many of which come with their own special software in tow. While some of these packages are easier to use than others, [Dan Royer] is pretty sure he can do it better.

Looking for a fun and engaging way to teach STEM subjects in schools across the country, [Dan] developed a relatively simple drawbot which can be constructed by a wide range of age groups. While he is trying to get schools to purchase his robot kits, we’re guessing that our readers would be more inclined to build their own.

So what does [Dan] have to offer that might interest you? Well, he says he has developed some drawbot software that’s pretty darn easy to use. Rather than multiple applications generating machine-specific code, his software will transform your picture into a line drawing in one easy step. The app uses a traveling-salesman algorithm to generate drawings with nary a crossed line in sight before outputting the resultant machine instructions in easy-to-use GCode.

We don’t have a drawbot of our own handy to test his software out, so if you do happen to give it a shot, let us know how it worked for you in the comments.

Building An Artificial Moon For Burning Man

lune-and-tide-burning-man

If you were lucky enough to score passes to this year’s Burning Man, be sure to keep a look out for [Laurence Symonds] and crew, who are putting together an ambitious fixture for the event. In reality, we’re guessing you won’t have to look far to find their giant moon replica floating overhead – in fact it will probably be pretty hard to miss.

They are calling the sculpture “Lune and Tide”, which of an 8 meter wide internally lit moon which hovers over a spinning platform that’s just as big across. The inflatable sphere is made up of giant ripstop nylon panels which are home to 36,000-odd sewn-in LEDs. The LEDs illuminate the sphere to reflect the natural color of the moon, though with a simple command, [Laurence] and Co. can alter the lighting to their heart’s content.

If Hack a Day’s [Jesse Congdon] makes his way out to the festival again this year, we’ll be sure he gets some footage of Lune and Tide in action. For now, you’ll have to satisfy your curiosity by checking out the project’s build log.

A Much Larger Rainbow Board Of Many Ping Pongs

[George] started with an 8×8 grid, but just couldn’t help himself from upscaling to this 32×16 pixel ping pong ball display. That’s right, It’s a 512 pixel array of fully addressable RGB LEDs diffused with one ping pong ball each.

We featured the predecessor to this project back in January. That one was an 8×8 display using a Rainbowduino as the controller. [George] took what he learned from that build and expanded upon it. The larger display is modular. Each module starts as an 8×8 grid which connects back to the Arduino using a breakout shield with some Ethernet jacks used as quick connects. The LEDs are driven by 595 shift registers, with transistors which protect the logic chips from the currents being switched.

He had a lot of help soldering all the connections for the display and ended up bringing it to show off at the Manchester mini maker faire. See it in action in the video after the break.

Continue reading “A Much Larger Rainbow Board Of Many Ping Pongs”

Arduino, Resistor, And Barrel Plug Lay Waste To Millions Of Hotel Locks

The security flaws on this common hotel keycard lock are nothing short of face-palmingly stupid. Look closely at the picture above. This is a hotel room door swinging open. The device he holds in his hand is an Arduino connected to the OUTSIDE portion of the door lock. It takes approximately 200 milliseconds from the time an attacker plugs the device in, until the door can be opened. Yes, in less than 1/4 of one second an Arduino can open any of the millions of these locks in service.

The exploit in Onity programmable keycard locks was revealed by [Cody Brocious] at the Blackhat conference. Apparently the DC barrel jack on the outside of the lock serves as a one-wire protocol interface. Once communications are established a 32-bit sitecode can be read from any of the locks and immediately used to open the door. There is no authentication or encryption used to obfuscate this kind of attack. To make matters worse, you can even read out master key and skeleton key codes. These codes facilitate ‘magic’ keys used to open a variety of different doors through the system.

We’re no strangers to easy hotel beak-ins. But how can a digital lock possibly be sold with this type of vulnerability present? Really!?

Here’s the white paper on the exploit as well as the slides from his talk (PDF).

[via Reddit]