ArduSpider Entertains Children And Exercises Pets

There are so many good things about [Jose Julio’s] robotic spider. It’s design is dainty yet robust, and the behaviors encoded in the firmware are nothing short of spectacular.

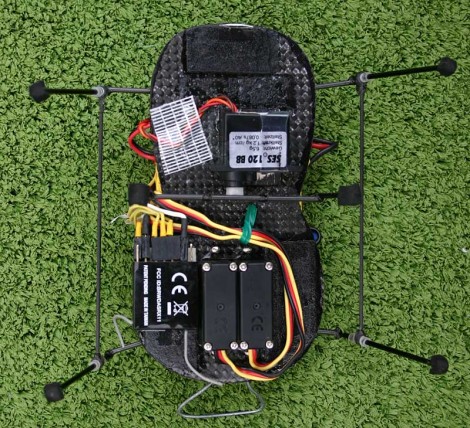
The body is built from a piece of balsa wood in between sheets of carbon fiber. The legs are carbon rods, using two servo motors for left and right leg movement, and a third servo which can move the intermediary legs like the roll axis of a plane. An IR sensor rides on the front for obstacle avoidance, with system control courtesy of an Arduino. For more hardware info check out his build log.

Don’t miss the video after the break. You’ll see that the little bot can be manually controlled, or allowed to roam free. As we said before, the behavior is fantastic. Not only has [Jose] programmed interesting characteristics like the spider getting tired and sitting down for a while, but when it is awakened it leaps into the air. The movements are fun to watch for human and feline alike; if only your house cat could be so lucky.

Continue reading “ArduSpider Entertains Children And Exercises Pets”

Atomic Pinball Clock

[Mark Gibson] sent us a load of details on his build, a WWVB atomic clock using a pinball machine marquee (PDF). This is the upright portion of an old machine that used electromechanical displays instead of digital electronics. It’s big, noisy, and seeing it running might make you a bit giddy. Luckily he included video that shows it working on both the outside and the inside.

It took a bit of probing to discover the connections for relays that control the display. From there he used optoisolation to drive them with an Arduino. With this hurdle behind him, [Mark] set out to add atomic clock accuracy. He picked up a WWVB module and added it to the mix.

Check out his build log in PDF form linked above. He went out of his way to explain how the original parts work, and the processes he used during prototyping. For more of those juicy details we’ve added a photo gallery and his video after the break.

Didn’t get enough pinball goodness from this project? Check out the this digital gas plasma display pulled and reused from a much more modern pinball machine. Oh, and there’s always Bill Paxton Pinball.

Continue reading “Atomic Pinball Clock”

Turning A One-armed-bandit Into Web Slots

[Kyle Kroskey] just finished his first Arduino project, adding web control to a slot machine. He started with an IGT S+ model which were extremely popular in Vegas and Atlantic City casinos for years, but are now being replaced with more modern versions. His grand idea was to modify the machine so that it can be controlled from a PC, then unleash a live stream so that the Internets can play.

This turned out not to be too hard, there’s just a few controls he patched the Arduino into; the button for maxing out the wager amount, and sensors that measure coin inserts and payouts. In order to keep the peace he disconnected the speaker but rerouted the audio into a PC so that it can be played over the streaming feed. This make sure it’s quiet in the room without sacrificing the online fun. The PC is running Ubuntu and controls the video feed, a screen detailing jackpot data above the machine, and facilitates passing webpage player requests to the Arduino for machine control.

For another fun slot machine hack, check out this gaming device turned bartender.

Scrolling Marquee Made From GE Christmas Lights

[John Riney] picked up three strands of addressable Christmas lights and used them to make a scrolling marquee. You may remember that the G-35 lights were hacked at the beginning of December, and we saw a project or two that involved these fun toys.

In order to make the display [John] modified the original packing material to hold three strands in a six by eighteen grid for a total of 108 pixels. In the video after the break he points out one interesting feature of the strand that we don’t remember from looking at the original hack; each bulb’s address is not fixed, it can be set after power-up. This works the same way as sending color data, except that you just send the address. This makes controlling a grid like this extremely easy from a microcontroller programming standpoint. Once all of the addresses have dropped down the serial bus, you’re ready to start sending color and intensity data packets.

The setup is fast, bright, and beautiful, taking just three pins of an Arduino for control. The only thing holding us back from trying this ourselves is the $150 price tag. But that was before the holiday, and we have heard some whispers about closeout deals on this product.

Continue reading “Scrolling Marquee Made From GE Christmas Lights”

Halloween Hangover: Talking Heads

Here’s a Halloween prop leftover; [Chris] built his own version of singing heads from Disney’s Haunted Mansion on his porch for last year’s ghoulish decor. A projected image of actors singing a spooky song gives each of the four Styrofoam mannequin noggins its own digital life. There’s an optical sensor on the porch stairs that is tripped by unsuspecting candy-seekers. An Arduino monitors the sensor and uses AutoHotkey to start the video clip on a netbook. Check out the video after the break to see the finished display do its thing after dark.

Continue reading “Halloween Hangover: Talking Heads”

IPhone Tilt Motion Controller

Here’s a mounting system that adds mechanical tilt control to the iPhone (link dead, try the Internet Archive version). It uses two servo motors to rotate along the X and Y axes. An analog joystick is used along with an Arduino to control the movement of the apparatus. As you can see in the video after the break, this works quite well when playing accelerometer-based games. But adding a joystick isn’t the end-goal of the project. [Shane] plans to point a camera at the iPhone and use image recognition to play games automatically. That sounds like a big bite the chew but we’ve seen this work with Guitar Hero so we’re optimistic.

Continue reading “IPhone Tilt Motion Controller”

CNC Cake Decorator

The AutoFrost CNC cake decorator is the result of a student project a Olin College of Engineering. [Tara Krishnan] and her classmates designed and built the hardware, as well as a Python interface that is used for drawing the design you want printed in frosting. The X and Y axes are controlled by stepper motors, with manual adjustments for the Z axis. The software has setting for the size of the cake, making it a bit more versatile than the last mechanized decorator we looked at. The GUI also allows for multiple colors which are applied one at a time, with the machine pausing for an operator to switch out the colored frosting container. All in all a nice build, but the next rendition should look to get rid of that second Arduino. We can’t think the code is complex enough to warrant two of them. Check out the demo video after the break.

Continue reading “CNC Cake Decorator”